Pages

Tuesday, February 26, 2013

Inspirational Tags - Imaginarium Designs

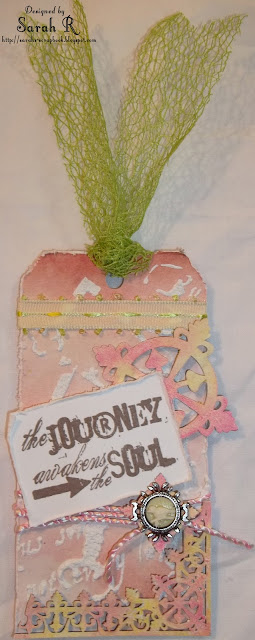
This is my second project for Imaginarium Designs this month - a pair of "Inspirational" Tags - loosely based on Tim Holtz's January/February Tags from the 12 Tags of 2013.
I cut the tags from some 7 Dots Studio paper from the Domestic Goddess collection. I started out my using a Crafter's Workship template (Mini Antiquities) with Martha Stewart White Texture Paste. I used Imaginarium Designs Edward Relief Chipboard collection for these tags. To coordinate with the background paper, I first coated them with gesso and then used a blend of three colours of Gelatos - Guava, Bubble Gum and Butter Cream. This was my first time working with the Gelatos and I loved the creamy texture and easy blending! 

The sentiments were created with Tim Holtz Visual Artistry Stamps and some Memento Dye Ink in Rich Cocoa. I really wanted the sentiments to be prominent - so I stamped on some white paper (to match the stencilling) and mounted them on 3D Foam Adhesive. I created these tags as part of the 7 Dots Studio February challenge as a little gift to myself to display in my craft room - often need a little inspiration to get the crafty mojo going. Here are some close-ups of the tags!

I used three of the small Edward Relief and part of the Edward Relief Border chipboard on this tag. I added a Prima Wooden Clip, Making Memories leaves and some ribbon, lace and a rose from my stash (I misted it with Tattered Angels Glimmer mist a long time ago and can't remember what colour I used...)


For this tag, I added some May Arts Baker's Twine, a We R Memory Keepers Cameo and some ribbon from my stash.


Imaginarium Designs Chipboard Pieces Used:
Edward Relief Border (IDB0010)

Edward Relief (IDC0009)

Edward Relief Small (IDT0032)

Thanks so much for stopping by my blog today. I appreciate your visits and sweet comments so much!
Other Materials Used:

Patterned Paper - 7 Dots Studio Domestic Goddess Collection - Raspberry Pudding; Martha Stewart White Texture Effect; Crafter's Workshop Template - Mini Antiquities; Tim Holtz Visual Artistry Stamps; We R Memory Keepers Cameo; Making Memories Leaves; May Arts Baker's Twine; Prima Wood Clip; Memento Dye Ink - Rich Cocoa; Gesso; Faber Castell Gelatos - Guava, Bubble Gum, Butter Cream; Flower, Lace and Ribbon from Stash; Aleene's Tacky Glue; 3D Foam Adhesive; Memory Tape Runner XL.

Adventure - Imaginarium Designs

Hi There! I'm so excited to share with you my first projects as part of the Imaginarium Designs 2013 Design Team! This month I've got a layout a pair of tags to share with you! This post features my layout and I'll have a subsequent post with details/close-ups of my tags!

This layout, entitled "Adventure" and based on the Prima BAP for February, features a sweet photo of my little guy making a dandelion wish! I've been learning to use different features in Photoshop lately and so I altered the colour saturation of this photo to get the muted, dreamy colour tone. I also sanded the edges of the photo to give it a more vintage/rustic look.
I used the Prima Craftsman Paper Collection for this layout - I sanded the edges of all the patterned papers and distressed them. I also did a little water distressing to get the rolled peek-a-boos at the top and bottom of the layout.
I wanted the chipboard pieces to look like rusted wrought iron - so I first embossed them with Distress Embossing powder in Black Soot; then I used a combination of Distress Crackle Paint in Aged Mahogany and  Antiqued Bronze and 'pounced' it on areas of the chipboard with a stencil brush to create the 'rust'.
I used the Steam Punk Clock and cut it in half to frame the photo matting. I LOVE this chipboard piece - it is so cool and I could totally see using it again a different way!
I used the 6x6 Honeycombe chipboard piece in two ways; first, the honeycombe around the outside of the layout and, second, I used a couple of the punched out hexagon pieces and scored them to make them look like screws.
I love how the cluster turned out in this corner of this layout! I used a Prima Craftsman Wood Clock and Wood Buttons and some older Prima Flowers (Artful Collage). I added some paper raffia to the wooden buttons (saved from some toy packaging). I also used a Prima Junkyard Findings Lightbulb as the title element for the layout. I fussy-cut a lightbulb from the Craftsman Engineer paper and coated it with six coats of UTEE to give it dimension and shine and to bring another lightbulb element to the layout.

Imaginarium Designs Chipboard Pieces Used:
Steam Punk Clock (IDS0030)

Honeycombe 6x6 (IDS0054)

Thanks so much for stopping by my blog today. I appreciate your visits and sweet comments so much!


Other Materials Used: 
Patterned Paper - Prima Craftsman Collection - Engineer, Architect, Mechanic; Prima Craftsman Wood Buttons; Prima Craftsman Wood Embellishments - Clocks and Tickets; Prima Junkyard Findings Vintage Trinkets - Typo Bulbs 2; Prima Flowers - Artful Collage; Corrugated Cardboard; Paper Raffia; Metal Brad; Melt Art Clear UTEE; Tim Holtz Distress Embossing Powder - Black Soot; Tim Holtz Distress Crackle Paint - Aged Mahogany and Antiqued Bronze;  Aleene's Tacky Glue; Aleene's Jewel-It Glue; 3D Foam Adhesive; Glue Dots- Craft; Tim Holtz Sander.

Friday, February 22, 2013

ScrapThat! March Kit Reveal and Blog Hop

Welcome to the ScrapThat! 
March Kit Reveal and Blog Hop!! 

You should have come here from the

If not then head back to Scrap That! to start the hop!

We are so excited to show you this beautiful and fresh kit! Not only does it feature papers from Meg's Garden, but Meg's Garden is also joining us on our hop and offering this gorgeous Spring Paisley Card Makers RAK on their blog!


The individual papers are the same as the 12” in design but are reduced to 6” for use on cards, OTP, tags etc. Can also be used as part of a LO. The pack comes with mini pics approx 2” which are perfect for the front or inside of a card, tags, OTP, as well as scrapbooking."

We are so thrilled to welcome the fabulously talented artist
Limor Webber
as our March Guest Designer!


Limor is known for generously sharing her amazing mixed media techniques. Her YouTube Channel with all her fabulous videos can be found here, and her fabulous blog is here. She designs for a number of companies including FabScraps, I Am Roses, Lindy's Stamp Gang, and guest designs for Faber-Castell. She has made some glorious creations with our March kit and will have a tutorial for us all as well!

We are saying goodbye this month to one of our amazing
ScrapThat! designers, 
Sandi Smith.
Sandi, you have been an amazing inspiration in both your stunningly creative projects and your sweet spirit. We wish you everything wonderful and know that you will succeed with everything you do! We were blessed to have you!

Our farewell to Sandi brings the excitement of introducing our new ScrapThat! designer and
Social Media Coordinator, 
~ Laura Gilhuly ~
Here is a little about Laura:
I am Laura (often know as AngelBear). I live in a small town in south-western Ontario with my family. I love to ink, tear, layer and distress my projects! The dirtier the better. I like to blog too which you can find at http://angelbearscraps.blogspot.com/ and you can see some of my layouts at scrapbook.com. My family is the focus of my life, my inspiration, and my motivation to scrapbook. 

For the full bio on Laura see our March Sneak Peek post!
Welcome to the team, Laura!

Now, without further ado,
introducing our fabulous March Kit, 
"New Blooms"

Featuring the oh, so lovely, Meg's Garden Spring Paisley Collection and loaded with Prima goodies, this kit boasts the most beautiful shades of green and pink, just perfect to bring a little spring into our winter! There are also neutrals and some funky accents to allow for creations from shabby chic to masculine to mixed media. Take a look:

Main Kit

Embellishment Add-On

Flower Add-on

Paper Add-on

More details on this romantic Collection can be seen here: 

We are currently accepting new
Kit Club Members.

For more information,
complete the form on the link below:

Look at the beautiful sketch Amarilys has created for March:


See details about the challenge here: Sketch Challenges
Be sure to also check out the details of our monthly DT challenge
hosted by Laura here: DT Challenge.

Everyone is welcome to participate, 
all entries for both challenges due by March 27.
Something new! All winners of our challenges, including Layout of the Week, will be eligible to receive 10% off any 2012 Kits-includes Add-ons!
~~~~~~~~~~~~~~~
Here are the projects I created with the gorgeous ScrapThat! March Kit. I just loved everything about this kit and was SO excited to get to work with the stunning Meg's Garden papers! Be sure to check back throughout the month of March for details and close-ups of my layouts

Our Boy
Based on the March Sketch
Main Kit, FAO; plus Imaginarium Designs Chipboard

Those Eyes
Main Kit Only

Are You Ready?
Main Kit, FAO
~~~~~~~~~~~~~~~
Our Blog Hop features 11 fantastic hop sites including our Design Team blogs. 
We have been scrapping away and are so excited to show you our creations!

Our SPECTACULAR March Blog Hop Prize
is a ScrapThat! July Main Kit,
"Summer in My Garden", featuring Fabscrap's Organic Collection:


To qualify for this month's FABULOUS Prize, 
you must complete the following:

* Visit each blog listed on the hop to see what each designer has created using this month's kit and sketch(comments are very much appreciated).
* Each designer's blog hop post will feature a word to make up a secret sentence, collect these words along the way.
* You must become a FOLLOWER of each blog along the way and LIKE us on our Facebook Page!
* Post the ScrapThat! Blinkie on your blog.
* For your last stop on our Blog Hop return to the ScrapThat! Chat Blog.
Leave a comment letting us know you have
completed the hop.

(Please do NOT include the secret sentence in your comments.)

*Email the secret sentence to Tracey Sabella:tracey@scrapthat.ca

The Blog Hop ends Sunday, February 24 at Midnight EST.

The prize MUST be claimed within 3 days of the forum announcement which will also be made on the ScrapThat! Blog.
~ If left unclaimed a NEW winner will be chosen ~
**Winner will pay actual shipping costs for sending the kit from Canada.**
Shipping costs will be invoiced via PayPal unless you are a kit member, then your prize will be shipped with your monthly kit.
Prizes won during the month will be mailed out the first week of the following month.
Due to Customs clearance, International mailings sometimes take 30-75 days to receive.

My secret word is: 
Everyday

Next hop over to :

Should you lose your way, here is the Blog Hop order:


For your final stop, return to the ScrapThat! Blog 
to let us know you have completed the hop.

Remember ~ only send the secret sentence to tracey@scrapthat.ca

Happy Hopping!

Wednesday, February 20, 2013

ScrapThat! March Kit Sneak Peeks!

It is nearing the last Friday of the month and almost time to reveal our March "New Blooms" Scrap That! Kit. The ScrapThat! designers have been super busy designing with this awesome new kit!

We are all super excited to share a few sneak peeks of the DT's gorgeous work:


Stay tuned for our Blog Hop and March Kit reveal on Friday, Feb. 22nd, 6:30 AM EST. 

You will want to visit all the designer's blogs to see their amazing work with this month's kit ...
and for a chance to win our grand prize this month, the July "Summer in My Garden" Kit. 

_____

Now on to more exciting news .. Scrap That! is excited to welcome our newest design team member and new Social Media Co-ordinator, Laura Gilhuly. 

Here is a little about Laura:

"I am Laura (often know as AngelBear). I live in a small town in south-western Ontario with my family. I am a stay at home mom to 2 fantastic and energetic little boys - Cody is 12 and Ty 11. I am happily married for 13 years to my best friend and the most patient & handsome man on earth, Jon. He is so supportive of my hobby and never asks what I spent on supplies! He drives long haul truck, and is only home on weekends, so I am kept pretty busy with two tweens.

I started scrapping years ago when my sister took me to a Creative Memories beginner class and I although I really enjoyed it I just wasn't a Creative Memories scrapper and soon struck out on my own. I found a few very helpful and friendly sites on the web and have been trying new things and learning ever since. I love to ink, tear, layer and distress my projects! The dirtier the better. I like to blog too which you can find at http://angelbearscraps.blogspot.com/ and you can see some of my layouts at scrapbook.com. With my husband on the road, and two very active boys to keep me busy, I don't have a lot of time to myself to scrap so I make time! Every night after the kids go to bed. I take out my supplies and try an do something scrapbooking oriented every day to give me some 'me' time. My family is the focus of my life, my inspiration, and my motivation to scrapbook. " 

Welcome to the team, Laura! 

~ That's it for today! See you Friday! ~

Saturday, February 9, 2013

Unforgettable - Details and Closeups (ScrapThat! February Kit)

I'm sharing the details of my second layout with the ScrapThat! February kit. For this layout, I wanted to show the versatility of the kit and went with a monochromatic, masculine layout. The photo of my sweet little boy was taken during his first train ride - the "Santa Train" - it truly was an "Unforgettable" day. I adore this photo and really wanted it to be the focal point of the layout, which is why it is the only real colour on the layout.
This layout is based on the February ScrapThat! sketch and was made with the Main Kit plus a few items from my stash (Twine, a brad, Distress Embossing Powder and Ink) and two pieces of Imaginarium Designs Chipboard. I used the natural cardstock as the base page and water-distressed the Harlequin paper for the first layer. I cut the title and other layering elements from the Dear John and  Messenger papers and also added in some Prima packaging (LOVE using their packaging in layering). Here is a close-up of the photo/layering section. I did some hand stitching with twine along the edge of one of the layered papers.
I loved the hot air balloon and wanted to use it on the layout but wanted to dress it up a bit. So I added the twine to make it appear as if the balloon were suspended on the page. I didn't have a brad to match the layout, so I used a purple one, heated it with my heat-embossing tool and dipped it into my Distress Embossing Powder in Frayed Burlap to make it match the layout!
Finally, for the chipboard elements, I simply inked them with Distress Ink in Walnut Stain and roughly embossed them (i.e. here and there) with the Distress Embossing Powder in Frayed Burlap. Here is a close-up of the compass.

Thanks so much for stopping by my blog today. I appreciate your visits and sweet comments so much!

Materials Used: TBA

Thursday, February 7, 2013

True Love - Details and Closeups (ScrapThat! February Kit)

I thought I'd share with you the details and a few close-ups of my "True Love" layout - made with the gorgeous ScrapThat! February Kit "With Love" - featuring paper from Prima's "Romance Novel" collection. This layout is based on the Prima Build-a-Page sketch from January and I chose to scrap a picture of my husband from our wedding day.

This layout was made with the Main kit plus a few items from my stash (i.e. the keyhole heart, heart doilies; vellum and wood embellishments); the flowers are from the ScrapThat! December kit Flower Add-on and the metal Prima key is from the November kit Embellishment Add-on. I also used two colours of Tattered Angels Glimmer Mist - Latte and Tattered Rose, as well as Tattered Angels Chalkboard Glimmer Mist in Cherry Cola
I used the Prima "Romance Novel" Wordsmith paper as the base page for this layout. I added the heart doilies and then stitched around the edge of the layout using a zig-zag stitch -- I wanted it to look sort of like a ECG readout. I cut lots of the smaller elements out of the Bookplate and Messenger papers to use in the layering and also used some Prima packaging in the layering.
Here is a close-up of the lower right side of the layout - the journalling is a quote from the P!nk song "True Love" - which also provided the title for the layout.
Thanks so much for stopping by my blog today. I appreciate your visits and sweet comments so much!

Materials Used: TBA

Friday, February 1, 2013

Through the Looking Glass - Scrap for Help and The Paper Mixing Bowl

Today is my first reveal as part of the Scrap for Help Design Team! This month, the recycled element to be used in the Scrap for Help Challenge was plastic. I combined my Scrap for Help layout with the January recipe at The Paper Mixing Bowl (since I didn't have a layout for our January 15th reveal). Here is my layout, entitled Through the Looking Glass, using the gorgeous "Wonderland" collection by 7 Dots Studio. I'm also going to enter this layout in the "Cold Colours" challenge on the 7 Dots Studio blog.
I wanted to do something really different for this layout, so I decided to do an "artsy" layout. Like so many people, I struggle with my weight and often feel badly about my appearance - so this layout is about trying to overcome these feelings. The photos of my eyes are offset to represent the dysmorphia with which I often see myself. 

I machine-stitched around the edge of the top layer of the layout - first using a straight stitch and then a zig-zag. For my plastic element for the Scrap for Help Challenge, I used some plastic packaging that I melted with my heat embossing tool and layered underneath the corrugated cardboard on the layout. I coated the cardboard with gesso and added microbeads in silver and ebony - then I sprayed it with a light coat of acrylic sealer to help keep the beads on. I smashed a mirror from an old compact and used the pieces to surround the photos in my layering. (It isn't bad luck if you break a mirror on purpose, right?)
The journalling in the rolled paper in the top right corner says, "You are so much more than what you see in the mirror."  You can more clearly see the microbeads in this close-up.
I had some fun with Photoshop creating the pics for this. I had my husband take a picture of me and then I cropped it so that I could focus on the eyes. I converted the picture to black & white, but then re-revealed the eye colour - my eyes are very light blue, so the effect is very subtle. Here is a close-up of the photos so you can more clearly see the effect. I sanded the edges of the photos to get that awesome distressed look!
Here is the January recipe card from The Paper Mixing Bowl that I used for this layout.
Thanks so much for stopping by my blog today. I appreciate your visits and sweet comments so much!
Materials Used:
Patterned Papers - 7 Dots Studio - Wonderland Collection - Mushroom & Smoke, Alice, and White Rabbit Alpha Stickers; Plastic Packaging; Corrugated Cardboard; Claudine Hellmuth Studio Gesso (White); Recollections Microbeads - Silver and Ebony; American Crafts Thickers - Poolside Vinyl Letter Stickers (Black); Queen & Co. Bakers Twine; Aleene's Tacky Glue; 3D Foam Adhesive; Krylon Satin Finish Sealer.