Pages

Monday, April 29, 2013

Imaginarium Designs - No Pictures Please

Today, I'm sharing my second project for Imaginarium Designs this month -  a layout entitled "No Pictures Please". It is getting hard to get my son to cooperate and let me use him as the subject of my photography, so this layout features him hiding his face from the camera, getting annoyed with me for continuing to take his picture anyway and then finally making some silly faces.

I used Bo Bunny's MamaRazzi2 papers to create this layout, as well as some Tim Holtz Idea-ology Film Strip Ribbon. The 'rings' and 'splotches' were created with a Bo Bunny Texture Stamp - love their new texture stamps! I used the Imaginarium Designs Train Track Border to simulate a film strip by alternating cutting away two sections of "track" and then leaving a bar.
The Train Track Border and the Alphas I used for the title were simply painted with two coats of Shimmerz paint in "Coal". I wish the camera could pick up the "shimmer" better - as they look much more impressive in real life! Here are some close-ups of the chipboard elements!


Imaginarium Designs Chipboards Used
Train Track Border
IDB0006

Capital Letters
IDAUC0001

Lower Case Letters
IDALC0001

Other Materials Used: Patterned Paper - Bo Bunny MamaRazzi2 Collection - Shutterbug and Tripod;  Bo Bunny Stained Texture Stamp; Memento Dye Ink in Tuxedo Black; Tim Holtz Idea-ology Film Strip Ribbon; Michael's Metal Trinket (Camera); Shimmerz Paint in Coal; Aleene's Tacky Glue; Thermoweb Memory Tape Runner XL; 3D Foam Adhesive.

Friday, April 26, 2013

ScrapThat! May Anniversary Kit Reveal and Blog Hop!

Welcome to the ScrapThat! 
May Anniversary Kit Reveal and Blog Hop!! 

May is our three year anniversary and we want to 
thank all our subscribers and members for sharing their pages and creations with us!!
We are so excited to share the details about our newest kit
 featuring the amazingly gorgeous Prima Divine !!

If you came here from 
Tracey Gregory
you are on the right track!

Should you lose your way, here is the Blog Hop order:

We are so thrilled to welcome the talented Scrappy Superstar ~
Gabrielle Pollacco
as our May Guest Designer!!!


My name is Gabrielle Pollacco, I'm a mom of 2 sweet girls, happily married to my husband Steve and we have one big fluffy Labradoodle named Zoe, that sometimes makes her way into our family photos!   I've had the privilege of being a Guest Designer for ScrapThat! in the past year and was delighted to come back to scrap with this year's Anniversary kit! 

We are also so happy to announce our latest addition
 to the Design team as our Video Educator,
Kelly Klapstein !
Some of you may know me online as "Kelly Creates." I am a Canadian scrapbooker living in Edmonton, Alberta. I'm excited about sharing my designs and techniques with you through my video tutorials!"

You can subscribe to my YouTube Channel at www.youtube.com/user/kellycreates

Now, without further ado,
 introducing our fabulous May Anniversary Kit,
 "Spring into May"

And what a spring it is! We wanted a very special anniversary kit and this kit is packed with so many fresh and lovely goodies featuring Prima's Divine Collection. There are fabulous textures and soft bling to bring out your creativity!
Take a look:

Main Kit


Embellishment Add-On

Flower Add-On


Paper Add-On


More details on this collection can be seen here: ScrapThat! Store 

We are currently accepting new
Kit Club Members.
For more information,
complete the form on the link below:
New Subscriber 

Look at the beautiful sketch Amarilys has created for May:

See details about the challenge here: Sketch Challenges
Be sure to also check out the details of our monthly DT challenge
 hosted in May by Sarah here: DT Challenge
We have a Round Robin Challenge to celebrate National Scrapbooking Day this month as well hosted by Tracey G. It looks like it will be a blast!

Everyone is welcome to participate.
All entries for both challenges are due by Wednesday, May 29.
 All winners of our challenges, including Layout of the Week, are eligible to receive 10% off any 2012 Kits ~ including Add-ons!

Our Blog Hop features fabulous hop sites including our Design Team blogs. 
We have been scrapping away and are so excited to show you our  creations! 
~~~~~~~~~~~~~~~
Here are my creations with this month's gorgeous kit! 
Egg Hunt
Based on the ScrapThat! May Sketch - Main Kit, EAO, FAO

c.1979
Based on the Prima BAP for April - Main Kit, FAO

Spring
Main Kit Only

Be sure to check my blog later in the month for details and close-ups of all these projects!
~~~~~~~~~~~~~~~
The May Blog Hop Prize is our 2012 Main Kit,Prima's Nature Garden


To qualify for this month's FABULOUS Prize, 
you must complete the following:

* Visit each blog listed on the hop to see what each designer has created using this month's kit and sketch (comments are very much appreciated).

* Each designer's blog hop post will feature a word to make up a secret sentence,
collect these words along the way.

* You must become a FOLLOWER of each blog along the way 
and LIKE us on our Facebook Page!

* Post the ScrapThat! Blinkie on your blog.

* For your last stop on our Blog Hop return here to the ScrapThat! Chat Blog.
Leave a comment letting us know you have
completed the hop.
(Please do NOT include the secret sentence in your comments.)
*Email the secret sentence to Tracey Sabella:tracey@scrapthat.ca

The Blog Hop ends Sunday, April 28 at Midnight EST.


The prize MUST be claimed within 3 days of the forum announcement which will also be made on the ScrapThat! Blog.
~ If left unclaimed a NEW winner will be chosen ~
**Winner will pay actual shipping costs for sending the kit from Canada.**
Shipping costs will be invoiced via PayPal unless you are a kit member,
 then your prize will be shipped with your monthly kit.
Prizes won during the month will be mailed out the first week of the following month.
Due to Customs clearance, International mailings sometimes take 30-75 days to receive.

My secret word is:
Gerard

Next hop over to
Tracey Sabella

For your final stop, return to the ScrapThat! Blog 
to let us know you have completed the hop.
Remember ~ only send the secret sentence to tracey@scrapthat.ca
Happy Hopping!

Thursday, April 25, 2013

Imaginarium Designs - April Tag

Today, I am sharing one of my April projects for Imaginarium Designs. (Check back next week for my second project!) This year, I am playing along with Tim Holtz's 12 Tags of 2013 - and this is my interpretation of his April Tag! I wanted to go for a monochromatic look with a pop of colours - so I started out by mod-podging some Tissue Wrap (Melange) onto the base tag - I knew I wanted to use a chipboard butterfly, so I intentionally used a section of the Tissue Wrap with a large butterfly. I used Film Strip Ribbon in place of the Crinkle Ribbon and stapled it to the top of the tag. I used three different Tissue Tapes - two from the Elements pack and one from the Symphony pack. In place of the metal corner, I used a rectangular Facet with Tissue Wrap mod-podged on the back - I used the section of wrap that had the definition of "Memory" on it. I added a jump ring and Swivel Clasp to the Facet and attached the Swivel Clasp to one of the embellishments. The flowers are all by Prima - I love the way the teal pops against the black and white tag!
The Imaginarium Designs embellishments and number are painted with black acrylic paint, to which I added some pearlizing medium (I wish this showed up better in the photos).  I added a couple of rhinestones to the centre of the embellishments and some Kaisercraft Tiny Alphas to the number so that it says "4-ever". The butterfly is painted with white metallic pearl acrylic paint and then I finger-smudged some Smooch Pearlized Accent Ink in Frosted Aqua around the edges of the wings and on the body/antennae. Here are some close-ups!


Imaginarium Designs Chipboards Used
Monarch Butterfly
IDS0059

Embellishment 8
IDS0014

Numbers
IDN0001

~~~~~~~~~~~~~~~
Other Materials Used: American Tags #8 Shipping Tag (White); Tim Holtz Idea-ology Products: i) Tissue Wrap Melange, ii) Tissue Tape - Symphony and Elements, iii) Swivel Clasp, iv) Facet (rectangular), v) Film Strip Ribbon; Folk Art Acrylic Paints in Pure Black and Metallic Pearl White; Americana Pearlizing Medium; Smooch Pearlized Accent Ink in Frosted Aqua; Kaisercraft Tiny Alphas in  Black; Prima Flowers: i) Rose Leaf, ii) Soprano C, iii) Mini Roses - Teal; Rhinestones (stash); Aleene's Tacky Glue; Aleene's Jewel-It; Mod Podge - Matte.

Wednesday, April 24, 2013

Scrap That! May Kit Sneak Peek .. and a new Design Team member!

It is nearing the last Friday of the month and almost time to reveal our May Scrap That! 2013 Anniversary Kit "Spring into May." Our designers have been super busy designing with this awesome new kit! 

We are all excited to share a few sneak peeks of their gorgeous work:


Stay tuned for our Blog Hop and May Kit reveal on Friday, April 26th, 6:30 AM EST. 

You will want to visit all the designer's blogs to see their amazing work with this month's kit ...
and for a chance to win our grand prize this month, the May 2012 Scrap That! Kit featuring Prima's Nature's Garden.. 
~~~~~~~~~~~~~~~
Now on to more exciting news .. Scrap That! is excited to welcome our newest Design Team member and new Video Educator, Kelly Klapstein. 
Here is a little about Kelly:

"Some of you may know me online as "Kelly Creates." I am a Canadian scrapbooker living in Edmonton, Alberta. My 3 teenagers keep me busy with their sports, and my husband and I will celebrate 25 years of marriage in 2014! My passions are teaching and writing, and I'm a former high school English teacher. Now I enjoy designing and teaching scrapbooking classes across Canada! My dream came true when I was invited to design and write for Canadian Scrapbooker magazine in 2011. I'm excited about sharing my designs and techniques with you through my video tutorials!"

We hope that you will subscribe to Kelly's YouTube Channel. Here is the link. http://www.youtube.com/user/kellycreates

Also, please check out her blog: http://kellycreates.blogspot.com/

Welcome aboard, Kelly!

~ That's it for today! See you Friday! ~

Friday, April 19, 2013

Mixed Media Demonstration

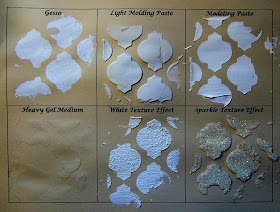
With all the mixed media being used on layouts lately, I thought it might be nice to show all my scrappy friends a little demonstration of some different mediums! They are super fun to use and can have such an impact on your scrapbook pages. For this demonstration, I've used six different mediums and a Prima mask to show their different effects:  1. Gesso, 2. Light Molding Paste, 3. Modelling Paste, 4. Heavy Gel Medium, 5. White Texture Effect, and 6. Sparkle Texture Effect. The paint brush and 'credit card' are what I used to apply the mediums to the paper.
To start out with, I taped my stencil over my paper to make sure it didn't shift during the process of applying the media.
I then applied the different media to the appropriate sections of the page. I sponged the gesso on using the sponge brush - this gives the gesso a nice textured effect. I scraped the thicker media over the stencil using the 'credit card' - this is the easiest way to spread the medium fairly evenly.
Here is what the different media look like once they're dry.
And some close-ups of each of the different media so you can get a better idea of their effects on the page.
1. Gesso

2. Light Molding Paste

3. Modelling Paste

4. Heavy Gel Medium

5. White Texture Effect

6. Sparkle Texture Effect
Finally, I misted everything with a light coat of Tattered Angels Glimmer Mist so that you could get an idea of how the different media react to misting!
I hope you liked this little Mixed Media demonstration and that it inspires you  give some different media a try on one of your scrapbook pages!

Happy Scrapping!

Saturday, April 6, 2013

Cherish Time Tag - Scrap for Help April Challenge

This month at Scrap for Help, we have a wonderful challenge with one of my favourite kinds of "recycled" elements - book pages!
For my DT project, I decided to make a tag rather than a layout. I really love making tags lately! So I created this lovely little "Cherish Time" tag, using the definition of "time" cut out of a dictionary as my book page element. To play up the dictionary element, I used Tim Holtz Tissue tape, with a dictionary print for the 'ribbon' on this tag.
The first step in making this tag was cutting the tag shape - for this I used 7 Dots Studio Domestic Goddess collection. I did some masking using the Crafter's Workshop mini Time Travel mask and some Martha Stewart Texture paste and distressed the edge of the tag. I layered the Tim Holtz Cherish Philosophy Tag on top of the dictionary definition to create the 'Title' for the tag.
For the larger flowers on the tag, I used some recollections Mulberry paper flowers, which I misted with three different colours of Smooch Spritz to get them to match the tag base. The chipboard pieces are by Imaginarium Designs - I painted these with a light coat of gesso and then blended three colours of Gelatos to get the colour effect that I wanted. I added in some Prima mini-roses and Prima rose leaves to finish off the flower clusters. 

Here is a finally photo of the tag taken at an angle so that you can see the dimension of the tag.
I hope you liked my DT project for Scrap for Help this month and that you'll stop by the Scrap for Help blog and play along with the April Challenge!

Thanks so much for stopping by my blog - I appreciate your visits and comments so much.

Friday, April 5, 2013

Good Old Boy - Details and Close-ups (ScrapThat! April 2013 Kit)

My final layout with the ScrapThat! April kit is based on Amy's gorgeous Sketch - be sure to check out the April Sketch Challenge on the ScrapThat! Ning site and play along for a chance to win a wonderful RAK. This layout features the cutest photo of my son and our 18-year old cat Teezer. I am continually amazed by the patience this cat shows for a toddler's over-zealous affection - hence the title Good Old Boy (though I debated using Poor Old Boy given what the poor cat puts up with....). I wanted to go with a rustic/vintage, distressed look for this layout - so I've done a lot of distressing and inking, including sanding the edges of the photo to make it look worn. I did some random punching with two different punches around the edge of the layout and used my fiskars paper tearer to create the wavy-edged green background page.
I did some masking with moulding paste and then spritzed it with Perfect Pearls mist in Heirloom Gold - I also did some inking on the masked area with Distress Ink in Vintage Photo. Not entirely happy with the masking, but it was an experiment. (They can't all turn out perfectly, right?) The layered strips of paper at the bottom of the layout were created with the same punches I used around the outside of the page. I also added in the Prima heart charm string embellishment from the EAO to finish off the layering here. I matted the photo on the burlap from the MK - which I frayed all around the edge to add to the rustic/vintage look of the layout.
I used the Prima flowers from the FAO, as well as some leftover flowers from the March Kit FAO to create the flower cluster. I cut the burlap leaves with my Tim Holtz Tattered Leaves die and fussy cut some butterflies from the Nancy's Mushroom paper to add to the flowers. I used the Chipboard Alphabet Stickers for the title and inked them with a generous amount of Distress Ink in Vintage Photo.
Finally, I added a small flower cluster with a butterfly and leftover charm to the top right of the photo. This flower originally had a more ornate centre, so I ripped that off and added the brown button so that it coordinated better with the other flowers. I also had to ink the edges of this flower and the smaller flower in the larger cluster (since they were all natural originally). Great detail shot of the photo and sanding here too!
Well, that is my final creation with the ScrapThat! April kit - I actually have LOTS of paper and things leftover, so I'm sure that I'll be able to get at least another layout or two out of the kit and add-ons! 

I hope you've enjoyed the details/close-ups I've shared over the last few days. Thanks so much for stopping by my blog - I appreciate your visits and comments so much.