Pages

Monday, December 30, 2013

This Moment Card & Watercolor Flower Tutorial ~ Scraps of Darkness

I have a quick post to share with you tonight of a card I made using the Scraps of Darkness November Kit. I am not a card maker at heart - but I wanted something simple to showcase the watercolored flowers I made, so I used a Prima paintable card (also painted with watercolors), the dragonflies and some ribbon from the SOD kit and some gold embellishments (actually a piece of a Christmas garland) and gold embossing powder from my stash to create this simple card.
Here is a close-up of the watercolored flowers - I used white Prima flowers and LuminArte Twinkling H2O watercolors to alter them.
~~~~~~~~~~~~~~~
Watercolor Flower Tutorial
I find when I want to alter the color of flowers, spray mists are usually my go-to medium; however, I always find that it takes a lot of spray to get into all the layers of the flowers, so I wanted a better way to alter flowers than over-using my mists! Here is my solution - altered flowers using Twinkling H2Os by LuminArte - you still get the lovely shimmer that is possible with mists, but it uses so much less product and it is much easier to paint between the layers with a paintbrush than trying to spray them!
Thanks for stopping by my blog today. I'll have some new projects to share using the Scraps of Darkness December Kit "Winter Wonderland" in the New Year!

Sunday, December 15, 2013

Your Angry Face ~ Scraps of Darkness

I have a layout created with the Scraps of Darkness November Water Lilies Kit to share with you today. I used the 7 Dots Studio 9th Wave papers from, as well as some of the Canvas Corp White Tissuestock (scrunched) to create the torn, grungy layering for this layout. I also had some fun with mediums on this layout and have included masking with molding paste, stamping and misting (with the awesome Lindy's Stamp Gang Mists included in the Kit and Colour Add-on)!  I caught a picture of my son's "angry face" the other day and thought it was too cute not to scrap!
(Sorry it looks like the photo is crooked on the layout - the page warped due to the media and it was impossible to get it flat enough in time for the picture!)

I used the Glitz Design Stickers for my title and trimmed one of the Pink Paislee Color Wash tags for under the photo - I misted the tag and then, once it was in place, outlined inside the word with a black Aquarellable pencil (by Stabilo).
Here, you can see a close-up of the misting, stamping and masking. I used a checkered mask and stamp by Finnabair for Prima. The mists are Lindy's Stamp Gang Flat Fabio in Curioser Chartreuse and Starbursts in Tea Pot Purple and Down the Rabbit Hole. I also used some diluted Black Soot Distress Re-inker for the black misting.
Thanks so much for visiting my blog today! I still have one more project to share with the Scraps of Darkness November Kit and it will include a short tutorial - so be sure to watch my blog in the next couple of days for that!

Sunday, December 8, 2013

A Nutcracker Sweet Christmas ~ Imaginarium Designs

Today, I am sharing two Christmas projects with you - both using Imaginarium Designs Chipboard with Graphic 45's Nutcracker Sweet collection.
~~~~~~~~~~~~~~~
Nutcracker Sweet Bell Jar
First up is a Bell Jar I put together using the Imaginarium Designs Bill Board Train as the base. I knew as soon as I saw this 3D Train that I wanted to use it with the Graphic 45 Nutcracker Sweet collection and create a Nutcracker Christmas scene!
I mod-podged some of the the Nutcracker Sweet paper to the vertical portion of the Bill Board Train piece and did lots of fussy-cutting for the characters/embellishing.
 For the Train Side, I've included images of the Grandfather Clock, the Mouse King and the Nutcracker and added a "Happy Christmas" Title Chipboard.
I painted the train with acrylic paints and then dry-brushed gold paint over the entire thing; for the smoke, I used a Snow Marker that creates a puffy snow effect when heated with a heat gun. I painted the train track with black acrylic paint and then heat embossed it with holographic embossing powder. For the title, I painted it gold and then heat-embossed it with gold embossing powder. In the background, behind the train and the Mouse King, you can see one of the small Imaginarium Designs Chipboard presents.
 For the other side of the 3D piece, I again mod podged the paper to the vertical piece and fussy cut the title and an image of Clara from the Graphic 45 papers. I added a large bottle-brush Christmas Tree to this side as well.
I painted the Imaginarium Designs presents with acrylic paint and then used Sparkle Mod-Podge over that to give the pretty sparkly finish. You can also see the base of the Billboard Train, painted with gold acrylic paint and a better view of some of the train track in this photo.
~~~~~~~~~~~~~~~
Nutcracker Sweet ATC/Ornament
My second project today is an Artist Trading Card, which can also be used as a Christmas Tree Ornament.
Once again, lots of fussy cutting of the Graphic 45 Nutcracker Sweet papers. I also did some masking with a Crafter's Workshop 6 x 6 template and some Sparkle Texture Effect mixed with Heavy Gel Medium to create a "snow" effect.
I used the Imaginarium Designs Music Symbols with Holly on the ATC - I heat embossed them with Gold Embossing Powder and then used Stickles in Christmas Red and Holly to add the Holly details.
~~~~~~~~~~~~~~~
Imaginarium Designs Chipboard Used
4 Presents on Board - IDT0008

Bill Board Train - IDAA0006


Happy Christmas - IDP0073 

Music Symbols with Holly - IDFL0006

Other Materials Used:
Patterned Paper - Graphic 45 Nutcracker Sweet collection; Acrylic Paint; Mod Podge - Matte and Sparkle; Distress Embossing Ink; Ranger Embossing Powder - Holographic; Stampendous Embossing Powder - Detail Gold; Ranger Stickles - Christmas Red and Holly; Martha Stewart Sparkle Texture Effect; Heavy Gel Medium; The Crafter's Workshop 6 x 6 Halftone Circles Template; Marvy Uchida Snow Marker; Recollections Holiday Ribbon; Sparkle Resin Heart; Mini Bells; Aleene's Tacky Glue; 3D Foam Adhesive; Beacon 3-in-1 Glue.

~~~~~~~~~~~~~~~
That's it for me today - I hope you enjoyed my Christmas projects and I would like to wish everyone a wonderful holiday season! Don't forget to leave a comment on my blog post on the Imaginarium Designs Blog for a chance to win some amazing Imaginarium Designs Chipboard!

{Free} Layout and Wish Layout ~ Scraps of Darkness Design Team Reveal ~ November "Water Lilies" Kit

Ack! I am SO late posting this!!! December has been ultra-busy and I am behind in my blogging! But I'm here now to show you two more layouts created with the incredible Scraps of Darkness November "Water Lilies" Kit.
~~~~~~~~~~~~~~~
{Free}
*Scraplift of Louise Nelson Layout for 7 Dots Studio


I was inspired by the SOD/SOE Lift a Designer Challenge - this layout is a Scraplift of Louise Nelson's {Heart Heart} Layout for 7 Dots Studio. I adore Louise's artsy style and have always wanted to try to emulate it - so here is my attempt at a Loolabelle-inspired layout! Although there is no title on the layout, I am calling it free - because my son is so happy and free flying down his favourite slide at the park.
 
I started off the LO by misting the 7 Dots Studio paper with Lindy's Stamp Gang Flat Fabios in Tweedle-Dee Denim and Curioser Chartreuse. Then I whitewashed over the misted background with watered-down gesso.
 I stamped and heat-embossed the birds using a Tim Holtz stamp and Distress Embossing Ink + Distress Embossing powder in Black Soot. I added some black thread, sequins and rhinestones from the kit, as well as two of the Glitz Design Giant Rhinestones.
The feathers are chipboard by Imaginarium Designs - I painted the feathers with Viva Maya Gold in Turquoise and then rubbed the centre of the feather with Viva Inca Gold in Cobalt Blue; finally, I heat-embossed the ends of the feathers with Stampendous Embossing Powder (Detail Gold).
~~~~~~~~~~~~~~~
Wish
My second layout today is called "Wish" and features a picture of my son telling Santa his Christmas Wishlist (oddly enough, he asked for slippers...). I am so glad my son wasn't afraid of Santa this year - he was for the past two years! 
I have used the Pink Paislee Color Wash star die-cut paper, along with some Lindy's Stamp Gang Starburst mist in Cheshire Cat Cherry and a hint of Glitz Spritz in Steel Shimmer.  I also added a sheet of white cardstock from my stash, which I stamped and heat-embossed with shimmery snowflakes around the edge; you can also see some the embossed snowflakes on the main page and on the tag. The Inkido challenge this month is Stars and Snowflakes, so I am entering this layout in their challenge (wish me luck)! I also did some masking on the background to create a "snowfall" effect using the Crafter's Workshop 12 x 12 template included in the Colour Add-On and some Martha Stewart Sparkle Texture Effect mixed with heavy gel medium (I find the sparkle texture effect very thick/heavy - it is much smoother and spreads better over the mask if you mix it with some gel medium). 
I used the Prima flowers from the Main Kit and added some of the Sparkle Texture Effect/Gel Medium mixture to them to add some sparkle. For the frame, I used a paint brush to paint it with the Lindy's Stamp Gang mist and, once it had dried, very carefully inked it with embossing ink and heat-embossed it with the silver/white embossing powder - this really helped bring out the pattern on the frame. I used one of the Pink Paislee tags for my title and simply embossed it with stamped snowflakes. I added in some bling from my stash, some Tresors de Luxe lace, torn/crinkled strips of the tissuestock paper from the Kit and some leftover beaded ribbon from the SOD July Kit. 
~~~~~~~~~~~~~~~
That's it for me today - I hoped you liked these two layouts with the fantastic Scraps of Darkness November Kit - it is so versatile - I just love it!

Tuesday, November 26, 2013

Halloween/Autumn Tag Trade ~Scraps of Darkness~

I have a really quick share for you tonight - I realized that I forgot to post the tag I created for my friend Lee (aka Violent Kittie) for the Scraps of Darkness Halloween/Autumn Tag Trade! I chose to go all-out-Halloween for my tag and created this Spooky oversized tag for Lee! The base is a Prima Doll tag and there is a second Size 5 tag on the top (the spiderweb). I used a section of Imaginarium Designs chipboard Spade-Top fence, and lots of fun Halloween embellishments to create this fun tag!
It looks so much cooler in real life.....I hope Lee loved it!

In return, I got an A-mazing tag with gorgeous Autumn Colours - I LOVE IT! Check it out on Lee's blog here!

Friday, November 22, 2013

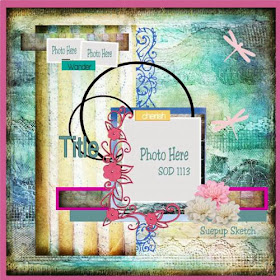
Love This ~ Scraps of Darkness November Kit Sketch ~

The Scraps of Darkness November Kit - "Water Lilies" - was inspired by the famous painting by Claude Monet and is full of spectacularly gorgeous papers and embellishments! My first layout with this kit, entitled "Love This" is based on this month's exclusive sketch by SuePup! My layout features pictures of my son playing outside at a local harvest festival this Autumn - I love watching him play and have so much fun! I converted the photos to black and white since the background of this layout fetatures so much colour! Here is my layout:
And here is the sketch this layout is based on:
For this layout, I used the Kits 7 Dots Studio paper, the Crafter's Workshop Template, Petaloo Flowers, Leaky Shed Studio Chipboard, 3D Stamp Paint, Inka Gold colour, Lindy's Stamp Gang Mists and Pink Paislee tag from the SOD kit and add-ons, along with some mixed media elements, Lindy's Stamp Gang Mists, drywall tape and cardstock from my stash. Here are a few close-ups of the different elements of the layout.
In this close-up, you can see the masking done with the TCW template - I used Fibre Paste from my stash, mixed with some of the Cobalt Blue Inka Gold colour from the Main Kit. The circles are the 3D stamp paint from the Creativity Add-on - I simply painted the edge of the paint lid and stamped that on the page.
I used four different Lindy's Stamp Gang Starburst Mists on this layout - Tea Pot Purple, Time Travel Teal, Shabby Turbine Teal and Edelweiss Moss Green. You can really see the drywall tape and layering in this close-up - I also used some staples to hold down some of the layers and the tag.
I painted the Leaky Shed Studio Chipboard with Luminarte Silks Acrylic Glazes (Olive Vine, Pomegranate and  Solar Gold). I twisted the Petaloo vine around the chipboard and also added a cluster of Petaloo flowers to the opposite corner of the main photo. (It is too bad the photo of my son isn't sharper - that's what happens when I let my husband be the photographer ;).

I can't wait to get back to creating with this kit - there are so many possibilities!!!!! Thanks for stopping by my blog today!

Saturday, November 16, 2013

You Colour My World ~ Imaginarium Designs & Scrap Around the World ~

This month, Imaginarium Designs is one of the sponsors at the Scrap Around the World challenge blog and the Imaginarium Designs DT was asked to create a project inspired by the mood board and/or optional sketch. I chose to create a project inspired by the rainbow of colours on the mood board and made this mixed media canvas featuring an adorable picture of my son from this Autumn - he truly does "colour my world".
I started off the project using a Crafter's Workshop 12 x 12 Bricks template with Golden Coarse Pumice Gel. Once that had dried I coated the masked bricks and canvas with a coat of gesso. Then I added the Imaginarium Designs compass, clock and border and painted them with gesso as well. I created my own rainbow of mists for the colours using watered-down acrylic paint + pearlizing medium. Once the coloured paint dried, I added the picture and flowers and then dry-brushed everything (including the flowers) with white gesso and then Luminarte Silks Acrylic glaze in gold. The last step was to add the title - first I primed the chipboards with gesso, then painted them with Distress Crackle Paint in Picket Fence; finally, I dry brushed the letters with the gold acrylic glaze and attached them to the layout.

Here is the Scrap Around the World mood board that inspired this project:
Thanks so much for stopping by my blog today - be sure to play along with the Scrap Around the World Challenge this month for a chance to win an amazing prize pack of chipboard from Imaginarium Designs!

Friday, November 15, 2013

Scraps of Darkness - November 2013 "Water Lilies" Kit

The Scraps of Darkness November Kit was revealed today and it is utterly gorgeous! Melinda's inspiration for this Kit was Claude Monet  - and so the Kit has been named Water Lilies in honour of one of his most famous paintings. Here is a picture of the Kit - be sure to check the Scraps of Darkness website for a full list of the kit contents and the amazing add-ons available!
I'll be back very soon with some projects created with this breathtaking kit - I can't wait to create with it!

Wednesday, November 6, 2013

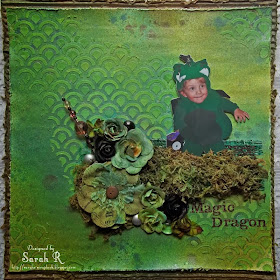
Magic Dragon ~Scraps of Darkness~

The Scraps of Darkness October Kit had an amazing Colour Add-On that included the Lindy's Stamp Gang Industrial Chic Mists set, designed by Limor Webber. I decided to use the mists to create my own background for a page featuring my son dressed up as a dragon (Halloween 2012). The colours in the Industrial Chic set were ideal for this - the greens/teals with sepia and silver accents really complement the picture and make this one of my favourite layouts this year!
 
I started out with a large piece of cardboard and tore off the top layer to reveal the corrugated layer underneath - this made a great, heavy base for the mixed media layout and looks great too. Then, I masked "Scales" onto a piece of white cardstock using a Prima Finnabair 12 x 12 stencil and some light molding paste mixed with Luminarte Primary Elements pigments (Forest Green, Lucky Apple, Mediterranean Blue) to tint it a light greenish-blue colour. Once that had dried, I started misting with the Industrial Chic mists - mainly the green and teal colours (Rusty Lantern Lime, Shabby Turbine Teal, Time Travel Teal) along with hints of the Sepia and Silver (Steampunk Sepia, Steel Shimmer). Here is a close-up of some the masking/misting.
The green and teal in this layout are perfect for the Lindy's Stamp Gang November Colour Challenge - so I am submitting this layout!
Once the background was complete, it was finally time to get to the picture and embellishments! I fussy cut the picture so it would look like my son was sitting on the layered ribbons (from the Creativity Add-On and Main Kit) and then added some "graveyard moss" for texture (and to hide the fact that my husband cut-off my son's legs in this photo). I added a combination of Prima, Kaisercraft and Petaloo flowers from the Main Kit and Flower Add-on and the Signature Stick Pin from the Embellishment Add-on. Finally, after carefully covering the picture, I did some more misting of the flowers/moss to finish off the layout!

As always, thank you so much for stopping by my blog today - I appreciate your visits and comments so much!

Tuesday, November 5, 2013

Imaginarium Designs - There's No Place Like Home

I have a "challenging" layout to share with you today. I love playing along with challenges and haven't been doing it as much as I used to - so this month I have created a layout to play along with the November Sketch at Once Upon a . . . Sketch and CSI - Color, Stories Inspiration Challenge #96. These two challenges actually intersected quite nicely for me as my "happy" place is my home - I'm a total homebody and love just cozying up at home with my family and my pets. My home is also a century home - so I've documented a bit of its history through photos and talk about the struggles/joys of owning such an old home in my journalling. I had fun searching through our County's Archives for some vintage photos and have to credit Google Earth for the most recent photo - I hope you enjoy a little peek into the history of my home!
Here is the OUAS sketch, which I rotated 90 degrees clockwise for my layout design!
I used Bo Bunny's "The Avenues" collection for this layout - the colours were perfect for the CSI colour palette and the door motif was so appropriate for documenting a layout about my home. I distressed the papers quite heavily as I thought it suited the theme of the layout. I used the Imaginarium Designs 8x8 Honeycombe as a layering element and the There's No Place Like Home phrase for my title. Both of these chipboard pieces were primed with black gesso and then painted with Luminarte Silks Acrylic Glaze in Carmen to give them a deep black/red colour.
 
I fussy cut the windows from the door and added a piece of velum so that it looked like frosted glass. I used a variety of Prima and Kaisercraft flowers to create the flower cluster and added in some Imaginarium Designs chipboard 'greenery' to complete the cluster. I simply sponged the greenery with acrylic paint in a colour to match the leaves on my flowers.
Finally, in case you're wondering what the journalling says, here is a little close-up of the tag tucked into the velum envelope behind the door. I wrote the journalling on my computer using a typeset font to fulfill one of the 'testimony' requirements for the CSI Challenge and then printed it on a nice, textured tag.
Here is a quick summary of how I solved the CSI Case File:

The Scheme: I incorporated all the colours.
Evidence: I have used clocks, flowers, a vintage photo, velum (something transparent) and paint (white gesso). 
Testimony: I have used a typewriter font, tucked my journalling behind a door and used the inspirational words message and remember for my journalling.

Imaginarium Designs Chipboard Used
8x8 Honeycombe - IDS0053
 There's No Place Like Home - Phrase - IDP0061

Kerri Flourish Tiny - IDT0026

Other Materials Used:  
Patterned Paper - Bo Bunny "The Avenues" - Treasures, Clocks, Doors, The Avenues; Pro Art Gesso - White; Bazzill Basics Cardstock - Red; White Cardstock; QuicKutz Die - Paint Chip; Black Soot Reinker; Velum, DecoArt Acrylic Paint - Leaf Green;  Prima Mini Roses - Red, Grey;  Aleene's Tacky Glue; 3D Foam Adhesive
Bits & Pieces from Scraps of Darkness Kits - Mini Clothespins - Red; Velum Envelope; Quilled Creations Textured Gift Tag; Red Gingham Ribbon; Prima Flower - Clara; Kaisercraft Paper Blooms - Black.

Thanks so much for stopping by my blog today - don't forget to leave a comment on my post on the Imaginarium Designs Blog for a chance to win some fantastic Imaginarium Designs Chipboard!