Wednesday, July 31, 2013

Scraps of Darkness - July 2013 Design Team Reveal - Gypsy Summer Kit

Today, the Scraps of Darkness Design Team is revealing the July Kit Gypsy Summer!  This kit is full of gorgeous Graphic 45 Bohemian Bazaar and My Mind's Eye Collectables papers, as well as coordinating embellishments in fun summer colours - and it was SO much fun to work with. The Add-ons are outstanding and must-have for this kit - Mandy's signature stick pin is STUNNING (see it on my layout below)! Melinda chose an amazing quote to go along with the reveal this month; it is so inspiring and wonderful:
“We are all wanderers on this earth. Our hearts are full of wonder,
and our souls are deep with dreams.” ~Gypsy Saying
I've already shared my sketch layout for this kit with you - see it here. And today, I have a second layout and an altered birdhouse to share with you!
~~~~~~~~~~~~~~~
Live. Love. Laugh.
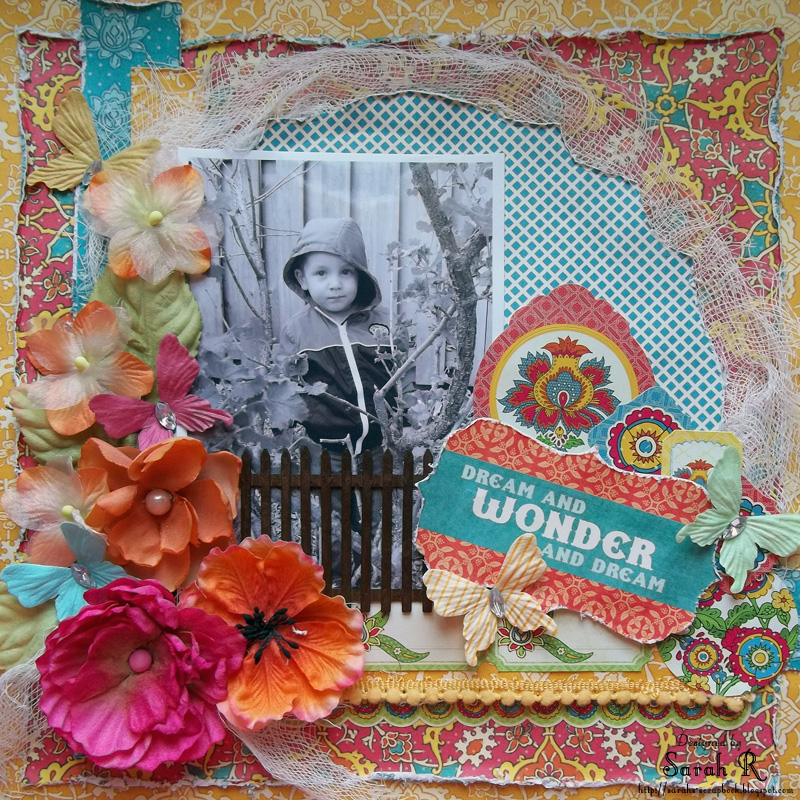
First up is my second layout with this kit, entitled "Live. Love. Laugh." I had lots of fun creating the background for this layout and fussy-cutting the gorgeous Graphic 45 papers for some of the embellishments. The photo is of my husband and me on our honeymoon in Punta Cana.
For the background of this page, I started with a sheet of the MME paper and used the Prima 12x12 Turkish Grunge stencil with Heavy Gel Medium. Once the gel medium had set, I mod-podged squares of fuchsia tissue paper over the entire base page, doubling up the tissue layer in a few random spots. Finally, I dry brushed Luminarte Silks Acrylic Glaze in Solar Gold over the stenciled areas to highlight the stenciling. Turned out pretty cool, don't you think?! Let me know if you'd like a more detailed tutorial on this . . . .I could be convinced to put one together!!
I (obviously) didn't want to hide too much of the background that I painstakingly created, so I focused my photo cluster in one corner of the layout, with a small embellishment cluster in the opposite corner. As the 'mat' for my photo element, I used part of an Imaginarium Designs 12x12 Moroccan Chipboard Shape, plus some of the cut-outs from the shape, which I painted Solar Gold. I cut the floral flourishes from the Graphic 45  Bohemian Bazaar papers and highlighted the dots on the flourishes with Stickles in Patina. The 'mesh' elements are actually the backing off some leftover bathroom tiles. I also added some tangles of white cotton thread. The title "Live. Love. Laugh." is the Kaisercraft Wood Flourish from the Embellishment Add-on, which I painted with Luminarte Silks in Bolivian Blue. Finally, on the right side of the photo, you see Mandy's gorgeous stick-pin, which so perfectly coordinates with the colours in this kit!
And, here is a quick close-up of the small embellishment cluster in the bottom left of the layout (you can really see the Stickles here).
~~~~~~~~~~~~~~~
Bohemian Birdhouse
For my second project today, I created an altered "Bohemian Birdhouse". I started off with a plain wooden birdhouse that I picked up on clearance at Michael's. I knew I wouldn't be able to cover the front with paper, so I started out by painting the front, edges and top finial with Luminarte Silks in Pink Anthurium. Once the paint dried, I embellished the front of the birdhouse with the Queen & Co. rhinestones from the Main Kit and the Bohemian Bazaar title sticker from the Graphic 45 Sticker Sheet (Main Kit).
I used the Bohemian Bazaar papers with mod podge to cover the sides, top, back and bottom. The beaded ribbon around the top of the birdhouse is from the Embellishment Add-On and the floral border and photo corners around the bottom edge are from the Graphic 45 Sticker sheet. 
I used a section of Imaginarium Designs chipboard Spade Top Picket Fence along the front of the birdhouse, which I painted with Acrylic Paint in Antique White and Luminarte Silks in Ice; finally, I rubbed some of the fence areas with the Gold Gelato included in the Main Kit to give it a worn look. I used an Imaginarium Designs chipboard Vine on the right side as the base for my flower cluster. The flowers are a combination of the flowers from the Flower Add-on and few extras from my stash. The birds (by Prima) are also from my stash.
~~~~~~~~~~~~~~~
That is it for me today! I have LOTS of stuff left from this kit and will share some more projects with you as I get them done! I just LOVE this kit to bits - just working with it brightens your day!

Saturday, July 27, 2013

Inspire. Create. Art. - Art Journal Page ~~Imaginarium Designs~~

I was fortunate enough this month to take several classes with Ania Dąbrowska (aka Finnabair) and one of the classes resulted in my first foray into Art Journalling - and now I might be hooked! So I thought it would be fun to create an Art Journal page to celebrate my experience learning from Ania! This page is inspired by Finnabair's page called Tangled and uses her gorgeous Prima Sunrise Sunset papers, stamps and Vintage Trinkets, as well as some "found objects" (aka I raided the husband's toolbox) and thread. The picture of Ania and me was taken following the first class (please forgive that I look like a grinning idiot - I was so thrilled with learning from Ania!).
Here are some close-ups of the left and right pages.
I used the new Imaginarium Designs Loolabelle's Nested Arrows and Loolabelle's Chevrons 2 chipboard shapes. I left the shapes plain when I attached them to the journal page so that they could absorb the misted colours of the page. I also sprinkled some pigment powder directly onto them in places and misted it with water to get the really cool gold metallic effects. Here are some close-ups of the chipboard!


Imaginarium Designs Chipboard Used
Loolabelle's Nested Arrows - IDDL0018

Loolabelle's Chevrons 2 - IDDL0022

Other Materials Used: Patterned Paper - Prima Sunrise Sunset Collection; Prima packaging; Prima Sunrise Sunset Vintage Trinkets; Prima Sunrise Sunset Alphabet Stickers; Prima Sunrise Sunset Stamp; Prima Clear Stamp; Memento Dye Ink - Tuxedo Black; Luminarte Artist Pigments - Ginger Peach, Golden Opal, Mandarin Blush and Nutmeg; Dylusions - Black Marble; Black Cotton Thread; ProArt Gesso; Masking Tape; Strathmore Drawing Paper; Beacon 3-in-1 Craft Glue.
~~~~~~~~~~~~~~~
Don't forget to pop over and leave a comment on the Imaginarium Designs blog  for a chance to win some amazing Imaginarium Designs Chipboard! 

Friday, July 26, 2013

Time to Remember ~~Imaginarium Designs~~

Today I am sharing a wedding layout created for Imaginarium Designs chipboard, using Prima's Lyric collection and based on the Prima BAP for July. The colours for my wedding were black, white, pink and silvery-grey - and this layout was created to reflect that. I had lots of fun doing some fussy-cutting, stitching, masking, and stamping on this one!
I did lots of fussy-cutting for this page - the most obvious being the two 'border' elements at the top and bottom of the layout. I attached these by machine stitching them with a couple of rough lines of stitching.
I used a Crafter's Workshop 6x6 Harlequin template with black gesso in the background of this layout and then did some stamping with a Prima Clear Stamp and Silver Pigment on top of the masked area. I fussy cut the banner-pennants, 'lace' and clock for the centre of the layout and did some more rough machine-stitching. Instead of  traditional journalling, I used some random Lyric collection word stickers around the photo.
I used an Imaginarium Designs phrase for the title - "Time to Remember" and treated it with Viva Colour Inca Gold Metallic Rub in Old Silver; this was my first time using this product and I just love the effect!
The clock was also treated with the Metallic Rub - but then I fussy cut a clock face from the Prima papers and added some Ingvild Bolme Vintage Trinkets Clock Hands to it. The fussy-cut clock was the perfect size to embellish the centre of the 4.5 inch Clock Face - love how this turned out!

Imaginarium Designs Chipboard Used
Clock Face - 4.5 In. - IDS0005

Time to Remember (Phrase) IDP0078

Other Materials Used: Patterned Paper - Prima  Lyric collection; Art Alternatives Black Gesso; Craft Smart Pigment - Silver; Viva Colour Inka Gold Metallic Rub - Old Silver; Crafters Workship Template - 6x6 Mini Harlequin; Prima Clear Stamp; Black Cotton Thread; Prima Ingvild Bolme Vintage Trinkets - Clock Hands; Recollections Boutique Fleur Floral Embellishments; Aleene's Tacky Glue; Memory Tape Runner XL.
~~~~~~~~~~~~~~~
Don't forget to pop over and leave a comment on the Imaginarium Designs blog  for a chance to win some amazing Imaginarium Designs Chipboard!  

Wednesday, July 24, 2013

There Never Seems to Be Enough Time

July has been a busy month for me and I'm just getting around to sharing a layout I completed at the beginning of the month for the Round Robin at Scraps of Darkness. I used the July challenge at Once Upon a Sketch for my inspiration - I loved this month's "grow" journalling prompt too....The picture is of my son, who is growing up SO fast - he'll be three in a couple of weeks! And, like all moms, I often feel that there never seems to be enough time to do all the things I want to do with my son - hence the title, inspired  by Jim Croce's song Time in a Bottle. The journalling on the back of my layout reads "William - June 14, 2013. Growing up SO fast! Almost 3 now!"
I used 7 Dots Studio Domestic Goddess papers for this layout and did some bubble wrap stamping with gesso to create the background - I love how this echoes the bubble pattern in the paper. I rubbed a few areas of the stamped areas with gelatos to blend with the base paper. I did some punching with my Crop-A-Dile around the edges of the base paper and some of the layers to make it look like torn notebook paper.
I used an Imaginarium Designs Clock chipboard clock and Imaginarium Designs Numbers (large and small) and treated them with gesso and five colours of gelatos to blend them into the background. I was thinking of the numbers as time 'falling away', which is why I combined them with the clock piece and had them scattered around the page. I added in some stamping with the Third Eye Cardiogram stamp around some of the base page edge and on one of the layers under the photo - love the extra little detail this adds!
The metal embellishments are a combination of Prima Sunrise Sunset Vintage Trinkets and Prima Ingvild Bolme Junkyard Findings. I also added in some tangled thread to add texture/interest to the layout.
Thanks so much for stopping by today! Be sure to stop by the Scraps of Darkness Forum and sign up for our next Round Robin - you don't have to be a kit subscriber to play along!

Saturday, July 20, 2013

Dream and Wonder - Scraps of Darkness Gypsy Summer Kit

Hello Scrappy Friends! Today, I am sharing my first project created with the Scraps of Darkness Gypsy Summer Kit! This kit is full of gorgeous papers and embellishments in fun summer colours - and it was SO much fun to work with. And I just love the quote that Melinda put with the reveal this month; it is so inspiring and wonderful:

“We are all wanderers on this earth. Our hearts are full of wonder,
and our souls are deep with dreams.” ~Gypsy Saying

For today's layout, I used the kit sketch by Charlotte Jenkins (aka Suepup). Be sure to stop by the Scraps of Darkness Forums and enter the monthly sketch challenge - you don't have to be a kit subscriber to play along and you could win a $20 credit to the Scraps of Darkness store!
I used the gorgeous Graphic 45 Bohemian Bazaar papers and stickers and the title, flowers and pompom trim from the main kit for this layout. The photo is of my son and was taken in the early Spring this year and, because of the bright colours in the papers, I converted the photo to black and white to showcase it! I used lots of layering to add to the colourful, flower-garden feel of the layout and distressed the edges of all the papers to add texture and soften the layering.
I wanted this layout to feel like a 'garden' picture and be a little bit dreamy - so I added in a bit of metal fencing from my stash and put some cheesecloth around the circular layer (looks a little like clouds I think). 
I just love the Prima flowers in this kit, which I retwisted into the vine running up the left side of the layout. I also added in a few Prima butterflies (Divine collection) from my stash - my son is obsessed with butterflies right now (all bugs actually).  
On the right side of the layout, I used a the My Mind's Eye Collectable card as my title and clustered it with some of the Graphic 45 stickers and a couple more butterflies. This title was so perfect for the layout, since I think my son has a dreamy expression on his face in the photo (either that or he is annoyed that I'm forcing him to pose for yet another picture.....).
Thanks so much for visiting my blog today - I hope you liked my first Scraps of Darkness kit layout. I'll be back soon with more projects to share from this gorgeous Gypsy Summer kit!

Friday, July 19, 2013

Classes with Ania Dąbrowska - Second Class - Untitled Tea Stained Layout

Today, I am sharing the results of the second class that I took with Ania Dąbrowska (aka Finnabair) at The Art House Studio. This was a layout class, entitled "Tea for Two", and we used tea-staining to create part of the background. This was SO much fun and was also my first exposure to Luminarte Silks paints and Artist's Pigments, which are incredible! I didn't add a title to the layout because I didn't think it needed it . . .and I didn't want to cover any of the cool background! Here is the layout and a few close-ups!


I still need to share the results of the third class with you - my first foray into art journalling - and I'm hooked! Hope you'll come back in the next few days to check it out!

Thursday, July 18, 2013

Classes with Ania Dąbrowska - First Class - "Love" Collage

Hello Scrappy Friends - it has been a while since my last post - computer issues are plaguing me lately.....I swear technology hates me. Anyhow, I was lucky enough to take three classes with Ania Dąbrowska (aka Finnabair) at The Art House Studio last weekend - and let me tell you - they were all AMAZING! I learned so much and can't wait to employ the new techniques in my scrabooking/crafting.

The first class was called "Imagine" Collage - and we created mixed media collages on canvas. I won't share the techniques with you here - you'll have to sign up for a class with Ania for that ;) - but I will share the project and some close-ups with you. I just loved creating my "Love" collage and can definitely see creating more of these in the future!


I have a few more projects from my classes with Ania to share over the next few days - so I hope you'll stop by for some more grungy/inky goodness!