Wednesday, November 21, 2018

Shabby Chic Christmas Altered File Folders ~ Creative Embellishments

Hi there Crafty Friends! Today I'm sharing a Shabby Chic Christmas project with you - using gorgeous chipboard elements from Creative Embellishments! Like all of you, I'm sure, I've started getting ready for Christmas - and decided to create these Altered File Folders as packaging for Christmas Gifts! I coffee-dyed a standard letter-size file folder and then cut it in half - sewing the sides of each half closed to create a pocket. I layered vintage music paper, vintage dictionary paper, some coffee-dyed paper doily, and some pages from Charles Dickens' A Christmas Carol on the folders and then added some vintage pink velvet ribbon and some vintage pink & white floral lace. I printed the angel images (a free printable I found on Pinterest), distressed them with Vintage Photo Distress Ink and stitched them to some coffee-dyed paper and white cheesecloth. I added three buttons, stitched with silver thread, to each printed image. I added a CE chipboard Pine Tree to each folder - I embossed the trees with Stampendous Embossing Powder in Winter Wonderland. I also added a CE chipboard Bow to each folder - I embossed the Bows with Distress Embossing Powder in Worn Lipstick, but didn't like the colour tone on this project, so I painted over it with some Prima Art Alchemy Metallique Paint in Vintage Rose and added some highlights with Smooch Pearl Accents. Finally, I embossed words from the CE Chipboard Christmas Sentiments with Martha Stewart Embossing Powder in Sterling - I used silver to pick up on the silver flecks on the trees and the silver thread in the buttons.


I've left the back of the folders fairly plain (for now!) - simply adding a small collage of vintage music paper, book page and lace at the top and randomly stamping the folders with my favourite CE Stamp - Distressed Script.

Wednesday, November 14, 2018

Writing Boards for Vintage/Junk Journals ~ Creative Embellishments

Hi There Crafty Friends! Today I'm sharing a fun and functional projectwith you! I've been creating Vintage Style Junk Journals lately and wanted to include a writing board in them -- a hard surface for those who like to journal on the go -- and the Creative Embellishments Large Tags are the perfect size to tuck into a journal for this purpose! For the "writing surface" side, I wanted to make sure that it remained flat, without any bumps or embellishments that would interfere with writing, so I started off by brushing a rough coat of white gesso on one side of the tag - leaving some places where the kraft colour of the tag base could peek through. Next, I stamped the tag with the Creative Embellishments Distressed Script Stamp and some black Archival Ink. I then decoupaged torn sections from a Paris-themed Napkin onto the tag. Finally, on the writing side, I heavily inked the edges of the tag with Distress Ink in Vintage Photo.

For the reverse side of the tags, I created some "Franken-Paper" using bits of paper left over from creating the journals these tags were created for (check out Nik the Booksmith's YouTube for the inspiration for the Franken-Paper technique). I collaged the papers together and then cut the tag shapes from the collaged paper. Next, I stitched around the outside of each tag shape and along each seam of the papers; then, I added some lace that coordinates with some used in the journals. Before gluing the sewn/collaged papers to the Large Tags, I added a Pen Loop to each of the tags using wide black elastic. Finally, I glued the collaged papers to the back of each tag and inked the edges with Distress Ink. I finished off the tags with some lace, sari silk and eyelash trim and an antique-style pocket watch charm.

Wednesday, October 31, 2018

Steampunk Costume Accessory - Altered Toy Pop Gun ~ Creative Embellishments

Happy Halloween Crafty Friends! Today I'm sharing an Altered Toy Pop Gun that would be the perfect accessory to a Steampunk-Inspired Halloween Costume! I started off with a cheap plastic foam-dart gun from the dollar store - it was originally fluorescent orange and green - and added several different sizes of Creative Embellishments Gears, a glass bottle as a scope and some metal embellishments from Prima Marketing. Once I was happy with the arrangement of the chipboard and embellishments, I painted everything with Prima Art Basics Black Gesso and then dry-brushed on Prima Art Basics White Gesso to bring out the details. Next, I dry-brushed the gun with Prima Art Alchemy Metallique Paint in Steampunk Copper. I added some additional colour with Prima Art Alchemy Waxes - Antique Brilliance Lucky Emerald and Mystic Turquoise and Metallique Bronze Age. Finally, I finished off the project by adding two clear Prima Melange Art Pebbles to either end of the glass bottle 'scope'.


Monday, October 22, 2018

"Bird of Paradise" - Mixed Media Altered Mask ~ Creative Embellishments

Hi There crafty friends! Today I'm sharing a new mixed media project with you - what I'm calling my "Bird of Paradise" Altered Mask. I started out with a (very) cheap mask from the dollar store. Then, I started layering lots of Creative Embellishments chipboard elements on the mask, including:
Once I was happy with the design, I primed everything with Prima Art Basics Black Gesso and then dry-brushed Prima Art Basics White Gesso to bring out the details. I added colour using Prima Art Alchemy Paints - Sparks in Mermaid Sparkle, Magical Pond, Fairy Wings, and Unicorn's Hair; and Metallique in White Pearl and Silver Spoon. I finished off the colour with Prima Art Alchemy Waxes - Antique Brilliance in Lucky Emerald and Mystic Turquoise; Opal Magic in Turquoise Satin; and Metallique in Old Silver. Finally, I added a few silver-toned half-pearls around the eyes for a bit of bling.


Sunday, October 14, 2018

A Murder at 221B Baker St. - House Vignette ~ Creative Embellishments

Hi There Crafty Friends! Today, I'm sharing a new Creative Embellishments House Vignette with you! I love the CE House Vignette SO much - it is such fun to create with - and this time I have used Graphic 45's Master Detective collection to create A Murder at 221B Baker St.
(Note: If you're going to be creating your own CE House Vignette,
I have a video tutorial on my YouTube Channel showing how I put it together.)
For the exterior of the House Vignette, I first covered the house with the Graphic 45 papers. Then, I added two Greek Gable End Ornaments as planters on either side of the house. I painted the ornaments with Prima Art Alchemy Metallique Paint in Steampunk Copper and then rubbed them with Art Alchemy Antique Brilliance Waxes in Lucky Emerald and Fire Ruby. I used the Arched Doors Set 2, one of the Windows Set of 4, and one of the Arrow Banners and embossed them with Stampendous Aged Black Embossing Enamel. I added some spiderweb paper behind the window and some Tim Holtz Vellum on the back of the doors. I hinged the doors and added Tim Holtz Mini Fasteners as knobs. The hinged doors open to reveal a fussy-cut of Sherlock Holmes (and Friends) in the doorway. Finally, I fussy cut "221B Baker St." from the Graphic 45 papers and added it to the Arrow Banner.

I used the Title Page of the 8x8 Master Detective collection to cover the interior of the House Vignette and then fussy cut elements from a second Title Page to create the 3D vignette inside the house. I added some spiderwebs and spiders, as well as some moss to the top of the house. I added moss along the floor of the house, along with skulls, a poison bottle, an evidence scroll, and a pumpkin. Here's a close-up of all the little decorative bits!


Monday, September 24, 2018

Alice in Wonderland ATCs ~ Creative Embellishments

Hi There Creative Embellishments Fans! Sarah here today to share a set of three Alice in Wonderland ATCs with you! I used playing cards (the Jack, Queen and King of Hearts) as the base for these ATCs and covered the back of the cards with book pages from Alice in Wonderland. Then, I fussy cut illustrations from the book for each ATC. I embellished each ATC with a CE Chipboard piece painted using Prima Metallique paints, as well as a few metal elements and some moss.
For the "Drink Me" ATC, I used one of the CE Potion Bottles. After painting it, I added an eyelet and attached it to the ATC using a small chain.
For the "Hidden Door" ATC, I used one of the CE Simple Key Hole Plates.
For the Caterpillar "Who Are You?" ATC, I used two of the CE Mini Mushrooms.


Wednesday, September 19, 2018

Vintage Style Needle Book ~ Creative Embellishments

Hi there Crafty Friends! After taking short hiatus from crafting, I'm back to share a new project I created for Creative Embellishments - a Vintage Style Needle Book I made using the CE Passport Journal Cover.
I started off by separating the front and back covers from the spine piece, as I wanted a little more flexibility to the cover hinges. I wrapped the outside of the cover with fabric and decorated it with some lace, cheesecloth, measuring tape trim and a vintage sewing Trade Card. I added a couple of vintage buttons and a sewing machine charm on a bulb pin and made a closure for the book using a post button and a recycled Sari Silk tie.

I lined the inside of the cover with blue felt and made a pocket for the front and back covers using felt and lace. I made the interior 'pages' from felt and decorated them using lace trims and measuring tape trim. There are tucks and pockets to hold all manner of sewing paraphernalia. I added in a few pieces from the CE Button and Thread Cards, which I covered using print-outs of vintage sewing Trade Cards and patterned paper - I also inked the edges of the thread cards with Distress Ink in Vintage Photo.

Thursday, April 26, 2018

5x7 Canvas Traveler's Notebook ~ Canvas Corp Brands Crew

I love Traveler's Notebook style journals! You can create a gorgeous cover to hold your notebooks - and when the notebook is full you just swap it for a new one! I used Canvas Corps' 5x7 Canvas Portfolio and altered it so that it would function as a Traveler's Notebook cover. The portfolio comes with one heavy duty elastic already inside, but I removed it and added eyelets and elastic - and now it can hold two (or more) 5x7 journals.
I decorated the cover my decoupaging torn pieces from a Paris-themed Napkin to the front and back cover and then I added some Canvas Corp green burlap layered with some ivory lace in a band around the bottom of the cover. I created an embellishment for the front of the cover by layering some cheesecloth, Canvas Corp ivory burlap, Canvas Corp Black on Ivory Cardstock and a cut-out from the Canvas Corp Bon Voyage Red & Ivory French Sayings paper. I did lots of machine stitching on the layered elements to add some extra detail.
7 Gypsies has amazing Starter Blank Journals that fit perfectly inside the 5x7 portfolio cover - so I added a Kraft journal inside, which will be great for art journalling on-the-go. I also made my own blank writing journal insert using some Canvas Corp Black and Ivory Fleur de Lis Paper and some ivory linen paper I had at home. It was easy to make the extra journal insert - I just used the 7 Gypsies journal as a template, cut my papers to size and then stitched them to the patterned paper cover!
And, because a traveler's journal isn't useful unless you have a pen handy, I used a wire bulldog clip and glued a black elastic loop to it to create a pen holder that can clip to the journal cover. A cute fleur-de-lis charm on a pin finishes off the clip!

Canvas Corp Brands Materials Used:
Canvas Corp - Canvas Portfolio 5x7
Canvas Corp - Scraps of Fabric
Canvas Corp - Printed Cardstock - Black on Ivory Paper
7 Gypsies - Starter Blank Journal - Kraft 5x7
Canvas Corp - Black and Ivory Fleur De Lis Rev Paper
Canvas Corp -Bon Voyage: Red & Ivory French Sayings Paper


From my Stash:
Lace, Cheesecloth, Paris Napkin, Mod Podge, Black Elastic, Eyelets, Bulldog Clip, Bulb Pin, Fleur de Lis Charm, Fabric Glue

Wednesday, March 28, 2018

Graphic 45 2018 Brand Ambassador Audition

Hi There Crafty Friends! If you follow my blog, you'll know that I am a huge admirer of Graphic 45 - and it is time for their 2018 Brand Ambassador Auditions! I am throwing my hat in the ring this year and am showcasing two of my favourite G45 projects below!

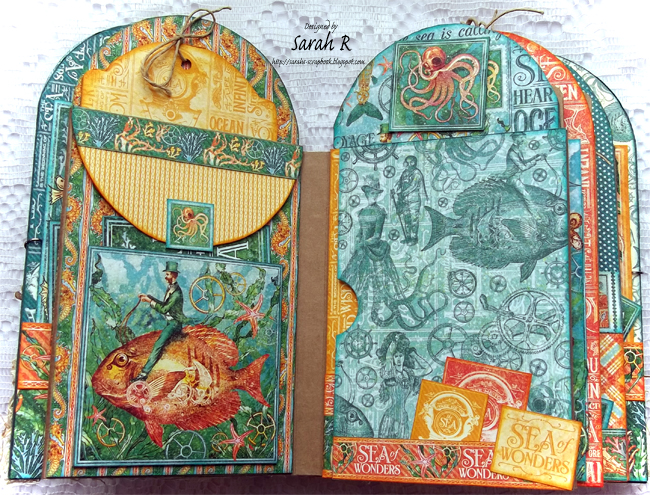
Project #1: Voyage Beneath the Sea Mini Album
with Video Flip Through and Step-by-Step Page Construction Tutorial
I created this mini-album using Graphic 45's gorgeous Voyage Beneath the Sea collection. I have a video walk through of the album so you can see all the pockets, tags and embellishments. I've also provided a tutorial in the video on how to create the page bases for the album. You can find the original blog post for this project (with all the measurements) here.

I embellished the cover of the album with chipboard elements by Creative Embellishments and added in some decorative grass and real sea shells. The closure for the album is a Tim Holtz Swivel Clasp and two seashell eyelets I had in my stash. All the Graphic 45 papers in the album are edged with Distress Ink - either Peacock FeathersWild Honey or Spiced Marmalade, depending on the colour of the patterned paper.

Mini Album Walk Through and Tutorial

Album Photos
Front Cover

Album Spine

Back Cover

Full Cover

Front Inside Cover & Page 1

Page 1 & Page 2

Page 2 & Page 3

Page 3 & Page 4

Page 4 & Back Inside Cover
Project # 2: Master Detective Clue Game
Oh No! Sherlock Holmes has been murdered and it can only have been by one of those closest to him! You are now a Master Detective and must discover which one of Holmes' companions has committed the crime! 

We LOVE playing games in our family and Clue (by Hasbro) is one of our favourites! As soon as I saw the Master Detective Collection by Graphic 45, I knew I had to create my own version of Clue using the papers!

I created the folding gameboard and covered the back of the board with papers from the Master Detective 12 x 12 Patterns and Solids. All the papers for the game are inked with Distress Ink in Ground Espresso. I outlined the front panel of the gameboard with some Tim Holtz Halloween-themed Design Tape that perfectly complements these papers! I used the Signature Page from the 8x8 Paper Pad to decorate the front of the board.
I made a large envelope for the back of the 8x8 page and attached it with velcro dots - this way it can be used as storage for all of the game cards! I made a second smaller envelope (tucked into the pocket on the front) that can be used during the game to hold the suspect, weapon and location cards for the mystery.
I created the Weapon and Location cards by printing on some of the papers from the 12 x 12 Patterns and Solids - I sized these cards to fit on the 12 x 12 Master Detective Card cut-outs - so all of the cards, including the Character Cards, have the "Master Detective" Design on the back. I also created the game score cards using paper and colours that coordinate with the Master Detective Collection. I laminated all the cards so they could be played with and not get damaged; I also laminated the score cards so that they can be used with dry-erase marker! The game tokens are some small skulls I cut off of a Halloween costume necklace!
For the Game Board itself, I used different papers for each room (and a journalling card for one of the rooms) and then outlined each room with some Tim Holtz Design Tape so that the room boundaries were defined. The game spaces were made using alternating colours of the Houndstooth patterned paper from the 12 x 12 Patterns and Solids. All the room labels, as well as the weapons and "Clue" title are Custom Cut Creative Embellishments Chipboard!
Here's a closer look at all the cards, weapons and game tokens!
Well, that's it! My audition post is complete! Wish me luck! 
Sarah

Bon Voyage Traveler's Notebook Insert - Junk Journal Style ~ Canvas Corp Brands

I absolutely love making junk journals, but the most time consuming part is often just gathering up all the papers to create the journal. That's just one reason that I love the Mix & Match Pads from Canvas Corp - they are absolutely perfect for making journals since you already have a combination of coordinating fabric and gorgeous papers!

For this Traveler's Notebook insert, I've used the Canvas Corp "Voyages" Mix & Match Pad. The beautiful French/Paris themed Canvas fabric is perfect for making the journal cover and the Patterned Papers with their Ivory backs add flair to the journal while still allowing plenty of writing room. The red burlap included in the pad was perfect as an accent for a pocket on the inside back cover.
For some extra added interest, I've included a few pages from the 7 Gypsies Architextures™ "Vintage Pink" Mix and Match Book. I sewed one of the pages from the Mix and Match Book on my sewing machine to create two mini pockets to hold some decorated Canvas Corp White Market Tags. I finished off the journal by adding a tie using some Canvas Corp Red Ticking Fringe, which I tore in half to get a distressed look. I also added a 'dangle' to the journal's spine that I made using some trinkets from my stash, as well as a 7 Gypsies Antique Black Key.

I hope you'll have a look at the complete journal flip-through video so you can see all the yummy details!

This journal will be available in my Etsy Store if you're interested in purchasing it!