Wednesday, April 27, 2016

Good Ol' Sport Layout ~ Creative Embellishments and CSI #198

Hi there Crafty Friends! Today, I'm sharing a Creative Embellishments Design Team project based on CSI Challenge #198. I've used Graphic 45's Good Ol' Sport collection to create a soccer themed layout featuring a photo of my son!

On this layout, I've used the Creative Embellishments Distressed Chicken Wire Border as the 'netting' behind the photo layering and a Nautical Compass as an embellishment. Because the paper I used on this layout is so colourful, I used a simple gesso treatment on the chipboard pieces so that they would really pop on the layout. I used a sponge dauber to add two layers of white gesso to each chipboard element - the dauber adds a nice texture to the gesso. I added some fussy cut soccer balls and a whistle to the Chicken Wire 'netting' as well. Here are a few angles/close-ups.


Thanks for stopping by my blog today! I hope you have played along with the Creative Embellishments Design Team this month over at the CSI Challenge site - its been so much fun!

Wednesday, April 13, 2016

Guest Designer at CSI - Case Files #196 and #197 ~ Creative Embellishments

Hi Scrappy Friends! This month the Creative Embellishments Design Team is Guest Designing for the CSI: Color, Stories, Inspiration challenge site. Today, I'm sharing two layouts created for CSI challenges #196 and #197.

CSI #196
On this layout, I've used the Creative Embellishments Circles panel, Gears and a Mini Pocket Watch. All the chipboard elements were altered using Finnabair's new Rust Effect Paste by Prima Marketing Inc. I randomly dabbed the 3 different paste colours onto the chipboard pieces using a sponge dabber until I was happy with the results - I love how the rust effect paste blends so beautifully with the rust-coloured fowers on the layout!


CSI #197
On this layout, I've used the Creative Embellishments Window Set # 4 (smaller window), a Lamp Post and Rose Leaves. The window and lamp post were primed with white gesso and then painted with ColourArte Silks Acrylic Glaze in Black Ice and Yellow Rose. I used a baby wipe to smudge the black glaze for a distressed look. The rose leaves were embossed using Stampendous Shabby White Embossing Enamel. 


Thanks for stopping by my blog today! Happy Scrapping!

Tuesday, April 12, 2016

Graphic 45 Voyage Beneath the Sea Mini Album ~ with Video and Tutorial

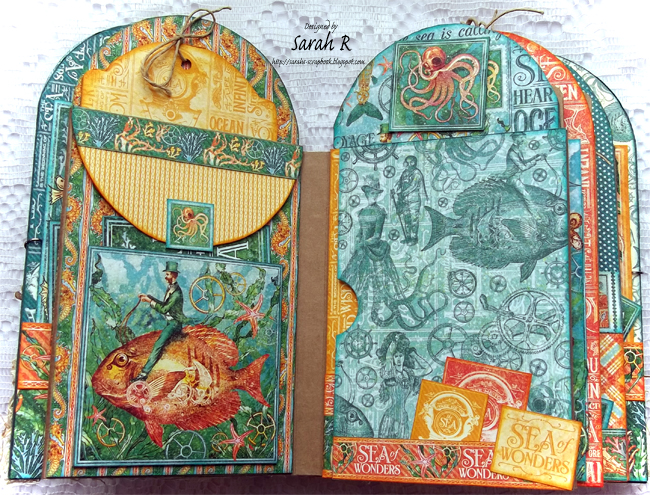
Hi There Scrappy Friends! Today, I have a Mini Album to share with you - created with Graphic 45's gorgeous Voyage Beneath the Sea collection. I have a video walk through of the album so you can see all the pockets, tags and embellishments. I've also included a tutorial in the video on how to create the page bases for the album.

I embellished the cover of the album with Sea Grass, Seaweed and Gears chipboard elements by Creative Embellishments, which I painted using the new Prima Art Alchemy paints by Finnabair. I also added in some decorative grass and real sea shells. The closure for the album is a Tim Holtz Swivel Clasp and two seashell eyelets I had in my stash. All the Graphic 45 papers in the album are edged with Distress Ink - either Peacock Feathers, Wild Honey or Spiced Marmalade depending on the colour of the patterened paper.

Mini Album Walk Through and Tutorial

Album Photos

Front Cover

Album Spine

Back Cover

Full Cover

Front Inside Cover & Page 1

Page 1 & Page 2

Page 2 & Page 3

Page 3 & Page 4

Page 4 & Back Inside Cover
Tutorial Measurements
Not shown in diagrams: Bottom Hinge for Tag Booklet pocket - 3 1/2 in. x 1 in. - scored at 1/2 inch and corners trimmed at 45 degree angle.


Thanks so much for stopping by my blog today - I hope you enjoyed seeing my Voyage Beneath the Sea Mini Album! Happy Scrapping!

Wednesday, April 6, 2016

Altered Initial using Graphic 45's Good Ol' Sport Collection

Hi There Crafty Friends! I have a quick share today - an altered initial I made for my son using Graphic 45's Good Ol' Sport collection.
I started off by covering the W with the "Teamwork Paper" - I inked the edges with Distress Ink in Faded Jeans and covered it with a coat of matte Mod Podge. Next, I fussy-cut images from the papers and used pieces from the borders and cut-aparts to decorate the initial. All the decorative pieces are edged with Distress Ink in Black Soot and I've layered them and curved them to give lots of dimension to the project. Here are a few angles and close-ups.


My son just loves this and it is already hanging in his room!
Thanks for popping by my blog today! Happy Crafting!


Saturday, April 2, 2016

Graphic 45 'Home Sweet Home' Expanding Recipe Folder - Video Tutorial

I have a brand new off-the-page project to share with you today - AND my very first video tutorial! I have made an expanding recipe folder using Graphic 45's Home Sweet Home collection and I filmed the process from start to finish so that you can follow along and create one too! Here are a few pictures of the finished Recipe Folder. Scroll down for all the paper/chipboard measurements and a link to the YouTube video!


Measurements:

  • Sides
    • 2 pcs Kraft Cardstock - 4 1/4 in. x 10 in.
    • 2 pcs cut from a Tyvek envelope - 4 1/4 in. x 10 in.
  • Divider Tabs
    • 9 pcs Kraft Cardstock - 4 5/8 in. x 6 1/4 in.
  • Cover
    • Front and Back
      • 2 pcs chipboard - 6 1/2 in. x 5 in.
        • Front Cover - 3 magnets - centre at 1 in., 1 3/4 in. and 2 1/2 in. from top
      • 2 pcs patterned paper - 8 1/2 in. x 7 in. (outside)
      • 2 pcs patterned paper - 6 1/4 in. x 4 3/4 in. (inside)
    • Bottom
      • 1 pc chipboard - 6 1/2 in. x 2 in.
      • 1 pc patterned paper - 7 1/2 in. x 2 1/2 in. (outside)
      • 1 pc patterned paper - 6 1/4 in. x 2 in. (inside)
    • Hinges
      • 2 pcs Kraft Cardtock - 2 in. x 6 1/4 in. (reinforced with strong tape)
  • Top Flap
    • 2 pcs patterned paper - 6 1/2 in. x 6 1/2 in.
    • 1 pc cut from Tyvek envelope - 6 1/2 in. x 6 1/2 in.
    • 1 magnet - centre at 1 in. up from bottom
Now that you have all the material measurements, you can follow along with the construction of the folder!
Thanks for stopping by my blog today! I hope you liked the expanding recipe folder and find the tutorial helpful!

Friday, April 1, 2016

All You Need is Love - Music-Inspired Art Journal Page ~ Creative Embellishments April Challenge

It is the first of the month and a new challenge is up on the Creative Embellishments Blog! This month's Inspiration Image is full of bright colours and musical imagery - and the twist is to use a song title in your project!
The bright colours, music and guitar in the inspiration image made me think of The Beatles - so I created a page in my Music-Inspired Art Journal for their song All You Need Is Love.
I started the page by cutting up the Hearts Panel 2 and gluing scattered pieces of it over the two-page spread. I added 'drips' from the bottom of the hearts using a hot glue gun and then coated everything with Heavy White Gesso. I added colour to the page by sprinkling several different Finnabair Mica Powders in places and then misting the pages with water to activate the colours. I dry-brushed the heart panel pieces with Finnabair Art Alchemy Opal Magic Acrylic Paint in Aqua-Rose (I wish you could see how the colour changes in different light!). Then, I smudged charcoal pencil around the outside of all the chipboard hearts and the drips. I added the title and the CE chipboard 'Love' (from the Happy Words Set), which I embossed with Ranger Black Embossing Powder. Finally, I inked the edges of the pages with Black Soot Distress Ink and splattered everything with Diluted Black Soot Distress Reinker. Here are some close-ups and different angles of the page.


Creative Embellishments Challenge Rules:
  • Create a NEW project layout, mini album, tag, card, canvas, etc….as of April 1st 2016.
  • Please add your entry to our InLinkz box below to be eligible for the prize. You have until the last day of each month 11:55 pm eastern time to enter.
  • It is required that you mention in your blog post that you are playing along at Creative Embellishments together with a link back to our blog. Please make sure to reference our challenge. Please no back linking.
  • Combining with other challenges is permitted.
  • We would love to see you USE AT LEAST 1 CE product on your project but it isn’t required to play along. However everyone that does will get and extra chance at winning.
  • WINNERS will have 2 weeks to claim their prize. The winner will be announced on this post the day after the challenge ends. Keep an eye out to see if you are a winner.
Thanks for stopping by my blog today - and I hope you'll play along with the April Creative Embellishments Challenge!