Wednesday, January 27, 2016

Dare to Spread Your Wings - Mixed Media Canvas for Creative Embellishments

Hi Crafty Friends! Today I'm sharing a project I created using the Creative Embellishments Steampunk Dress Form 1 as the centerpiece of my design. I just love this dressform with its gorgeous big angel wings and wanted to show it off - so I dressed it up with a handmade paper skirt and created a fun mixed media background on canvas to showcase it. I've also used sections of the Mini Brick Panel chipboard to decorate the canvas.
The background and skirt were made using Prima Printery collection papers. The colours I chose for this canvas were inspired by the  Lindy's Stamp Gang January 2016 Color Challenge. I love this colour combination so much that this is my second project using it! I've used two different Starburst mists for the colour on the background - Mad Hatter Mint and Tea Pot Purple.
The wings of this piece were actually attached to skirt of the dressform, so I did some fancy trimming to free them so they could rest on top of the handmade paper skirt. To decorate the dressform , I started out with a coat of white gesso. I then painted the wings with Silks Acrylic Glaze in Ice and the dress form body with Silks Acrylic Glaze in Silver Bells. Finally, I added some Finnabair Glass Glitter in Sterling to the wings to give them lots of sparkle. 
For the bits of the brick panel, I first primed the chipboard with a coat of white gesso. Then, I painted the bricks with Silks Acrylic Glaze in Yellow Rose. I wanted the bricks to blend a bit more with the purple and green in the background, so I rubbed sections of the brick pieces with Silks Acrylic Glazes in Pomegranate and Teal Zircon to match the background colour. Finally, I added some Finnabair glass beads in Licorice and some green glass beads from my stash to the brick sections to add extra texture and interest to the canvas.
Here are another couple of angles of the full canvas.

Thanks for stopping by my blog today!

Saturday, January 16, 2016

'Couture' Make-up and Jewelry Tray

This week, I was playing with the Couture Collection by Graphic 45. A while ago, I made a necklace rack using this collection and I decided to make a coordinating Make-up/Jewelry tray to use on my dresser! I wanted someplace to put a few things I use frequently, like a lipstick, my glasses, hand cream and my favourite necklace (when I'm not wearing it) and this was my solution! I used an old photo frame I picked up at a second-hand store and painted/distressed the frame. I used the backing of the frame to build up the decor for my tray. Lots of fussy cutting/layering of images from these gorgeous papers and coordinating roses added to make it extra feminine (though I had to squish the flowers a bit to fit it under the glass)! Here are a couple of different angles of the tray and a close-up (there's a wee bit of glare from the glass top of the tray - its really hard to photograph glass)!


And here is the tray in use on my dresser! So perfect to hold everyday items!
I'm going to enter this in the Graphic 45 January Challenge -  #GetG45Organized! Wish me luck!

Thursday, January 14, 2016

Try - Art Journal Page

Here is my first Art Journal page of 2016 - inspired by P!nk's song Try.
I wanted this page to be feminine but still with a grungy/edgy feel - so I used grunged-up lace as the main element on the page. The colours for this page were drawn from the Lindy's Stamp Gang January 2016 Color Challenge.
I've used three different Starburst mists for the colour on the page - Mad Hatter Mint, Bodacious Blush and Open Arms Amethyst. The paper bits layered on the page are from Finnabair's Sunrise/Sunset collection. (I have promised myself that I will use up some of my paper stash this year!) The stamping on the layout is also done with Finnabair stamps and archival ink. Here are some more photos of the page!


Thanks so much for stopping by my blog today!

Wednesday, January 13, 2016

An "Elf-Sized" Mini Album for Creative Embellishments

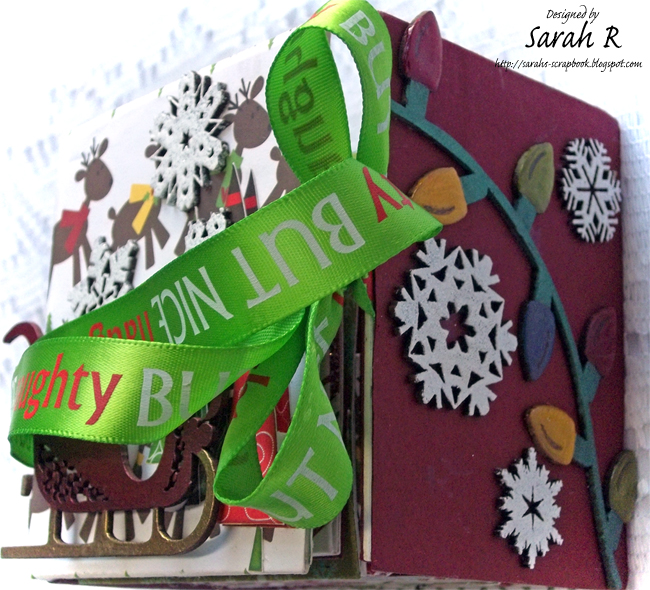
Hi Crafty Friends!  Today I'm sharing a fun little project with you! I've created an "elf-sized" mini album - the album pages are only 3 in. x 3 in.! I made this album for my son for his Elf on the Shelf pictures from this past December. The Elf on the Shelf is such a fun thing for small children and keeps the "magic" of Christmas alive for the whole month, so there are twenty-four pocket pages in the album to hold a picture for each day from Dec. 1 - Dec. 24. A tiny album like this is also a great way to use up your stash of leftover Christmas papers!
I created a four-sided cover for the album and have decorated three of the four sides with Creative Embellishments chipboard elements. For the outer spine of the album, I've used The Elf on the Shelf title chipboard, which I embossed with Antique Gold embossing powder. I stacked the title so that it was triangular from top to bottom, to reflect the shape of a Christmas tree. I added some sequins as Christmas balls and a CE Chipboard Snowflake (embossed with Winter Wonderland embossing powder) as the 'star' of the tree.
I created a mini-scene on the front cover by fussy cutting some paper trees twice and layering them and added some CE Chipboard Snowflakes and the Santa Flourish Sleigh. I embossed the runners and the railing of the sleigh with Antique Gold embossing powder and painted the sleigh using Silks Acrylic Glaze in Carmen.
On the folding spine, I've used some more Chipboard Snowflakes and a section of the Christmas Light Strand 4 chipboard. I painted the Christmas Lights with Silks Acrylic Glazes and then added Glossy Accents to the bulbs to give them a nice, dimensional shine.
Finally, for the pages inside the album, I have used lots of Chipboard Snowflakes on the pockets to decorate the pages. I also used a tiny chipboard button (painted with Silks Acrylic Glaze and then treated with Glossy Accents) on the inside of the spine to hold the tassels and ornaments I used to add a little more interest to the spine.
Now I just have to add the photos and journalling and my son's Elf on the Shelf Album will be complete!

I hope you enjoyed my fun little Elf album! Happy Crafting!

Friday, January 1, 2016

Imagine - Creative Embellishments January Challenge

Happy New Year Scrappy Friends! I'm so excited to share my first project as part of the Creative Embellishments Design Team! This project is part of the Creative Embellishments January Challenge - using the photo below as inspiration and circular elements on the project.
I was inspired by the Steampunk feeling of the January Challenge image and decided to create a fun Steampunk Canvas featuring my son. 
I've used a whole lot of different Creative Embellishments chipboard elements to create my project: pieces of the Harlequin Panel, the Steampunk Hat Set, Steampunk Wings Set 4, some of the 1-inch Gears, two of the Industrial Hanging Light Bulbs, and the Imagine title. The chipboard pieces were painted with black gesso and then treated with a combination four different colours of Inka Gold rubs, Gold and Copper Dimensional Paints, glossy accents and both holographic and Black Soot Distress embossing powders. I've also used Creative Embellishments Distressed Harlequin Stamp to emboss the pattern on the top hat! Here are some close-ups and different angles of the canvas!


Join us and play along with the Creative Embellishments Challenge this month for a chance to win some fantastic CE Chipboard! 

Challenge Rules:
  • Create a NEW project layout, mini album, tag, card, canvas, etc….as of 1st of the challenge month 2016.
  • Please add your entry to the  InLinkz box on the Creative Embellishments blog post to be eligible for the prize. You have until the last day of each month 11:55 pm eastern time to enter.
  • It is required that you mention in your blog post that you are playing along at Creative Embellishments together with a link back to the CE blog. Please make sure to reference the CE challenge. Please no back linking.
  • Combining with other challenges is permitted. 
  • We would love to see you USE AT LEAST one CE product on your projects but it isn’t required to play along. However everyone that does use CE products will get and extra chance at winning.
  • WINNERS will have TWO weeks to claim their prize. The winners are announced the day after the challenge ends and on the same month’s challenge post.
Thanks so much for stopping by my blog today!
I wish you all the best for the year ahead and I hope you'll come back and visit often!