Showing posts with label Artist Trading Card. Show all posts

Monday, September 24, 2018

Alice in Wonderland ATCs ~ Creative Embellishments

Hi There Creative Embellishments Fans! Sarah here today to share a set of three Alice in Wonderland ATCs with you! I used playing cards (the Jack, Queen and King of Hearts) as the base for these ATCs and covered the back of the cards with book pages from Alice in Wonderland. Then, I fussy cut illustrations from the book for each ATC. I embellished each ATC with a CE Chipboard piece painted using Prima Metallique paints, as well as a few metal elements and some moss.
For the "Drink Me" ATC, I used one of the CE Potion Bottles. After painting it, I added an eyelet and attached it to the ATC using a small chain.
For the "Hidden Door" ATC, I used one of the CE Simple Key Hole Plates.
For the Caterpillar "Who Are You?" ATC, I used two of the CE Mini Mushrooms.


Tuesday, August 15, 2017

Earthy ATCs ~ Creative Embellishments

Today I'm sharing a set of four "Earthy" ATCs created for the Creative Embellishments Design Team. I love making ATCs to try out new products/techniques and use up bits and pieces from my stash. I started out with some heavy black cardstock and used mod podge to cover it with scrunched up Tim Holtz Melange Tissue Wrap. Once that had dried, I used four colours of Distress Oxide Inks in Earth-tones to colour the ATC backgrounds (i.e. Walnut Stain, Vintage Photo, Iced Spruce and Peeled Paint). Next I added some Tim Holtz Remnant Rubs to each of the ATCs and then wrapped them with black thread attached with tiny staples. Next - time for the CE chipboard/wood veneer elements!
On the first ATC, "FOUND", I used a Nautical Compass Chipboard piece that I trimmed the right side off of - don't be afraid to cut up your chipboard pieces! I embossed the compass with Ranger Black Embossing Powder and then rubbed some of the Iced Spruce Distress Oxide into the star section of the compass.
On the second ATC, "FRAGILE", I used one of the wood veneer Hearts - I actually used the reverse side of the broken/band-aid heart and embossed it with Distress Embossing Powder in Tattered Rose. I inked the edges of the two heart pieces with the Vintage Photo Distress Oxide Ink.
On the third ATC, "discover", I used one of the chipboard Globes, which I trimmed the left side off of and then embossed it with Distress Embossing Powder in Old Paper and then rubbed the continents of the globe with the Peeled Paint Distress Oxide Ink.
On the fourth ATC, "be still", I had used a rub-on of a bird and wanted a bird-cage over it - but I didn't have any in my stash! So I used one of the chipboard Open Arched Windows and added a piece leftover from the Moroccan Lattice Panel to the back of it - you can layer your chipboard elements and remnants to create new designs! Next, I embossed the 'bird-cage' with Stampendous Shabby White Embossing Enamel and rubbed sections of it with the Walnut Stain Distress Oxide Ink.
I finished off the ATCs by adding some Prima/Finnabair Art Ingredients, including Frosted Mica Flakes, Granite Mica Flakes and Sterling Glass Glitter.

Thanks for stopping by my blog today - I hope you enjoyed seeing my ATCs!

Saturday, April 1, 2017

Bitten Bunnies ATCs ~ Creative Embellishments April Challenge

It's April! It's Spring (finally)! And a new month means a new challenge at Creative Embellishments! Here is this month's inspiration picture - and the challenge twist is to use flowers on your project!
I was inspired by the grass and bright colours of this month's challenge photo to create this fun series of Easter ATCs using the CE Bitten Bunnies.
I used the CE Fairy Dust 2 Stencil with some Prima Art Basics Modeling Paste to add some texture to the background of the ATCs. I created the colour gradient in the background using three colours of Distress Ink - Pine Needles, Bundled Sage, and Broken China and then I splattered the cards with water to dilute/remove some ink. I inked the edges of the ATCs with Distress Ink in Ground Espresso. I painted the Bitten Bunnies with Art Anthology Dimensional Paint in Chocolate Sorbet and used a dab of heavy white gesso for the eyes. I used SnowTex to create the puffy tail on the larger bunny. I also used the CE chipboard Grass Set, which I primed with white gesso and then misted with two colours of green mist; then I added glossy accents to the grass. Finally, I used two of the CE chipboard Flourish Eggs, which I painted with Prima Art Alchemy Metallique Acrylic Paints in Pink Blush and Rich Turquoise. I added some Stickles in Fruit Punch and Mermaid to the eggs to enhance the details.  Here are some close-ups of each card!


I hope you like my interpretation of this month's challenge - I can't wait to see what you create! Remember to follow the Rules for the Challenge so that you're eligible to win!

Challenge Rules:
  • Create a NEW project (i.e., layout, mini album, tag, card, canvas, etc…) as of April 1st 2017.
    • Please no back linking (meaning projects from previous months that may fit the challenge requirements). Please link only NEW projects.
  • Combining the CE Challenge with other challenges is permitted.
  • Please add your entry to the InLinkz box on the Challenge Post on the Creative Embellishments Blog to be eligible for the prize. You have until the last day of each month 11:55 pm eastern time to enter.
  • It is required that you mention in your blog post that you are playing along at Creative Embellishments together with a link back to our blog. Please make sure to reference our challenge. 
  • We would love to see you USE AT LEAST 1 OF CE products on your projects but it isn’t required to play along; however, everyone who does use CE product will get and extra chance at winning.
  • WINNERS will have 2 weeks to claim their prize. The winner will be announced on the CE blog post the day after the challenge ends.
Thanks so much for stopping by my blog! Happy Spring!

Wednesday, November 2, 2016

The Poisoner's Handbook ATCs

In October, I played along with an ATC exchange on the Scraps of Darkness/Scarps of Elegance Facebook Group. I created this set of three ATCs using the Materialize 8x8 paper stack, Curiosities Ephemera and Embellishments by Tim Holtz. I inked all the papers with Ground Espresso Distress Ink. I added Distress Crackle Paint and a Tim Holtz Apothecary Vial Label to the glass vial on the 1st ATC. I added an Incantation Metal Word Band, Gothic Remnant Rubs and a small skull to the 2nd ATC. For the 3rd ATC, I added an Arrow Adornment, some spider webbing and a small plastic spider. I'm calling this set "The Poisoner's Handbook ATCs" because each card has some poison warning labels.
Here are some close-ups so you can see the details on each card.


Thanks for stopping by my blog today!

Sunday, July 17, 2016

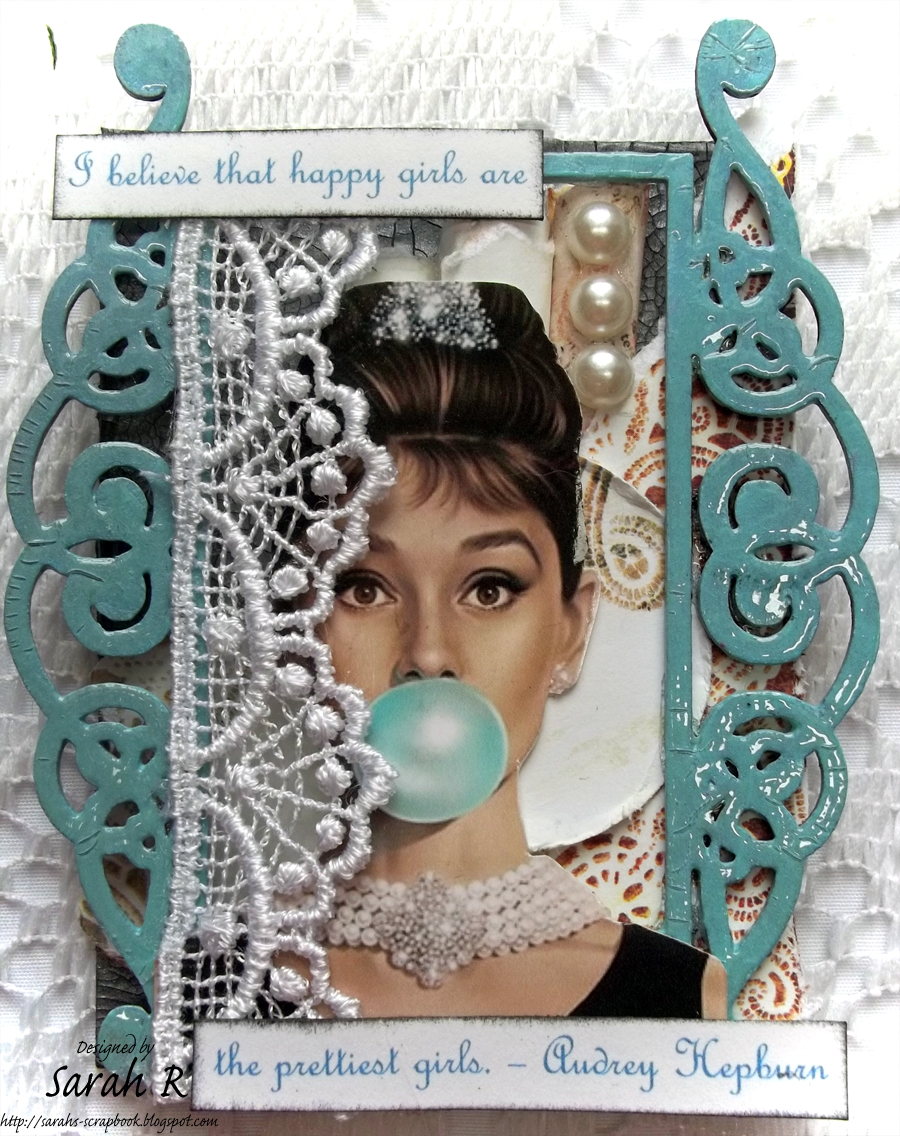
Hollywood Icons Artist Trading Cards ~ Creative Embellishments

Hi there crafty friends. Today, I'm sharing a set of Artist Trading Cards (ATCs) with you - inspired by two Hollywood Icons, Marilyn Monroe and Audrey Hepburn. I've used images fussy cut from some print-outs of paintings by the contemporary artist Michael Moebius - the Audrey Hepburn painting is called "Tiffany Blue" and the Marilyn Monroe painting is called "Pink Flavour". I always make two sets of ATCs so that I have one to keep and one to trade!
I've used one of each of the Creative Embellishments Mini Ornate Frames on each ATC. I painted them with Prima Art Alchemy Paints in colours that match the bubbles on each image. Then, I added Ranger Crackle Accents to the frame to get a crackled, vintage look. The backgrounds for the ATCs were created with Prima Art Extravagance Antique Silver Crackle Texture Paste. I inked the edges of the ATC with Tim Holtz Distress Ink in Black Soot. I also used papers from the 6x6 paper pad of Prima's Vintage Emporium collection. I added quotes by each actress to their ATC:
  • Audrey Hepburn - "I believe that happy girls are the prettiest girls."
  • Marilyn Monroe - "A smile is the best makeup any girl can wear."
Here are some close-ups of each of the four ATCs!


I'm trading two of these with my partner for the ATC Swap at Scraps of Darkness/Scraps of Elegance - I hope she likes them!

Wednesday, May 4, 2016

Oz-Inspired ATCs

Wow, April was a busy month and I wasn't as creative as I would have liked! But I do have a set of ATCs to share with you inspired by L. Frank Baum's book The Wonderful Wizard of  Oz. I made these for the March/April ATC swap at Scraps of Darkness/Scraps of Elegance and now that my partner has received them, I can share them with you! I just love the Oz stories - and I hope my swap partner does too!
First, we have the Scarecrow-inspired ATC. The background of Yellow Bricks was created with White Sand Texture Paste mixed with ColourArte Primary Elements in Golden Nugget. I layered a piece of rugged burlap and a patch of denim and added a twine 'belt' and the quote (matted on black cardstock).
Next is the Tin Man-inspired ATC. I used foil hardware tape which I scored and added 'rivets' to using my eyelet hole punch. I used Finnabair's Rust Effects texture paste along the seams/rivets. I made a heart out of air-dry clay and broke off and reattached one side of it. I painted it with ColourArte Silks Acrylic Glaze in Carmen and then added a generous coat of Ranger Crackle Accents.
Finally, we have the Cowardly Lion-inspired ATC. I painted the base with ColourArte Silks Acrylic Glaze in Forest Green - this made me think of the Emerald City - and then embossed the card with a Tim Holtz embossing folder. I cut the crown out of black cardstock twice using my Silhouette Machine and layered the two crowns with pop-dots in between. I roughly painted the top crown with ColourArte Silks Acrylic Glaze in Emperor's Gold and added a Liquid Pearl and two 'rubies'.
Thanks so much for stopping by my blog today - I hope you enjoyed this little visit to Oz. ;-)

Saturday, March 19, 2016

Graphic 45 'Couture' Pocket ATCs - with Tutorial

ATCs are so much fun to make and a great way of using up those leftover pieces of beautiful paper that you just can't bear to get rid of! I've created a new project using some bits and pieces left in my stash from the absolutely gorgeous Graphic 45 Couture Collection. I decided to create a pair of Pocket ATCs and have put together a step-by-step tutorial using Snapguide to demonstrate how to make one of these little gems!  I've included some photos of the finished Pocket ATCs below. For full details about how I created these, check out my Snapguide Tutorial.
Pocket ATCs - Front

Pocket ATCs - Front. Tickets removed.

Pocket ATCs - Back

Pocket ATCs - Back. Stamps and Tags removed.

Pocket ATCs - Back. Showing back side of tag insert.
 Thanks so much for popping by my blog today. Be sure to leave me a link in the comments if you try out the tutorial - I'd love to see YOUR creations!

Sunday, February 14, 2016

Happy Valentine's Day ~ Mon Amour ATC

A quick share for today - a Valentine's Day themed ATC I made for the January/February ATC swap at Scraps of Darkness/Scraps of Elegance!
 I've used the gorgeous Graphic 45 Mon Amour collection papers to make this ATC and decorated it with some white and pink paint splatters, fussy-cut flowers and cut-outs from the papers, along with some roses, clear mica flakes and fuschia glitter! Hope my ATC swap partner likes this one! Here are a couple of different angles of the ATC so you can see the layers!

Thanks for stopping by my blog today! Wishing you a Valentine's Day filled with Love and Happiness!

Tuesday, December 22, 2015

Vintage Santa ATCs

I created this set of ATCs for the November/December ATC exchange at Scraps of Darkness/Scraps of Elegance! I found out today that my exchange partner, Jenny, got them - so now I can share some photos/details about them!

My craft room is currently dis-assembled for redecorating, so I had to use some papers that I had handy - so I used the American Crafts Jack Frost 6x6 papers and some Vintage Santa images from Meg's Garden for the ATCs. I went with a wintery theme and stenciled on some Liquitex Opaque Flakes texture paste and poured Finnabair glitter over the wet paste for some extra shimmer. I made a wreath with some berry vine from my stash and punched out greenery from three different shades of green paper. I added some flowers from Wild Orchid Crafts and some winter berries from my stash and then finished the ATCs off with the 'snow' made from heavy gesso sprinkled with glitter. Here is a photo of the set and some close-ups of each ATC.


I really hope Jenny liked her ATC set! Happy Christmas!

Saturday, July 4, 2015

Vintage Pocket Letter ~ Meg's Garden DT

Hello! Today I am sharing a new project for the Meg's Garden Design Team using a combination of the gorgeous Butterfly Garden and Forgotten Meadows collections, as well as some embellishments from the Meg's Garden Store and from my stash. Have you heard of pocket letters? I just recently learned about them and, since I love making Artist Trading Cards, I thought it would be fun to create a pocket letter page, which is (essentially) a collection of coordinated ATCs in a trading card page! The Meg's Garden Mini-Papers and Cut & Create Ephemera papers are absolutely perfect for creating pocket letters - you can also use bits and pieces leftover from your larger papers! I wanted this page to look as though it were a collection of vintage memorabilia from a trip to Paris, so I have distressed and added Vintage Photo distress ink to the edges of the papers.
 Here are some close-ups of each of the rows  (out of the plastic trading card page to avoid glare)!


I hope you like my pocket letter page - it was so fun to make! If you create one with Meg's Garden products, leave me a link in the comments below so I can pop by for a look!

Happy Scrapping!

Meg's Garden Products Used:
Forgotten Meadows Paper Collection - Cut & Create Ephemera and Mini Paper Pack
Butterfly Garden Paper Collection - Cut and Create Ephemera and 12 x 12 A Flower Garden for Butterflies
Meg's Bundle of Goodies - Temptations in Cream and Sage and Temptations in Blue