Showing posts with label Baby. Show all posts

Wednesday, February 14, 2018

Sweetheart - Baby's 1st Year February Layout ~ Creative Embellishments

Hi there! I'm back with a new instalment in my "Baby's First Year" series of layouts. I've used a combination of several Graphic 45 paper collections (A Place in Time, Children's Hour, and Time to Flourish) to create this layout, along with a Creative Embellishments Sweetheart chipboard title from the Valentine's Hashtags and a wood veneer heart from the Lover's Hearts Set 2.
I layered my papers and cut-out elements from the papers (all inked with Distress Ink in Vintage Photo), added the sweet photo of my son and then added the title and wood veneer heart to finish off the layout. The title was a bit too long, so I ended up cutting the hashtag off of it. I painted the sweetheart title and the heart with Prima Art Extravagance Metallique Paint in Royal Red and then inked them with Distress Ink in Vintage Photo. Here are some close-ups/different angles so you can see all the layers and details!


Wednesday, January 31, 2018

New Beginnings - Baby's 1st Year January Layout ~ Creative Embellishments

Hi there! Today I'm back with a new installment in my "Baby's First Year" series of layouts. I've used a combination of several Graphic 45 paper collections (A Place in Time, Children's Hour, Mother Goose, and Time to Flourish) to create this layout, along with two Spoons from the Creative Embellishments Small Cutlery set.
I painted the spoons with Prima Art Extravagance Metallique Paint in Silver Spoon and then dry-brushed two tones of Metallique blue paint (Midnight Sky and Rich Turquoise) on the handles. Once the paint was dry, I added some Vintage Photo Distress Ink to the spoons to make them look slightly tarnished. Here are some close-ups and different angles so you can see all the layers and details!


Saturday, December 9, 2017

Believe - Baby's 1st Year December Layout ~ Creative Embellishments

Hi there Crafty Friends! Today I'm sharing another layout in my Baby's First Year series - created for the Creative Embellishments Design Team! Once again, I've used a combination of several Graphic 45 paper collections (A Place in Time, Children's Hour, Place in Time, and St. Nicholas) to create this layout - keeping with the theme I'm using throughout the 12 months of the album!
I've used the CE Chipboard Holly and Berry Flourishes and the Believe title from the Inspire Word Set on this layout. I painted the chipboard elements with Prima Art Extravagance Metallique Acrylic Paints and inked them with some Vintage Photo Distress Ink. I added Crackle Accents to the Holly Branches and Glossy Accents to the Holly Berries. Here is a close-up and a couple of different angles so you can see all the details and layers.


Wednesday, November 15, 2017

Timeless - Baby's 1st Year November Layout ~ Creative Embellishments

Hi there Crafty Friends! Today I'm sharing another layout in my Baby's First Year series - created for the Creative Embellishments Design Team! Once again, I've used a combination of several Graphic 45 paper collections (A Place in Time, Children's Hour, and Place in Time) to create this layout - as I plan on keeping a standard theme throughout the 12 months of the album!

I used the Timeless title from the Small Moments Border Words for this layout and simply painted it with some dark brown Acrylic Paint. I used the Fall Frame 2 to frame the photo. I painted the frame with Acrylic Paints in Fall colours and then splattered it with Dylusions Ink in Ground Coffee and inked the edges with Distress Ink in Ground Espresso to make them look like crunchy/distressed fallen leaves.


Tuesday, October 31, 2017

Trick or Treat - Baby's 1st Year October Layout

Hi there Crafty Friends! Happy Halloween! I have a quick share for you today - my Baby's 1st Year Layout for October. I just love the funny look on my son's face in this picture from his first Halloween! Such a cutie!
Once again, I've used a combination of several Graphic 45 paper collections (A Place in Time, Children's Hour, and Happy Haunting) to create this layout - and inked all the paper edges with Distress Ink in Ground Espresso. I used two chipboard Jolly Jack-o-Lanterns by Creative Embellishments to embellish the layout - I wanted these to look similar to those on the Happy Haunting paper, so I painted them with orange and green acrylic paint and backed them with some dark yellow paper - then I inked them with Ground Espresso Distress Ink and gave them a generous coat of crackle accents! Here's a close-up of the layered section and a couple of different angles so you can see the details/dimensions.


Thanks for stopping by my blog today! Happy Trick or Treating!

Friday, September 15, 2017

September Memories - Baby's 1st Year September Layout ~ Creative Embellishments

Hi There! Today, I'm sharing the second layout in my Baby's First Year series! Once again, I've used a combination of several Graphic 45 paper collections (A Place in Time, Children's Hour, and Mother Goose) to create this layout - as I plan on keeping a standard theme throughout the 12 months of the album!
I've used the "memories" title from the CE Small Moments Border Words. I rubbed the title with Prima Art Alchemy Antique Brilliance Wax in Fire Ruby and Metallique Wax in Vintage Gold - I also inked the edges with some Distress Ink in Vintage Photo. I also used the beautiful CE Flourish 6, which I rubbed with Prima Art Alchemy Antique Brilliance Wax in Lucky Emerald - I also inked some of the flourish with the Vintage Photo Distress Ink. To finish off this flourish, I added some small fussy cut flowers from the G45 paper. Here are some close-ups/angles so you can see all the details!


Thursday, August 24, 2017

Special Delivery - Baby's 1st Year August Layout ~ Creative Embellishments

Hi there! Today I'm sharing a more 'traditional' layout with you that I created for the Creative Embellishments DT! I decided it was high time that I got around to scrapbooking monthly layouts for 'Baby's First Year' (my son just turned 7, so better late than never)! I love mixed media scrapbooking, but for the baby album I wanted to go with a simpler, more traditional style - especially since I want the pages to fit inside the album! I've used a combination of several Graphic 45 paper collections (A Place in Time, Children's Hour, Mother Goose, and Precious Memories) to create this layout.
I think this layout is a great example of how just a couple of pieces of chipboard can really 'make' the page - I've used two of the leafy branches from the Chipboard Branches (set of 3), which I painted with acrylic paint in tones to match the papers. I used a dark brown for the branches and sponged two tones of green onto the leaves. Then, I used the branches to 'suspend' the fussy-cuts from the Mother Goose papers on the page - the two branches frame the central portion of the layout to direct your eye to the picture. Here are some different angles and close-ups of the chipboard elements.


Thanks so much for stopping by my blog today! I hope you liked my first 'Baby's First Year' layout - only eleven more to go!

Tuesday, March 1, 2016

Love & Family - Large Photo Tags ~ Creative Embellishments March Challenge

It is March 1st already - and that means Spring is just around the corner - and a new challenge is up on the Creative Embellishments Blog! This month I was inspired by the colours and watercolour feeling of the inspiration photo. The twist for March is to show/tell why you feel lucky, so I chose photos of me with my husband ("love") and my son as a baby ("family") because I feel so lucky to have two such special guys in my life! This month, the colours in the CE Challenge also just happen to correspond to the colours of this month's Prima Product Pick - so I'll be entering these tags for the March PPP challenge. 

Creative Embellishments Inspiration Photo
 

Prima Product Pick - March 2016
I've used two Prima Watercolor tags as the base for these - I stenciled each tag with a rose pattern stencil using Finnabair 3D Matte Gel and then misted them with two colours of Lindy's Stamp Gang Starburst mists to get an ombre effect. The green tag was misted with Edelweiss Moss Green and Ponderosa Pines Olive; the pink tag was misted with Bodacious Blush and Bougainvillea Fuschia. I've layered papers and tags cut from the Prima Tea Thyme collection under the photos and splattered the paper with white gesso and Shimmerz Inklinz in Burnished Buckle. I have used two Creative Embellishments Door Knockers at the top of the tags and two Creative Embellishments Keys as part of my flower clusters. To alter the chipboard, I painted it with white gesso and then Shimmerz Inklinz in Burnished Buckle. I finished off the chipboard by adding some Antique Copper micro beads to them using Matte Gel Medium.
Here are some close-ups and different angles so you can see all the layers and details.


Challenge Rules:
  • Create a NEW project layout, mini album, tag, card, canvas, etc….as of March 1st 2016.
  • Please add your entry to our InLinkz box below to be eligible for the prize. You have until the last day of each month 11:55 pm eastern time to enter.
  • It is required that you mention in your blog post that you are playing along at Creative Embellishments together with a link back to our blog. Please make sure to reference our challenge. Please no back linking.
  • Combining with other challenges is permitted.
  • We would love to see you USE AT LEAST 1 CE product on your project but it isn’t required to play along. However everyone that does will get and extra chance at winning.
  • WINNERS will have 2 weeks to claim their prize. The winner will be announced on this post the day after the challenge ends. Keep an eye out to see if you are a winner.
Thanks for stopping by my blog today - and I hope you'll play along with the March Creative Embellishments Challenge!

Tuesday, September 2, 2014

You and Me ~ C'est Magnifique September Sketch

The September Sketch has been revealed at C'est Magnifique! The Design Team has done an amazing job creating some truly stunning layouts based on the sketch to inspire you - so be sure to stop by the C'est Magnifique blog to see the team's creations with this sketch.
Here is my layout based on the sketch using items from the September C'est Magnifique Kit, Embellishment Add-on and Magnifique Mixed Media Kit. I also used some blue mist (13 Arts Ultramarine Chalk Mist) and a Prima Brad from my stash.
And here are a few close-ups of my layout!


Thanks for stopping by my blog today and I hope you'll join us at C'est Magnifique and play along with the September Sketch!

Sunday, July 6, 2014

Remember ~ Scraps of Darkness

This is my first layout with the gorgeous Scraps of Darkness Perfectly Stunning Kit for June 2014. This will also be my last kit designing for Scraps of Darkness - I have had an amazing year with SOD and can't say enough about how wonderful Melinda (the owner) and the SOD/SOE Design Teams are - they have made my DT experience truly fantastic!

Now, to share my first layout - based on Suepup's Sketch for the June Kit. Here is my layout, using the kit's fantastic Marion Smith Designs Nirvana papers, Prima flowers and embellishments (Main Kit, Flower Add-on and stash) and the Art Anthology media included in the Colour Add-on.
And here is the June Sketch:
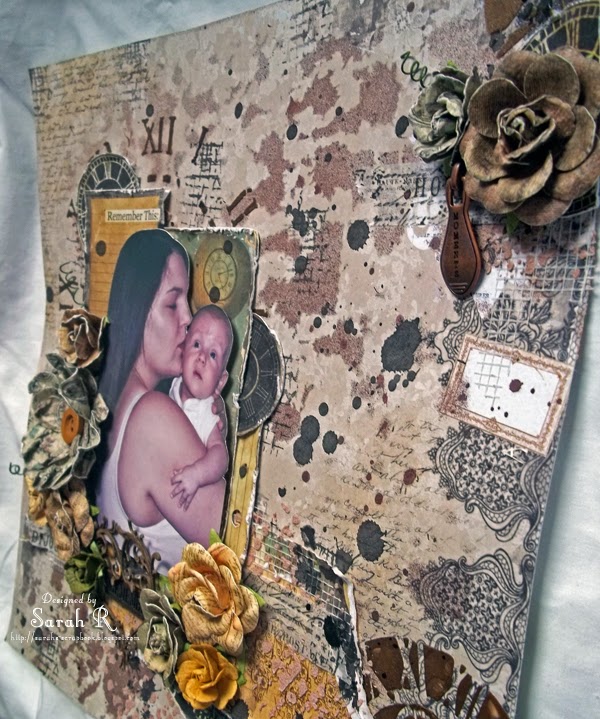
Rather than using paper for the large circle element in the background, I started out by masking a large clock face using a The Crafter's Workshop 12 x 12 Time Travel  template with the Art Anthology Velvet Dimensional Paint in Kona. I used the Tim Holtz Clockwork layering stencil (previous SOD kit) with the same paint on the right side of the layout. Once that had dried, I used the Prima Stain 12 x 12 Mask and misted the background page with the Art Anthology Mocha Colorations Spray. Then I started layering my torn and distressed papers along the bottom, adding in some drywall tape and pieces of Tim Holtz Tissue Tape (Sketchbook pack). Once that was in done, I did some more masking in a few places using The Crafter's Workshop 12 x 12 Well Rounded template with the Art Anthology Stone Effects Dimensional Medium  in Sandstone and then some stamping with black ink and a mesh stamp. The last bit of layering was the distressed matting for the photo and the fussy-cut clocks. As a final touch I did some splattering using Liquitex Ink in Carbon Black. To complete the layout, I added the photo, the Prima Flowers and Embellishments and included a chipboard heart from my stash that I painted with the Kona paint. Here are some close-ups!


Thank you so much for stopping by my blog today - I appreciate your visits and comments so much.

Happy Scrapping!