Sunday, May 29, 2011

"Roar?"

There are so many cute baby-related collections on the market - I just love Little Yellow Bicycle's new Baby Saurus collection - so I grabbed some of it to scrap some photos of my son. This layout is based on Creative Scrappers Sketch #154. The photos of my son are the "progression of a yawn" and were taken when he was almost 3-weeks old.
This is a very simple layout -- not a lot of techniques -- just some distressing and misting. The main papers are from Little Yellow Bicycle's Snugglebug Collection. The photo mat and title use Bo Bunny Double Dot paper and the title and journaling have some Bazzill Basics textured cardstock as well. The Chipboard Stickers are from the Little Yellow Bicycle Baby Saurus collection. I lightly distressed the edges of all the papers. I cut the dinosaur tracks on my Silhouette and used the negative cut-out to mist the tracks onto the page.
 I printed the journalling and cut it into strips and matted it on the Bazzill textured cardstock. I used 3D foam adhesive to attach the journaling to the page. The title was cut on my Silhouette - I thought it looked a little flat so I grabbed my Sakura Glaze pen and added the orange dots on top of all the dots in the Bo Bunny paper (I  then went back and added the orange dots to the photo mat too).

TFL,
Sarah

Materials Used:
Papers: Little Yellow Bicycle Snugglebug Collection - "Boy Green Flannel" and "Girl Orange Flannel"; Bo Bunny Double Dot Paper Powder Blue Dot; Bazzill Basics Textured Cardstock (Orange); Recollections White Cardstock; Little Yellow Bicycle Baby Saurus Chipboard Stickers; Tattered Angels Glimmer Mist in Forest Green; Sakura Glaze Pen in Orange; 3D Foam Adhesive; Xyron 1.5" Create a Sticker; Memory Tape Runner XL.

Friday, May 27, 2011

"Remember" - Our First Dance

This layout is my interpretation of the May 15 sketch from Once Upon a . . .Sketch. I used The Color Room's Palette #59. The picture is of my husband and me  -- our first dance as a married couple.
 
The background paper is from Pink Paislees Butterfly Gardens collection (love this collection). Ive added some chocolate brown textured cardstock, which I punched with a Fiskars edge punch, and some green and white polka dot paper from Making Memories Vintage Findings Home Kit; the sheer envelope is also from this kit. The postcards are cut from a Making Memories Embellishment Paper (Passport Collection). The "Remember" card is from Glitz Designs Love Nest Whatnot. All the papers were distressed and I inked the edges of everything except the background page with Tim Holtz Distress Ink in Walnut Stain.

I printed the journaling on vellum and then cut it to fit the shape of the fancy circular green and white polka-dot cut-out.  The journaling reads, "Our first dance together as husband and wife. Our song was Andrea Bocelli's Con te Partiro."
The floral embellishments on this page are handmade – simple gathered ruffle flowers. I saw some lace flowers on a layout by IngridG on Scrapbook.com – I fell in love with them and just had to try making my own. I love how this flower turned out, especially how the cameo centre completes it! I added a couple of peek-a-boos at the edge of the layout using the same lace as in this flower. The green flowers are made with some ribbon from the Making Memories Vintage Findings Home Kit and Ive added a simple glass pearl as the centre. The pearl sprays are from A Brides Wish Wedding Collection.
I love the Dusty Attic hinges and have been wanting to use one on a layout for a while. I thought the heart shape of this one was perfect for this layout. I first inked the hinge with  Tim Holtz Distress Ink in Walnut Stain and then misted it with Tattered Angels Glimmer Mist in Marshmallow. I then gave it a thick coat of Ranger Crackle Accents. I really like how this turned out – but I think next time Ill try Irene Tan's tutorial for creating a metallic hinge look.

TFL,
Sarah

Materials Used:
Patterned Paper: Pink Paislee Butterfly GardensBotanical Gardens, Making Memories Embellishment Paper – Passport collection Making Memories Vintage Findings Home Kit – Green and White Polka Dot Paper, Sheer Envelope and Green Ribbon; Bazzill Basics Chocolate Brown Textured Cardstock; Vellum; Glitz Love Nest Whatnot; Creative Décor Lace, We R Memory Keepers Cameo; Glass Pearl Beads; A Brides  Wish Wedding Collection Pearl Sprays; Dusty Attic Hinge; Tim Holtz Distress Ink – Walnut Stain; Tattered Angels Glimmer Mist – Marshmallow; Ranger Crackle Accents; Fiskars Edge Punch; Memory Tape Runner XL; Glue Dots – Memory Book and Mini.

Wednesday, May 18, 2011

"Meow"

This is my LO to play along with the Scrap That! May "Misting" challenge. I based my LO on the May 1 sketch from Stuck?! Sketches. This layout is a total departure from my normal style (way more white space than I'm used to) but a good exercise to get me out of my comfort zone. The photo is of my cat when he was about 15 weeks old.
I started this layout by misting the two corners of the white background page with Smooch Spritz in Log Cabin. The paper strips were simply some leftover scraps I had saved. The layout looked a little flat - so I used my paper crimper on the strips to add some texture and dimension. The pattern paper is from Basic Grey's "Max and Whiskers" collection; I love the cats on this paper and made sure to cut the smaller circle with the orange cat as the central image. I cut the "meow" title using my silhouette - I cut it twice and layered the two titles to make it stand out a bit better. The small letters in the journaling (if you can call it that) are by Jillibean Soup - I love these mini alphas they have out right now.

I have a stash of pet themed papers and embellishments - so I raided it for this layout. In addition to the paper, I've used some heartsy/pawsy ribbon, cat brads, a "best friend" brad that is actually from a Dog brads collection, and a large image brad from Karen Foster Designs' "Cat" collection.

That's it - a short list of materials and techniques. I still think its a darn cute layout though...

TFL,
Sarah

Materials Used:
Patterned Paper: Basic Grey - "Max and Whiskers" collection - Lightening, Coloured Cardstock - misc. from stash, Smooch Spritz in Log Cabin,  Jillibean Soup Kraft Mini Brown Alphas, Around the Block Paper Treats - "Best Friend" Brad, Eyelet Outlet Cat Back Brads, Michael's Special Value Ribbon, Westcott Paper Crimper, Quickutz Silhouette, Memory Tape Runner XL.

Monday, May 16, 2011

"Beloved"

I got my May Scrap That! kit this weekend and just love the Pink Paislee papers (alliteration anyone?!) - they're so romantic and perfect for a Wedding layout. I created this layout, which I've entitled "Beloved", based on The Color Room's Palette #58, as well as my interpretation of Sketch #155 at Creative Scrappers.
The Butterfly Garden papers by Pink Paislee are so gorgeous that they need very little embellishment; I used one sheet as the base page and fussy cut sections from another sheet to create the cluster of images on the lower left side of the page. I used a corner rounder on the papers and photo to soften the look and then inked the papers with Distress Ink in Walnut Stain. The doilies (behind photo and title card) were misted with Tattered Angels Glimmer Mist in Denim Blue, which was the perfect colour to match the hints of blue in the base page.

I found the paper flowers at a local surplus store for less than $2/pkg (wow!);  they're all from A Bride's Wish  (Wedding Collection).  I love the soft blue and white combination.

The title card is a Glitz Designs Whatnot piece from the Love Nest collection. The shape perfectly mimics the shape of the "Rose" emblem from the larger paper cutout and was just right for this page.

TFL,
Sarah

Materials Used:
Patterned Papers: Pink Paislee Butterfly Garden - "Botanical Gardens" and "Flower Blooms"; Glitz Love Nest Whatnot Card; EK Success Sticko Stickers - Mini Black Letters; Paper Doilies by We R Memory Keepers; Tattered Angels Glimmer Mist in Denim Blue; Zva Creative Self Adhesive Pearl; Flowers - A Bride's Wish  (Wedding Collection) - Wild Peony, Essentials, Wild Open Rose;  Tim Holtz Distress Ink in Walnut Stain; EK Success Corner Punch; Glue Dots - Memory Book; Memory Tape Runner XL.

Friday, May 13, 2011

"Me"

It is not often I find a photo of myself that I really love and definitely not often that I would scrap a photo of just myself - but I just love this photo that was taken by our wedding photographer when my husband and I were on our honeymoon! So, I decided to use the photo to play along with a couple of challenges:  I've based the design of this layout on The Dusty Attic May Sketch and am using The Color Room's Palette #57.
I just love the Laura Ashley velvet paper (base page) - it is so elegant and has such beautiful texture. On top of the velvet paper I've used some My Mind's Eye (MME) paper from the "Lost and Found" collection.  I stamped a row of flourishes along the left side of the MME paper; I also randomly stamped some smaller flourishes around the page. I added Distress Stickles in "Walnut Stain" to the stamped images to add some sparkle and texture. I edge distressed the MME paper and added some "Vintage Photo" Distress Ink and then scrunched the bottom left corner so that I could really bring attention to the Dusty Attic Chipboard Corner.
The red and cream circle is also a MME paper and was also distressed and inked. The paper on top of the circle was created by using simple kraft cardstock, a Prima mask and Tattered Angels Glimmer Mist in "Candy Apple Red". After the misted image dried, I fussy-cut around the mask's pattern and inked the edges of the cut-out shape. The velvet border behind the circle was made with a Fiskar's punch and some crushed velvet cardstock.

Most of the detail for this layout is in the papers - so I made some simple lollipop flowers out of coordinating papers as embellishments. The flower centres are simply some old brads from my stash that I painted with Smooch Pearlized Accent Ink in "Snickerdoodle".
I painted the Dusty Attic Ornate Corner with Distress Crackle Paint in "Tarnished Brass" and then added some Smooch in "Snickerdoodle" to portions of the corner. The title was cut out of plain white cardstock (using my Silhouette) and then also painted with the "Tarnished Brass" Crackle Paint.

TFL,
Sarah

Materials Used:
Patterned Paper: My Mind's Eye Lost and Found Collection - "Union Square Home Sweet Home Collage Paper" and "Union Square Favorite Union Station Paper"; Laura Ashley Velvet Paper; Doodlebug Designs Crushed Velvet Cardstock; Recollections Cardstock in Kraft and White; Bo Bunny Timepiece Collection "Moments"; Prima 8x8 Mask; Dusty Attic Ornate Corner #5; Fiskar's "Lace" Edge Punch; Tim Holtz Distress Ink in "Vintage Photo"; Distress Crackle Paint in "Tarnished Brass"; Distress Stickles in "Walnut Stain"; Tattered Angels Glimmer Mist in "Candy Apple Red"; Smooch Pearlized Accent Ink in "Snickerdoodle"; Kimberly Poloson Clear Stamps - Flourishes; Memento "Rich Cocoa" Stamp Pad; Xyron 1.5 in. create-a-sticker; Terrifically Tacky Tape; Dot Glue Runner (AdTech); misc. brads.

Thursday, April 21, 2011

"Adoration"

Happy Thursday of a long weekend - and welcome to my blog! I've completed a new layout, which I'm calling "Adoration". The picture is of me and my son when he was just 3-days old!
I've done a lot of layering on this layout using a combination of Bo Bunny Gabrielle and DCWV The Mariposa Stack papers - these papers are so complementary! I cut all the layers (with the exception of the base page) with wavy edge scissors. All the layers have been tool distressed and inked with Tim Holtz Tea Dye Distress Ink; I also water distressed the peach-coloured page. On top of the patterned paper layers, I added a Gabrielle Cut-Out and small paper doily, which I inked with Antique Linen and Tea Dye Distress Inks. The final touches on the layering are the beautiful Gabrielle Trinket, which I think looks so pretty on top of the doily, and the mini crochet doily that I tucked under the water-distressed paper.
The title is a chipboard word by Maya Road that I painted with Tim Holtz Distress Crackle Paint in Antique Bronze. That wasn't quite crackle-y enough for me so I topped that off with some Ranger Crackle Accents. I did a lot of fussy-cutting of butterflies for this layout - I love the tiny butterflies from the DCWV paper!

I handmade all the flowers on this layout. The large flower was made with individual petals stitched together around a cluster of artificial flower stamens. (The stamens were surprisingly hard to find - I ended up ordering a bunch on ebay from Malaysia!) This is the first time I've made this type of flower and it took a LONG time. I'm pretty happy with the result - but hoping to improve my technique.

The smaller flowers were each made from a single piece of ribbon using a U-gathering stitch. They were then wrapped around and stitched to the small cluster of flower stamens and the petals were also stitched together. Don't they look pretty on the Zva pearl swirl? These flowers were super-easy to make and can be made in 3-5 petal varieties and in a lot of different sizes depending on the width of ribbon you use.

That's all for today. Have a great Holiday weekend!

TFL,
Sarah

Materials Used:
Patterned Papers - Bo Bunny Gabrielle Collection - Gabrielle Dot, Gabrielle Cut-Outs; DCWV The Mariposa Stack; Chipboard Title by Maya Road; Tim Holtz Distress Crackle Paint in Antique Bronze; Tim Holtz Distress Inks in Tea Dye and Antique Linen; Ranger Inkssentials Crackle Accents; Recollections Boutique Fleur Mini Crochet Doily; Small Paper Doily by Wilton Enterprises; Bo Bunny Gabrielle Trinket; Smooch Pearlized Accent Ink in Tuxedo (used on the larger butterflies to accent the black areas); Michael's Special Value Ribbon; Artificial Flower Stamens; Zva Creative Adhesive Pearls; Glue Dots - Mini and Memory Book; American Crafts This to That Glue Runner.

Wednesday, April 13, 2011

My Layout is Featured on Scrapbook.com

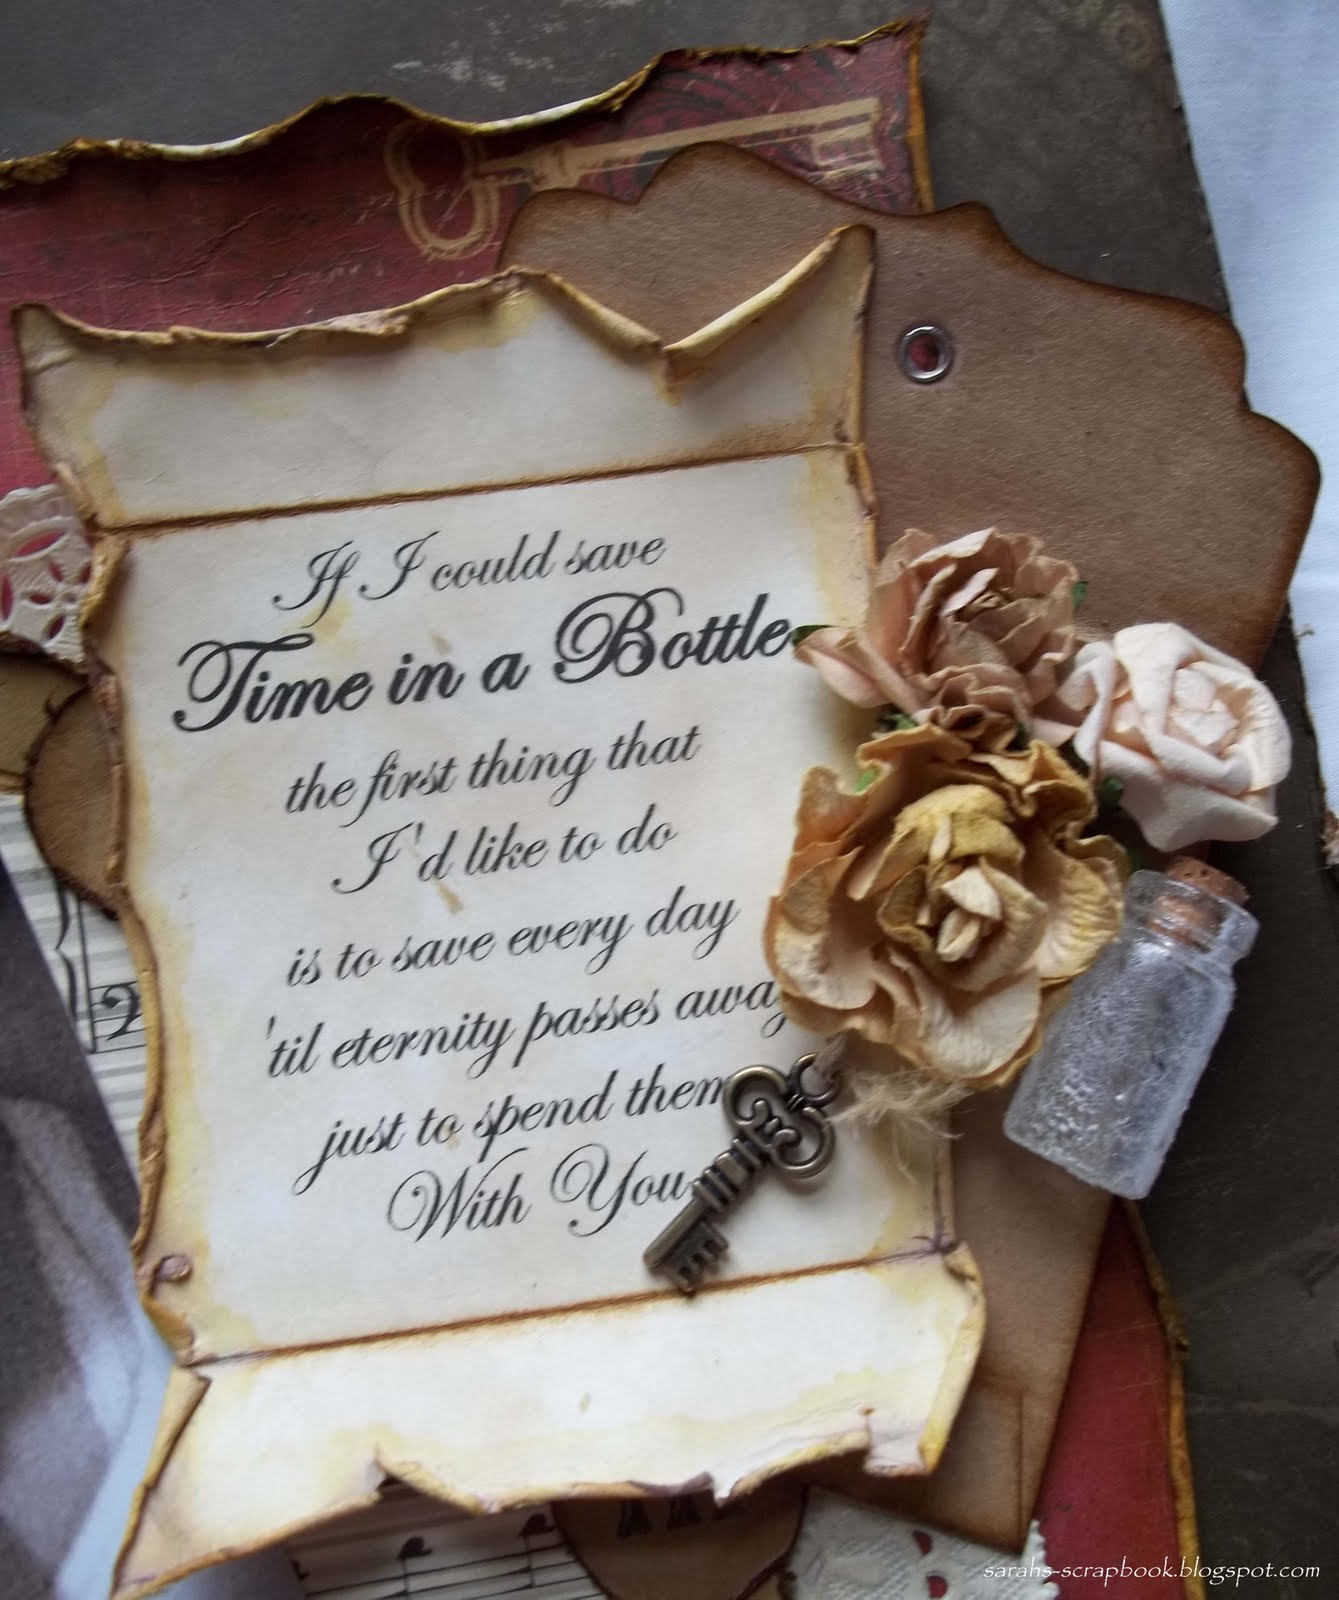
Okay, so I know it is a little thing - but is very cool and I am thrilled that my "Time in a Bottle" is showing up as a featured layout on the Scrapbook.com homepage. If you head over there, you might have to refresh the homepage a few times - but it'll show up!


See that layout in the bottom right corner of the picture? That's mine! :)

It is also showing up as a "favourite" featured layout in the gallery!
TFL,
Sarah

Tuesday, April 12, 2011

My Crafty Space

I thought I would share with you a picture of my (very small) crafty space. I have a corner of our guest room set aside for my scrapbooking - it is pretty crowded but I have it fairly well organized so that I can find things when I need them (most of the time).
A Few Organizational Highlights:
Those three rolling drawer units are a lifesaver for organizing. I have everything categorized by drawer and stored in Ziploc bags so I can easily grab what I need. The crates under the table are the perfect size for 12x12 paper. There is also a large rolling bin under the table where I keep my empty and partially finished albums. 

I save the "pizza" boxes from my Monthly Kits to store "in progress" layouts -- I keep any papers, embellishments, ribbon, etc. I think I might use on the layout in the box so I'm not constantly rifling through my drawers.

The tiered dessert stand (you can sort of see it between the computer desk and table) is perfect for storing all my stickles, paints and mists. And I have a cutlery organizer to store markers, chalk pencils, etc. 

TFL,
Sarah

Saturday, April 9, 2011

"Time in a Bottle"

I love the song "Time in a Bottle" by Jim Croce. Everytime I hear it, I think of my son - and how quickly time has passed since he was born. So, to save a little moment in time with my baby boy, I created this layout. It is a picture of me and William (he is two-weeks old here) that I took myself using my Blackberry (hence the graininess of the photo - but I kind of think that it works on this layout).

I used the Bo Bunny Timepiece Collection patterned papers for this layout. I love this collection and it was perfect for this layout. The background page has some simple tool-distressing and I inked the edge with Vintage Photo Distress Ink. I also used Vintage Photo ink on the edge of the red paper and then water-distressed it.  The clocks are all fussy-cut from one sheet of paper. I used Distress Crackle Paint in Clear Rock Candy on the faces of all the clocks to get an aged look and also inked all the edges of the clocks with Vintage Photo ink. The clocks were attached to the layout at different heights using foam adhesive to add some depth to the layout.

The "clock" in the centre of the layout was created using a circle of sheet-music paper layered on a circle of kraft paper. I then punched the 1" circles and stamped all the Roman numerals for the clock numbers. All the elements of the clock were tool-distressed and inked with Vintage Photo Ink. The doily behind the clock was originally white - so I inked it with Antique Linen Distress Ink to soften the colour.
I wanted the song-verse to look like an old letter - so I printed the verse on white cardstock, inked both sides of the note with Antique Linen ink and the edges with Vintage Photo ink and then water-distressed the edges. I added the folds to make it look like the note was taken out of the envelope on which it is resting (in fact - the note would fit perfectly in the envelope...).  I also inked the envelope with Vintage Photo ink. 

I added some flowers and the small key trinket to bring focus to the song-verse. The small vial on the note embellishment was originally clear glass. I painted it with Distress Crackle Paint in Clear Rock Candy to get achieve this look.

TFL,
Sarah

Materials Used:
Patterned Paper: Bo Bunny Timepiece Collection - Unlocked, Tick Tock, Moments, Moxxie Noteworthy Collection - In the Band; Recollections Cardstock - Kraft and White;  Paper Doily by Wilton Enterprises; Tim Holtz Distress Ink - Vintage Photo and Antique Linen; Tim Holtz Distress Crackle Paint - Clear Rock Candy; Maya Road square kraft envelope; My Mind's Eye Bits & Pieces - Key trinket; Kaisercraft Paper Blooms - Honey; Tim Holtz Idea-ology corked vial; Hungarian Hemp twine; Memento Ink Pad - Tuxedo Black; Dollar Store letter stamps; Keepsakes Memories adhesive foam dots; Glue Dots - Memory Book; Memory Tape Runner XL.

"One Kiss"

Can you believe it? Another new layout! I've got a tonne of duplicate wedding photos - so I thought I would use this one to play along with a couple of challenges. The design of the layout is based on Creative Scrappers Sketch #150. I'm also using the layout for the Scrap That! April Challenge, which required that the layout contain only two main colours along with any neutrals (black, brown, white, cream). I chose pink and green as the two main colours for my layout. I also submitted it for the first "Get Your Glitz On" challenge at the Glitz Design Blog.

There is actually a cute story behind the title of this layout. My husband and I got married in the Dominican Republic and the resort provided a photographer for the wedding. Our photographer, Lucia, was such a sweetheart. Lucia didn't speak fluent English - and during our photo session she must have said a hundred times "One Kiss" - in a beautiful Spanish accent. To this day, I still say to my husband (in an abominable Spanish accent) "One Kiss". It is such a happy memory from our wedding day!
I used a few pieces from my Scrap That! February Kit on this layout - the background page and the "Love" Bingo Card, as well as the Chipboard corner flourish.  
I really wanted the corner flourish to blend with the background page. To get this look, I first painted it white and then covered it with Tattered Rose Distress Stickles; while the Stickles were still slightly wet, I misted the flourish with Tattered Angels Glimmer Mist in Tattered Leather


The doily under the title was originally white - I misted it with Tattered Angels Glimmer Mist in Sweet Clover and then inked the edges with Colorbox Pigment in Moss Green. I love the Prima Sugar Alpha Chipboard Letters - I used 3D adhesive dots to make the title really stand out. The two paper border pieces are from the Basic Grey Porcelain Collection - the bottom (pink) border was fussy-cut out of a sheet of paper, the green border is from the element stickers; I then added a piece of ribbon to complete the layered border. Most of the flowers are by Prima or Recollections; however, if you look really closely, you can see that there are also some Sweet Clover misted Petaloo flowers underneath the larger flowers. 

TFL,
Sarah

Materials Used:
Patterned Paper: Glitz Design - Love Nest Collection - Damask, Basic Grey - Porcelain Collection - Chatsworth and element stickers; Glitz Design Love Nest Collection Whatnot - Love Bingo Card; Paper Doily by Wilton Enterprises; Michael's Special Value Ribbon; Prima Nursery Tales Collection Sugar Alpha Chipboard; Prima mini-roses in Fuschsia and Green Apple; Recollections Boutique Fleur Mulberry Paper Flowers; Petaloo Color Me Crazy Flower Layers; Claudine Hellmuth Studio Gesso in White; Distress Stickles in Tattered Rose; Tattered Angels Glimmer Mist in Tattered Leather and Sweet Clover; Colorbox Pigment in Moss Green; Chipboard Corner Flourish by ???; Glue Dots Minis; EK Success 3D Dots; American Crafts This to That glue runner.

"Itsy Bitsy Spider"

Here is another new layout featuring (big surprise) my son. The picture was taken on his first Halloween and, as you have probably guessed from the title of this post, he was dressed up as a spider.

The design of the layout is based on a Page Maps sketch for the Scrap That! March Blog Hop; however, I flipped the sketch 180 degrees for my layout.


There are quite a few different papers in this layout but not a lot of techniques. I distressed all the papers and inked the edges with Black Soot Distress Ink. I used machine stitching on the black velvet ribbon and to create the spider-web strings on the left side of the layout.

Materials Used:
Patterened Paper: My Mind's Eye - The Spider's Web Collection - Spider's Silk, Cauldron Bubbles,  Haunted Parlor, Pumpkin Patch, and borders; Echo Park - Happy Halloween Collection - Spider Webs; and Making Memories - Spook Alley Paper Pad; Tim Holtz Distress Ink - Black Soot; Pink Paislee Chipboard Alphabets Expressions - Licorice; Creatology Halloween Felt Stickers; Dashes, Dots & Checks - Black Velvet Ribbon; Glue Dots - Mini and Memory Book; Memory Tape Runner XL.

TFL,
Sarah

Saturday, April 2, 2011

"First Visit with Santa Claus"

Well, I got another layout finished! This is a picture of my son on his first visit with Santa Claus. I converted the colour picture to a sepia-tone because I wanted a vintage look to go with the fabulous Graphic 45 "Christmas Past" papers.
There is (clearly) a lot of distressing on this layout. I did simple tool-distressing around the outside edge on the base page and around the inside of the "frame" in the top page. I water distressed both the cut-out in the base page to frame the picture as well as the outside edge of the top page. I handmade the paper flowers, which I'm calling "distressed poinsettias".
I treated the chipboard swirls with both Perfect Pearls Heirloom Gold Mist and Tattered Angels Tattered Leather Glimmer Mist....and just to get a bit more sparkle and texture I threw some Chocolate Glitter on it too.
I love how the title scroll turned out for this -- I printed the title on white cardstock (Anglican Text font if you're wondering - I love it on this layout) and then treated both sides of the paper with Antique Linen Distress Ink. I then distressed and inked the edges with Vintage Photo Distress Ink.

Materials Used: 
Patterned Paper - Graphic 45 Christmas Past Collection - Visions of Sugarplums and Let it Snow; Recollections Cardstock - red, green and white; Tim Holtz Distress Ink - Vintage Photo and Antique Linen; Perfect Pearls Mists - Heirloom Gold; Tattered Angels Glimmer Mist - Tattered Leather; Pink Paislee Pixee Stix Glitter - Chocolate; Chipboard and Brads from stash; Glue Dots - Memory Book and Mini; Keepsakes Memories Foam Adhesive; Memory Tape Runner XL.

TFL,
Sarah

Sunday, March 27, 2011

"Baby Boy"

Finally, I completed a new layout! The picture is of my son, William, when he was just two-days old.

This is a layout I had in mind for a while. I wanted to do a "quilt" background -- so there is lots (and lots) of machine stitching and hand stitching on the layout. The stamped images on the Quilt were made using watermark ink and Distress Embossing Powder -- I also embossed the title letters.

I made the ribbon flowers by hand (and subsequently went out to purchase a thimble - ouch!).


Materials Used: Bo Bunny Back to Basics Cardstock - Dark Denim Dot, Recollections White Cardstock, Three Bugs in a Rug Patterned Paper - Welcome to the Jungle "Animal Stackers", Tim Holtz Distress Embossing Powder "Faded Jeans", Versamark Watermark Ink Pad, Inkadinkado Inchie Stamps "Baby", Prima Marketing "Say it in Crystals", Basic Grey "Bling It",  DMC Embroidery Floss, Offray Ribbon, Michael's Special Value Ribbon, Old Buttons from my stash, Glue Dots - Memory Book, Memory Tape Runner XL.

TFL,
Sarah

Saturday, March 26, 2011

Handmade Ribbon Flowers

I tried my hand at making some handmade ribbon flowers today -- and I'm pretty darned happy with how they turned out! They are for a layout I'm trying to finish - but I just had to show them off now! (Stay tuned for the full layout....)

I know that I'm going to be making a lot more of these - I just love them!
TFL,
Sarah

Tuesday, March 15, 2011

Now and Forever - French Bulletin Board Layout

This is a layout I did for our Save the Date/Wedding Invitations. I wanted it to look like a French Bulletin Board - and I was pretty happy with how it turned out.


Let me know if you'd like to see how to do the ribbon background - it involved some  careful measurements and a grid on scrap-paper - I'd be happy to post a quick tutorial for it.
TFL,
Sarah

Monday, March 14, 2011

Prima Canvas Flower - Copycat Tutorial

I visited my local Scrapbooking store this weekend and picked up a sheet of Prima Mistable Canvas Flowers. I just love them - but you can only get about four to six flowers out of a sheet, depending on how much you layer the pieces. So I thought, "How can I make more of these without buying more of the canvas sheets?" Here's what I came up with!

Tools Required
1 full sheet of Prima Mistable Canvas Flowers
1-2 sheets of vellum
black sharpie (fine point)
pencil
detail scissors
paper or fabric for creating your flower(s)
your adhesive of choice

1. Place a sheet of vellum over the canvas flowers and trace the shapes using your sharpie. The sharpie doesn't soak through the vellum - so don't worry about ruining the original
canvas sheet.

There are a few duplicate shapes on the canvas sheet -- you only need to trace each individual shape once. This will give you a total of 12 flowers. I was able to trace all 12 onto one sheet of vellum by shifting the paper around to fit the flowers closer together.


2. Cut out each of the vellum flowers. Now you have some traceable templates to create lots of flowers from!


3. Pick the flowers you want to use to create your final bloom. The vellum flowers are great because you can try a lot of different layering options before cutting any patterened/cardstock for your final product.

4. Using your pencil, trace your flowers onto the reverse side of the papers/fabrics you'll be using for your bloom.


5. Cut out each of your paper/fabric flowers.


6. Assemble your flower!
For the flower below, I misted the cut-out flowers with some water and gave them a good crumple before assembling the final bloom. I also created a beaded centre for the flower. I'm not 100% happy with this centre piece yet, but I'm going to work on perfecting it and maybe you'll see "Beaded Flower Centres" as another tutorial!


I'm sure I'll be making a lot more of these in the future!
I hope you found this helpful (and that it saves you a few pennies)!
TFL,
Sarah

Sunday, March 6, 2011

Finally, a layout . . . . "together"

Okay, so this is a layout I did last year, but I'm feeling guilty that I haven't posted anything yet....


The layout is based on a sketch by Karan Gerber.
The patterned papers are from the DCWV Old World Stack. The bling is Prima. I think the smaller flowers are Prima too but I can't remember. The large flower is Bazzill Basics.
TFL,
Sarah

Thursday, March 3, 2011

I'm a Winner!

Wow! I never win anything. I mean, not even a $3 lotto ticket. And this morning, as I was checking the blogs I follow, I found out that I WON the February Scrap That Blog Hop! I am SO excited! Of course, this means I HAVE to get scrappin'!
What a great start to the morning! Happy Thursday!
TFL
Sarah

Saturday, February 26, 2011

New Blog for a New Chapter....

I've officially started a new chapter in my life. I'm a Mommy! 
So I thought this was the perfect time to start a new blog. 
I had great intentions of staying on top of my (thousands of)  baby photos and getting lots of layouts done. Obviously that hasn't happened! But stay tuned! Now that we're settling into a routine - I'll have a (little) more time to scrap!
TFL
Sarah