Monday, December 31, 2012

Imaginarium Designs 2013 Design Team!!!

Reblogged from the Imaginarium Designs Blog:

Hello Everyone,

Hope you all have a wonderful and safe 2013.

Last week, we spent a day visiting all the blogs and sites for all the Ladies and Gent who applied for our 2013 Design Team. All I can say is that it was a very hard task. The standard of submissions was outstanding. There is such incredible talent out there!

We would have love to have everyone and found it really hard narrowing it down to a short list.

If you didn't make the final team then please don't despair as we will be contacting 11 of you to be a guest designer for one month this year.

We will also be sending everyone who applied, a small sample of our chipboard to play with and ask that the project you make using it be loaded up to our ning site.

It is always hard saying good bye to team members leaving us. Some of our wonderful girls from this year have decided to move on and we wish them all the love and luck in the world for their future crafty adventures. 
So over the next few days we will be posting some of our favorite projects done by our departing team members.

We are saying a saying a sad farewell to...
Asuka Miyamoto
Gloria Stengel
Heather Jacob
Adriana Bolzan
Hilde Janbroers-Solk
Nadia Cannizzo 

We wish them a wonderful and creative 2013.

Next week we will start introducing our new 2013 Design Team to you.

But for everyone wondering who will be joining us, here is the list (in no particular order)

Natalie May Design Team Co-Coordinator - Australia
Lady Grace Belarmino - Singapore
Shell Carman - Australia
Karen Zueger - USA
Patricia Basson - USA
Larissa Albernaz - Brazil
Evengia Petzer - South Africa
Miranda Edney - USA
Jolaine Frias - USA
Julie McKenna - Australia
Maiko Miwa - Japan
Sandrine Dawes - Australia
Sarah Routledge - Canada THAT'S ME!!!
Amy Voorthuis - Netherlands
Evgenia Sokolinskaya - Russia
Ingrid Gooijer - Netherlands
Sandie Edwards - Australia
Carole Maurin - France
Solange Marques - Brazil
Gerry Van Gent -Netherlands
Sue Smyth - Australia
Kaori Fujimoto - Japan

Congratulations Ladies!

With such a talented team it looks like being an amazing year! 

Have a fabulous New Year!

Friday, December 28, 2012

ScrapThat! January Kit Reveal and Blog Hop!


Welcome to the ScrapThat! January Kit Reveal and Blog Hop!! 

If you came here from Tracey Gregory's blog, 
then you are on the right track!

If you want to start at the beginning, here is the order:

We are so excited to show you our frosty wonderland themed January kit.
Not only does it feature the beautiful "Powder Mountain" line by BoBunny,
but BoBunny is also joining us on our blog hop this month!!
Leave a comment on their blog post for a chance to win a
BoBunny prize package!

We are so thrilled to have the amazing Kelly Klapstein
join us as our January Guest Designer!


Kelly is a contributing writer for Canadian Scrapbooker magazine. Not only does she create amazing pages, but she also loves to share her passion through teaching. She was a Featured Instructor at the 2012 Great Canadian Scrapbook Carnival.

So, without further ado . . . introducing our
~ January Kit Reveal ~ "Flakes of Snow"

Featuring BoBunny's "Powder Mountain" line, this kit matches crisp whites and blues with the earthiness of warm browns. When you open the box, the sparkles and textures just long to be played with!

Included are flowers from Prima and leaves from WOC, jewels and buttons from BoBunny, multiple ribbons from May Arts and more! Don't just think winter, as our DT will show you, this kit offers myriad layout possibilities!

Main Kit

Embellishment Add-On

Flower Add-On
 

Paper Add-On

More details on this sparkling Collection can be seen here: ScrapThat! Store


We are currently accepting new
Kit Club Members.
For more information,
complete the form on the link below:

Look what Amarilys created for January's sketch challenge!
See details about the challenge here: Sketch Challenges

Everyone is welcome to participate, all entries due by January 15th

Our Blog Hop features 11 fantastic blogs including our Design Team.

We have been scrapping away and are so excited to show you our  creations!

Here are my creations with the gorgeous January Kit!

~ First Snow ~
Main Kit, EAO, FAO
Based on the January Sketch


~1 Yr ~
Main Kit Only


~ Snowflake Rosettes ~
Main Kit, EAO, PAO


Our SPECTACULAR January Blog Hop Prize
is a ScrapThat! July Main Kit,
 "Summer in My Garden", featuring Fabscrap's Organic Collection:
To qualify for this month's FABULOUS Prize you must complete the following:

* Visit each blog listed on the hop to see what each designer has created using this month's kit and sketch (comments are very much appreciated).
* Each designer's blog hop post will feature a word to make up a secret sentence, collect these
words along the way.
* You must become a FOLLOWER of each blog along the way and LIKE us on our Facebook Page!
* Post the ScrapThat! Blinkie on your blog.
* For you last stop on our Blog Hop return here to the ScrapThat! Chat Blog.
Leave a comment letting us know you have
completed the hop.
(Please do NOT include the secret sentence in your comments.)

*Email the secret sentence to Tracey Sabella: tracey@scrapthat.ca
The Blog Hop ends Sunday, December 30 at Midnight EST


The prize MUST be claimed within 3 days of the forum announcement which will also be made on the ScrapThat! Blog.
~ If left unclaimed a NEW winner will be chosen ~
**Winner will pay actual shipping costs for sending the kit from Canada.**
Shipping costs will be invoiced via PayPal unless you are a kit member, then your prize will be shipped with your monthly kit.
Prizes won during the month will be mailed out the first week of the following month.
Due to Customs clearance, International mailings sometimes take 30-75 days to receive.

My secret word is: Bo Bunny's

Next hop over to

For your final stop, return to the ScrapThat! Blog to let us know you have completed the hop.
Remember ~ only send the secret sentence to tracey@scrapthat.ca

All of us at ScrapThat! wish you and your families a Happy New Year!
We are looking forward to seeing a whole host of new layouts!
Let the scrapping begin!
We can't wait to see what you create!

Wednesday, December 26, 2012

ScrapThat! January Kit - Sneak Peeks!

Be sure to join the ScrapThat! Design Team for the Full Reveal and Blog Hop of the gorgeous ScrapThat! January Kit - starting December 28th. You don't want to miss this Kit - so many wonderful goodies - here are a few sneaks to whet your appetite!

Sunday, December 23, 2012

Merry Christmas AND a WINNER!

Just a quick post to wish all my blog followers and scrappy friends a wonderful Christmas and Holiday Season! I hope you are all as lucky as I am to be spending the holidays with the people you love.

Also, a little housekeeping - I've had a giveaway going since my birthday - and I don't think I should let it run over into the New Year. So, a winner has been selected using Random.org. And the winner is:

*Drumroll*
Congratulations Kelly Codd Greatrex - you've won my Birthday Celebration giveaway! Please contact me via email to collect your prize!

Saturday, December 15, 2012

My ScrapThat! December Kit Creations - Details and Close-ups

Hi There! I hope that you are enjoying a wonderful holiday season! Today, I will share with you some details and close-ups of my creations with the gorgeous ScrapThat! December Kit.

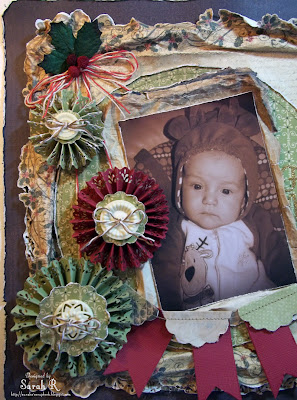
"First Noel"
Main Kit
This is the layout I created based on Amarilys' beautiful December Sketch! The picture is of my son on his first Christmas Eve in the cutest little reindeer jumper. 

Everything on this layout is from the Main Kit, with the exception of the buttons and the brown/white baker's twine, which are from my stash. I machine stitched a square about 1.5 ins. inside the edge of the die-cut page and then water-misted/scrunched the edges. I also added bits of edge-punched paper as peek-a-boos around the scrunched edge of the die-cut paper.

I love using the kit papers to create embellishments, so for this layout, I created a double-layered, stitched banner and three different sizes of rosettes. I "hung" the rosettes using the red/white bakers twine in the kit and added the holly leaves and berries as the "hanger" for the rosettes. For the banner, I handcut the flags and die-cut the scallops and machine-stitched them together to form a layered banner. Here is a close-up of the rosettes and part of the banner.
~~~~~~~~~~~~~~~~~~~~
"The Best Gift"
Main Kit, EAO, FAO, PAO
This layout was inspired by my scrappy friend Frank Garcia's layout entitled "Temps" and the song "The Best Gift" (which you can find on Barbra Streisand's Christmas Album). I wanted the page to look like unwrapping a gift - the best gift I ever got, my tiny baby boy, who is about 6 weeks old in this photo.

I handmade the large poinsettias on this layout - you can go here to see the tutorial on how I made them. The gold leaves and white roses are from Main Kit and FAO and the green spirals are the wires cut from the white roses. I also added additional poinsettia flowers that I picked up in the bargain bins at Michael's. I did a simple paint treatment on the chipboard bells and then added some of the gold border stickers from the EAO to echo the borders I used across the upper portion of the layout. I cut the gold balled wire from the Main Kit into individual  balls with stems to create the gold 'berry' clusters. 
I altered the white roses by smearing them with craft glue and then dipping them into the same mixture of micro beads that I used for the poinsettias. Here is a close-up of one of the altered white roses.
For the bottom portion of the layout, I tore two layers of paper, folded back the edges and secured them with gold 'berry' clusters. The flowers are a mixture of the FAO and flowers from my stash. I also added in a chipboad french horn from the EAO (again a simple paint treatment). The letters for the title are from the ScrapThat! November Kit.
 
~~~~~~~~~~~~~~~~~~~~
"Joy"
Main Kit, EAO, FAO
My final page with the kit - I wanted to go with a lot of silver and gold on this page with a few splashes of colour. Everything got misted with a generous coat of gold mist too! I have to apologize for the quality of the photos of this layout - the gold misting simply does not photograph well!

I started this layout by doing some stamping with two Kaisercraft stamps from my stash - a chicken wire stamp (just visible in the top left) and a postage marks stamp (right side). I used two of the speciality papers, some Prima packaging and some bits of one of the borders off the patterned paper in the layering here. I also added in some Prima Canvas resist pieces from my stash. 
 I used the white flowers from the FAO and the silver leaves and silver balled wire (again creating 'berry' clusters). I replaced the rhinestone cluster from the centre of the larger white flowers with the silver snowflake brads from the Main Kit. You can also see some fussy-cutting of the ornaments from one of the speciality papers.
I painted the chipboard ornament with white gesso, embossed it with an embossing folder and then brushed it with gold paint. 

~~~~~~~~~~~~~~~~~~~~
Thanks so much for visiting my blog today. I hope you found a little inspiration in my layouts and I wish you all the best during this holiday season!

Wednesday, December 5, 2012

Frosted Poinsettia Tutorial

I'm here with a quick and easy-peasy tutorial to create a beautiful frosted poinsettia!

Here is what you'll need:
  • Poinsettia Flower Die (or other flower of your choosing - this will work with any flower)
  • White Craft Glue
  • Diamond Dust
  • Microbeads (Optional)


STEP 1:
a.) Cut out your flowers.
b.) Mix together Diamond Dust and Microbeads (if using Microbeads).
STEP 2:
a.) Gently fold each edge of the flower petals upwards.
b.) Glue together the layers of your flowers, offsetting the petals.
STEP 3:
Outline the edges of each petal and the flower centre with white craft glue.
STEP 4:
Sprinkle mixture of Diamond Dust and Microbeads onto flower, shake off excess.
And that is it - like I said, quick and easy. Here is another view of the finished flower.
And here is the layout I used these frosted poinsettias on - made with the ScrapThat! December Kit.
Thanks for stopping by my blog today. If you give this little tutorial a try, be sure to leave a comment with a link to your project - I'd love to see what you do!

Tuesday, December 4, 2012

Fun with Chipboard - Imaginarium Designs DT Application

Well, I'm "throwing my hat in the ring" as they say and trying out for the Imaginarium Designs DT. So, I'm here to share ten of my favourite projects using chipboard!

1. "Love" - Chipboard Elements: Floral flourish and Title

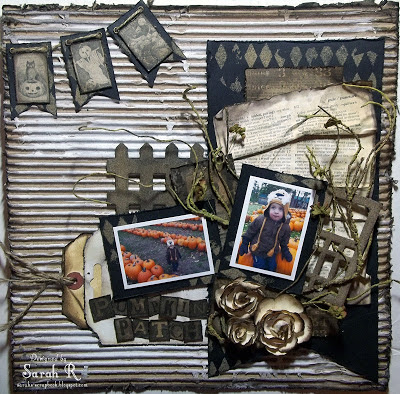
2. "Pumpkin Patch" - Chipboard Element - Door

3. "Things Are Always Better Than They Seem" - Chipboard Element - Leafy Branch

4. "If Happy Little Bluebirds Fly. . ." - Chipboard Element - Floral Vine.

5. "I Love You More" - Chipboard Element - Clock

6. "Good Boy" - Chipboard Element - Fence

7. "The Sun is Gonna Shine Above" - Chipboard Elements - Gears

8. "Hope" - Chipboard Element - Flourish

9. "Beauty" - Chipboard Elements - Dressform and Title

10. "The Best Gift" - Chipboard Elements - Bells and French Horn
Well, there it is - my top ten layouts with chipboard elements! Wish me luck - it would be an incredible honour to design for such an amazing, creative company like Imaginarium Designs!

Saturday, December 1, 2012

Scrap for Help Design Team!


I am so pleased and excited to announced that I am joining the Scrap for Help Design Team. It is an incredible honour to be part of such a talented group! Here is my bio from the newly designed Scrap for Help blog:

My term with the design team starts in 2013 - I can't wait to play along with the fabulous challenges at this fun and inspiring challenge blog! I hope you'll stop by Scrap for Help and play along too!