Showing posts with label Winter. Show all posts

Friday, December 1, 2017

Let it Snow ~ Creative Embellishments December Challenge

It's December 1st, which means a new challenge is up on the Creative Embellishments Blog. Here is this month's inspiration photo and the twist for this challenge is to use a border on your project.
I just loved this month's inspiration photo and have taken my inspiration from the colours and the glistening snowflakes to create this layout.
I've used an older Bo Bunny collection for this layout (Midnight Frost) because the colours were just perfect for the inspiration image and I promised myself that I would start using up my stash! I started off by whitewashing the dark blue background with some watered down gesso and layering some torn pieces to look like snow hills. I've used the CE Snowflake Stencil along with some white modelling paste on the blue background paper - and once the modelling paste was dry, I added some silver stickles to the snowflakes for a bit of sparkle. I also used the larger of the Snowflake Borders, the Falling Snow Set, and the Let it Snow title - I primed all these pieces with White Gesso and then embossed them with Stampendous Winter Wonderland Embossing Powder. I also added some Silver Stickles to the chipboard snowflakes. The embellishing for this layout was finished off with some tattered cheesecloth and silver sequins. 


I hope you will play along with this month's challenge and that you have a wonderful holiday season!

Challenge Rules:
  • Create a NEW project (i.e., layout, mini album, tag, card, canvas, etc…) as of December 1st 2017.
    • Please no back linking (meaning projects from previous months that may fit the challenge requirements). Please link only NEW projects.
  • Combining the CE Challenge with other challenges is permitted.
  • Please add your entry to the InLinkz box on the Challenge Post on the Creative Embellishments Blog to be eligible for the prize. You have until the last day of each month 11:55 pm eastern time to enter.
  • It is required that you mention in your blog post that you are playing along at Creative Embellishments together with a link back to our blog. Please make sure to reference our challenge. 
  • We would love to see you USE AT LEAST 1 OF CE products on your projects but it isn’t required to play along; however, everyone who does use CE product will get and extra chance at winning.
  • WINNERS will have 2 weeks to claim their prize. The winner will be announced on the CE blog post the day after the challenge ends.
Thanks so much for stopping by my blog! 

Friday, December 9, 2016

Rustic Holiday Cards ~ Creative Embellishments

Hi There! Today, I have a set of three Rustic, Wintry Cards using the Creative Embellishments chipboard Reindeer Set. I just love the combination of blue, brown and white for a wintry-look - so I've layered some older Bo Bunny papers with doilies, frayed burlap, cheesecloth and corrugated cardboard and added some burlap twine to the tag elements to create a rustic/shabby look for these cards. I used DecoArt Snow-Tex to add the snow and then splattered everything with watered-down white gesso. The plain chipboard reindeer were already the perfect colour for these cards - so I simply inked the edges of them of Distress Ink in Ground Espresso and added a little 'snow' to their antlers and hooves!
Here are some close-ups of each card:


Thanks so much for stopping by my blog today! Happy Holidays!

Tuesday, December 22, 2015

Vintage Santa ATCs

I created this set of ATCs for the November/December ATC exchange at Scraps of Darkness/Scraps of Elegance! I found out today that my exchange partner, Jenny, got them - so now I can share some photos/details about them!

My craft room is currently dis-assembled for redecorating, so I had to use some papers that I had handy - so I used the American Crafts Jack Frost 6x6 papers and some Vintage Santa images from Meg's Garden for the ATCs. I went with a wintery theme and stenciled on some Liquitex Opaque Flakes texture paste and poured Finnabair glitter over the wet paste for some extra shimmer. I made a wreath with some berry vine from my stash and punched out greenery from three different shades of green paper. I added some flowers from Wild Orchid Crafts and some winter berries from my stash and then finished the ATCs off with the 'snow' made from heavy gesso sprinkled with glitter. Here is a photo of the set and some close-ups of each ATC.


I really hope Jenny liked her ATC set! Happy Christmas!

Sunday, February 8, 2015

Winter - Mixed Media Layout

Hello Scrappy Friends! Today, I'm sharing a 'just for fun' layout I created using a kit I bought from the Flying Unicorn. The December 2014 kit included gorgeous papers from the 13 Arts "Cozy Evening" collection, along with some beautiful coordinated embellishments. I've paired these with some mixed media elements and flowers from my stash to create a snowy, winter layout - featuring an older picture of my son on the first snowy day of 2013.
Here are some close-ups! 


Thanks for stopping by for a peek at my layout! 
Happy Scrapping!

Tuesday, January 21, 2014

My Little Snowflake ~ Scraps of Darkness

I have one final layout created with the Scraps of Darkness December "Winter Wonderland" Kit to share with you today. I had this precious photo of my little guy all bundled up in his Tigger snowsuit when he was a baby and hadn't scrapped it yet - so here we have "My Little Snowflake".
I primarily used the Authentique "Glistening" collection for this layout - but have also used two pieces from the Bo Bunny Misc. Me Contents pages (Embellishment Add-On) in my layering.  I started out by creating the "divided" base by gluing a 6"x12" piece of the Authentique Glitter paper to the bottom of the Dazzle paper. I then used a Martha Stewart deep edge punch for the two punched border strips across the centre of the layout. Finally, to finish off the base, I used a Prima 12 x 12 mask and some Liquitex White Opaque Flakes medium to give it the look of a snow flurry. Here is a close-up of the masking.
I added a die-cut Misc. Me piece and fussy-cut a second Misc. Me paper to layer under the photos. I used Authentique Cardstock Stickers for the title and also for one of the banner elements - I cut additional banner pieces, using the Authentique Sticker as the template, and glued them onto pieces of wired burlap ribbon.   I raided some leftovers from older Scraps of Darkness Kits for the flowers, resin feathers and burlap bird that embellish the layout.
I was inspired to create this layout by this month's challenge, specifically the colours in the mood board, at Scrap Around the World!
Thanks so much for stopping by my blog today - I'll have some new projects created with the incredible Scraps of Darkness January "Style and Sophistication Kit" to post soon!
Happy Scrapping!

Saturday, January 11, 2014

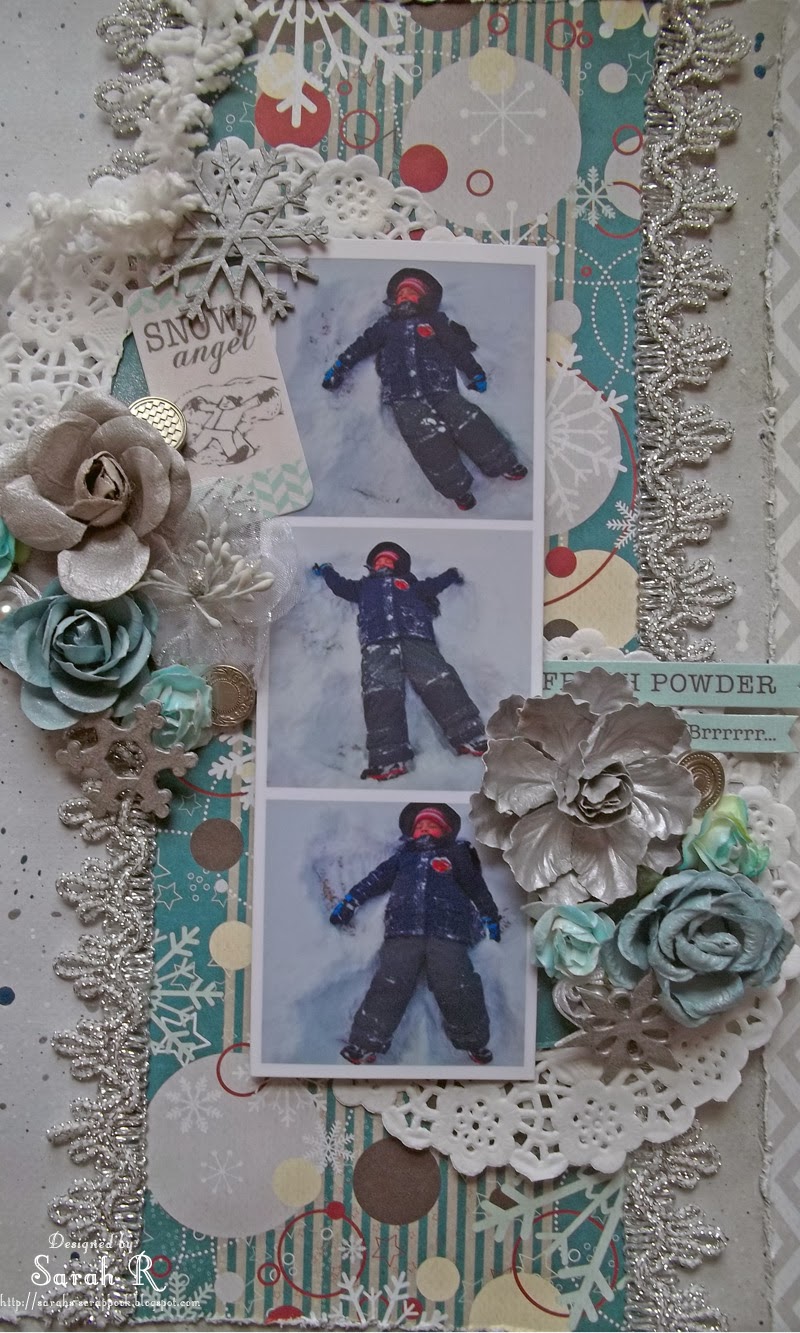
Snow Angel ~ Scraps of Darkness

Hello Scrappy Friends! I have a fun layout to share with you today - created with the Scraps of Darkness December "Winter Wonderland" Kit! I've used the Fancy Pants Designs "Timbergrove" papers to create this layout featuring photos of my son making a Snow Angel this winter!
I started out with the Frolic chevron-patterned paper as the base and then used the reverse side (a light grey) as the second layer and paint-splattered it using watered-down gesso, as well as two of the Silks Acryclic Glazes (Silver Bells and Bolivian Blue) included in the Colour Add-on.
I cut out the central pattern from the Flurries paper and used it as the vertical strip to anchor my photos and embellishments and added the Silver lace from the Embellishment Add-on along the vertical sides. I cut two circles from the leftover Flurries paper for the centre of the doilies. For the photos, I created an "Instagram" photo strip using Photoshop Elements to play upon the vertical lines of the layout.
Finally, I used a combination of flowers (Prima, Petaloo and Kaisercraft) from the Main Kit and Flower Add-On, some Authentique Cardstock stickers (painted with Silks Acrylic Glaze in Ice), Leaky Shed Studio Chipboard snowflakes (painted with Gesso and Silks Acrylic Glaze in Silver Bells), as well as some Farmhouse Studio brads to create the flower clusters.
Thanks so much for stopping by my blog today - hope you enjoyed this fun layout!

Friday, January 10, 2014

Mixed Media Gift Tag and a Tutorial ~ Scraps of Darkness & Imaginarium Designs

I am back with a second project for you this month combining the Scraps of Darkness December 2012 Kit with Imaginarium Designs Chipboard! Today, I am sharing a mixed media gift tag and a tutorial! I had lots of fun making this cute winter tag using the Bo Bunny "Woodland Winter" collection and Luminarte Silks Acrylic Glaze from the SOD kit, along with an Imaginarium Designs chipboard tree and sentiment!

First, I painted a white #8 shipping tag with the Silks Glaze in Bolivian Blue. I then masked some "snow" on the bottom of the tag using a Prima 12 x 12 stencil and some Light Molding Paste mixed with DecoArt SnowTex. I fussy cut the snowman from the Bo Bunny paper and added some of the Molding Paste/SnowTex mixture to the bottom of the snowman. I cut the snowflake circles from one of the Bo Bunny cardstock stickers (they were originally part of a border sticker) and added them randomly around the tag. I also used the awesome fur trim from the kit at the top of the tag - I threaded it through the tag's hole and glued the trim together and, once dry, I cut it into strips.
For the "Just for You" sentiment, I simply painted the chipboard with two coats of Luminarte Silks Acrylic Glaze in Silver Bells.
I used a couple of different techniques to create this snowy tree - so I thought I would share the process with you!

Snowy Tree Tutorial
Supplies:
  • Imaginarium Designs Christmas Tree
  • Luminarte Silks Acrylic Glaze - Silver Bells, Ice
  • Golden Light Molding Paste
  • DecoArt SnowTex
  • Luminarte Primary Elements Pigments -
    Forest Green and Bolivian Blue
  • Palette Knife
  • Needle
  • White Gesso

Mediums:
Before starting to alter the chipboard Christmas tree, you'll need to prepare your mediums:
  • First, mix together equal parts of the Molding Paste and SnowTex (the SnowTex is quite coarse and adding the molding paste makes it easier to spread)
  • Second, separate half of molding paste/SnowTex mixture into a second container - add Luminarte Primary Elements pigments to colour the medium. I wanted a green colour with a hint of blue, so I have used Forest Green and Bolivian Blue. (Add a little bit of each medium at a time until you achieve the colour you want.)
Altering the Chipboard Tree
Now you're ready to create your snowy tree! I've provided a step-by-step photo tutorial below!

Imaginarium Designs Chipboard Used
 Christmas Tree Board
IDS0008

"Just For You" Phrase
IDP0074

Other Products Used
Scraps of Darkness - December 2013 Winter Wonderland Kit - Patterened Paper - Bo Bunny "Woodland Winter" collection - Scarf and Cardstock Stickers; Luminarte Silks Acrylic Glaze - Ice, Silver Bells and Bolivian Blue; Wrights 1" Fur Trim.
Personal Stash - White #8 Shipping Tag; Prima 12 x 12 Stencil ; Golden Light Molding Paste; DecoArt SnowTex; Luminarte Primary Elements Pigments - Forest Green and Bolivian Blue; Claudine Hellmuth Studio Gesso; Aleene's Tacky Glue; Beacon 3-in-1 Glue; 3D Foam Adhesive.
~~~~~~~~~~~~~~~
Don't forget that Imaginarium Designs is looking for new Designers - check out the DESIGN TEAM CALL for more information.

That's it for me today! I hope you liked my tag and found my tutorial helpful! Don't forget to leave a comment on my post on the Imaginarium Designs blog for a chance to win some Imaginarium Designs Chipboard Products!

Sunday, January 5, 2014

Bittersweet 2013 ~ Scraps of Darkness & Imaginarium Designs

Today, I am sharing a personal layout based on the January Sketch at Once Upon a Sketch. The journalling theme at OUAS is "Lessons Learned" and I've chosen to add private journalling to the back of my layout about my personal journey in 2013. I've used the Bo Bunny Winter Woodland paper and stickers, as well as the Prima Flowers included in the Scraps of Darkness December 2013 "Winter Wonderland" Kit to create this layout! I chose a picture of some Bittersweet from my garden that was covered in ice and snow following  an ice storm we had just before Christmas. I decided to go with a monochromatic theme so that the only colour on the layout is the pop of orange of the bittersweet berries in the picture.
Here is a close-up of the layering/photo-cluster. I started off by doing some masking with a Crafter's Workshop mask and Light Molding paste. I cut squares/rectangles from the Journal sheet of the Bo Bunny paper and also added squares of burlap from my stash to the layering under the photo. I brushed the Prima flowers with white gesso to coordinate them with the chipboards.
I love how the Imaginarium Designs Chipboard Branches and Leaves with holes sort of looked like the Bittersweet brances - they were the perfect complement to the photo on this layout. I wanted to keep the branches fairly plain to go with the monochromatic colour scheme, so I simply dry-brushed the chipboards with gesso and then added some thick gesso to the top edges of the chipboards to look like snow.
Imaginarium Designs Chipboard Used
 Branch and Leaves with Holes
IDDN0013
Branch and Leaves with Holes Balanced
IDDN0014

Other Products Used
Scraps of Darkness - December 2013 Winter Wonderland Kit - Patterened Paper - Bo Bunny "Woodland Winter" collection - Journal and Cardstock Stickers; Prima Flowers - La Tela.
Personal Stash - Cardboard, The Crafter's Workshop 6 x 6 Mask - Mini Cell Theory; Golden Light Molding Paste; Burlap,;Claudine Hellmuth Studio Gesso; White Floral Wire.
~~~~~~~~~~~~~~~
Don't forget that Imaginarium Designs is looking for new Designers - check out the DESIGN TEAM CALL for more information.

That's it for me today! I hope you liked my simple, monochromatic layout! Don't forget to leave a comment on my post on the Imaginarium Designs blog for a chance to win some Imaginarium Designs Chipboard Products!

Friday, January 3, 2014

"We Shall Find Peace..." ~ Scraps of Darkness

Happy New Year and welcome to my first post of 2014. Today, I am sharing a layout created with the outstanding Scraps of Darkness December 2013 Winter Wonderland Kit. My layout shows a photo of my son amid some of the branches that came down during the ice storm we had just before Christmas. This layout is based on the SOD Sketch designed exclusively for this Kit by Suepup! Here is my layout:
And here is the December Kit sketch:
I used the gorgeous Authentique "Glistening" collection papers to create the layout and heavily distressed the edges of all the papers. I also added in two 5.5-in. doilies from my stash to create the layers. I had a great time experimenting with lots of different ways to create snow-effects on this layout! Here are the different ways I created the snow on the layout:
  1. The sparkly snow on the larger layers is a combination of heavy gel medium and Martha Stewart Sparkle Texture Effect - I simply added this to the layering with a palette knife.
  2. The snow on the window (a Tim Holtz die cut shape) is a combination of the Marvy Uchida Snow Marker and the Icicle Stickles from the Kit. 
  3. The snow on the snowflakes (also Tim Holtz die cuts) is a combination of DecoArt Snow-Tex and then Icicle Stickles on top.
  4. On the Kaisercraft flowers from the Main Kit, there is a combination of thick gesso, followed by Icicle Stickles.
  5. Finally, the tree was first treated with Distress Ink in Vintage Photo and then with the Snow Marker. Unfortunately, the ink bled through the snow, giving it an unfortunate "yellow snow" appearance. Yuck. So, I touched it up with the white gesso and added Icicle Stickles to salvage it.
 These look so much better in real life - but here is a close-up so you can see all the different effects!

Finally, I used one of the Authentique cardstock stickers, matted on some of the black patterned paper from the Glistening collection for my title and tucked another cardstock sticker into the snowflake/flower cluster. 
This kit is so lovely to work with - I just love it and can't wait to get back to it. I'll be back soon with more projects to show you!

Happy Scrapping!


Sunday, December 8, 2013

{Free} Layout and Wish Layout ~ Scraps of Darkness Design Team Reveal ~ November "Water Lilies" Kit

Ack! I am SO late posting this!!! December has been ultra-busy and I am behind in my blogging! But I'm here now to show you two more layouts created with the incredible Scraps of Darkness November "Water Lilies" Kit.
~~~~~~~~~~~~~~~
{Free}
*Scraplift of Louise Nelson Layout for 7 Dots Studio


I was inspired by the SOD/SOE Lift a Designer Challenge - this layout is a Scraplift of Louise Nelson's {Heart Heart} Layout for 7 Dots Studio. I adore Louise's artsy style and have always wanted to try to emulate it - so here is my attempt at a Loolabelle-inspired layout! Although there is no title on the layout, I am calling it free - because my son is so happy and free flying down his favourite slide at the park.
 
I started off the LO by misting the 7 Dots Studio paper with Lindy's Stamp Gang Flat Fabios in Tweedle-Dee Denim and Curioser Chartreuse. Then I whitewashed over the misted background with watered-down gesso.
 I stamped and heat-embossed the birds using a Tim Holtz stamp and Distress Embossing Ink + Distress Embossing powder in Black Soot. I added some black thread, sequins and rhinestones from the kit, as well as two of the Glitz Design Giant Rhinestones.
The feathers are chipboard by Imaginarium Designs - I painted the feathers with Viva Maya Gold in Turquoise and then rubbed the centre of the feather with Viva Inca Gold in Cobalt Blue; finally, I heat-embossed the ends of the feathers with Stampendous Embossing Powder (Detail Gold).
~~~~~~~~~~~~~~~
Wish
My second layout today is called "Wish" and features a picture of my son telling Santa his Christmas Wishlist (oddly enough, he asked for slippers...). I am so glad my son wasn't afraid of Santa this year - he was for the past two years! 
I have used the Pink Paislee Color Wash star die-cut paper, along with some Lindy's Stamp Gang Starburst mist in Cheshire Cat Cherry and a hint of Glitz Spritz in Steel Shimmer.  I also added a sheet of white cardstock from my stash, which I stamped and heat-embossed with shimmery snowflakes around the edge; you can also see some the embossed snowflakes on the main page and on the tag. The Inkido challenge this month is Stars and Snowflakes, so I am entering this layout in their challenge (wish me luck)! I also did some masking on the background to create a "snowfall" effect using the Crafter's Workshop 12 x 12 template included in the Colour Add-On and some Martha Stewart Sparkle Texture Effect mixed with heavy gel medium (I find the sparkle texture effect very thick/heavy - it is much smoother and spreads better over the mask if you mix it with some gel medium). 
I used the Prima flowers from the Main Kit and added some of the Sparkle Texture Effect/Gel Medium mixture to them to add some sparkle. For the frame, I used a paint brush to paint it with the Lindy's Stamp Gang mist and, once it had dried, very carefully inked it with embossing ink and heat-embossed it with the silver/white embossing powder - this really helped bring out the pattern on the frame. I used one of the Pink Paislee tags for my title and simply embossed it with stamped snowflakes. I added in some bling from my stash, some Tresors de Luxe lace, torn/crinkled strips of the tissuestock paper from the Kit and some leftover beaded ribbon from the SOD July Kit. 
~~~~~~~~~~~~~~~
That's it for me today - I hoped you liked these two layouts with the fantastic Scraps of Darkness November Kit - it is so versatile - I just love it!