Showing posts with label Nature. Show all posts

Friday, March 3, 2017

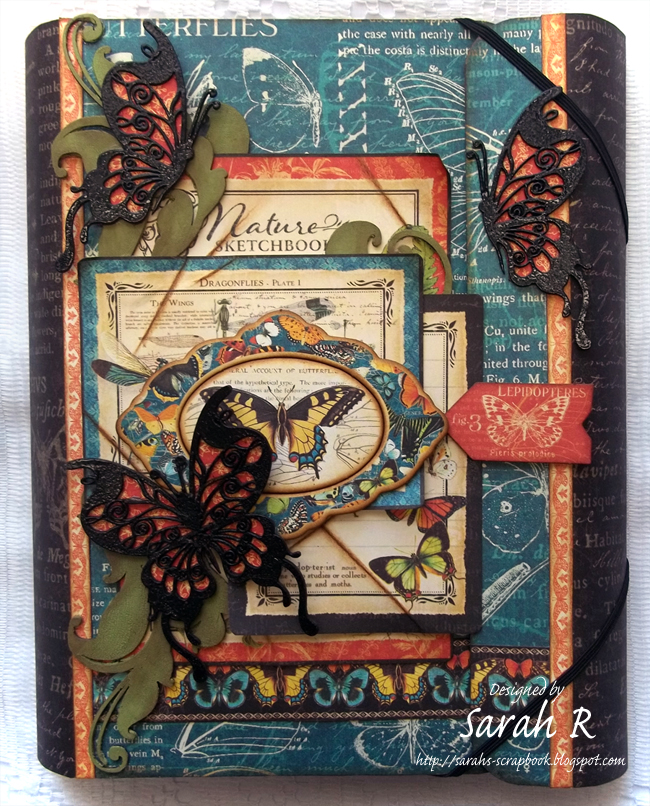
Nature Sketchbook Folio Cover ~ Creative Embellishments March Challenge

Its a new Month! And that means a new challenge is up on the Creative Embellishments Blog! As usual, please be inspired by at least one element in the picture below and mention how you were inspired if it isn’t obvious. The twist this month is to incorporate something that flies.
I'm really looking forward to Spring and some nicer weather, so I was inspired by the butterflies in the challenge photo to create this Nature Sketchbook Folio Cover. I'm going to have a video tutorial up soon showing how I created the insert for the inside of the folio - so be sure to watch for it!
I started out with a small Tim Holtz Folio and used Graphic 45's Nature Sketchbook collection (12x12 papers, 6x6 papers,Tags & Pockets, Decorative Chipboard, and Journaling & Ephemera Cards) to decorate the cover. I've inked all the paper edges using Distress Ink in Vintage Photo. I used the CE Chipboard Flourish Butterflies Set 3, which I embossed with Ranger Black Embossing Powder and then added some patterned paper from the 6x6 paper pad to the back. I also used two of the CE Flourish 19 chipboards, which I cut into pieces. I painted the flourishes with Distress Crackle Paint in Peeled Paint and then inked them with Distress Ink in Vintage Photo. Here are some different angles and close-up photos of the cover:


I hope you like my interpretation of this month's challenge - I can't wait to see what you create! Remember to follow the Rules for the Challenge so that you're eligible to win!

Challenge Rules:
  • Create a NEW project (i.e., layout, mini album, tag, card, canvas, etc…) as of March 1st 2017.
    • Please no back linking (meaning projects from previous months that may fit the challenge requirements). Please link only NEW projects.
  • Combining the CE Challenge with other challenges is permitted.
  • Please add your entry to the InLinkz box on the Challenge Post on the Creative Embellishments Blog to be eligible for the prize. You have until the last day of each month 11:55 pm eastern time to enter.
  • It is required that you mention in your blog post that you are playing along at Creative Embellishments together with a link back to our blog. Please make sure to reference our challenge. 
  • We would love to see you USE AT LEAST 1 OF CE products on your projects but it isn’t required to play along; however, everyone who does use CE product will get and extra chance at winning.
  • WINNERS will have 2 weeks to claim their prize. The winner will be announced on the CE blog post the day after the challenge ends.
Thanks so much for stopping by my blog! 

Tuesday, July 29, 2014

Day 3 of the Couture Creations & Imaginarium Designs Blog Hop

#couturecreationsaus   #imaginariumdesigns

Welcome to Day 3 of the

Couture Creations & Imaginarium Designs Blog Hop!  


We’re so excited to team up with Couture Creations sharing inspiring projects created with both our products with you this week. What could be more perfect than Embossing Folders and Dies and Imaginarium Designs gorgeous Chipboard designs.

Each day this week we will feature our Design Team projects and over on the 
Couture Creations Blog they will also feature their Design Team projects all created using Couture Creations and Imaginarium Designs products. So loads of inspiring projects for you to help get your creative juices flowing.
We will link to the tutorials on each Design Team members blogs,
please show all our designers some love and leave a comment on their blog.
We’ll be giving away Two $100 prize packages filled with Couture Creations & Imaginarium Designs goodness at the end of the week, so be sure to play along and check back on both Imaginarium Designs and Couture Creations blogs Monday 4th August 2014 to see if you’re the lucky winner!
Here are the different ways you can play along with us –
Like Couture Creations on Facebook.
Like Imaginarium Designs on Facebook.
Follow both the Imaginarium Designs and  Couture Creations Blogs. 
Share today's Imaginarium Designs blog post on your Facebook wall and tell them you did on our 
Facebook page.
 
 Leave a comment on today's blog post on the Imaginarium Designs blog post and on their Facebook page.
 Follow Couture Creations on Pinterest.
Follow Couture Creations on Instagram.
Hop over to the Couture Creations Blog and see what their Design Team has created using their Chipboard and Couture Creations products! 

They also have a  giveaway, so what are you waiting for – hop over!  

Oh, and don't forget to follow our Design Team Blogs!
~~~~~~~~~~~~~~~
Here is my project for the Blog Hop! 
I was inspired by the organic feel of the pattern in the Couture Creations embossing folder to create an "earthy" mixed media tag! This tag was so fun and easy to create with the Imaginarium Designs Chipboards and Couture Creations Die and Embossing Folder - here is a quick step by step:
  1. Emboss a piece of paper slightly larger than your tag base with the Couture Creations Embossing Folder - I have used the Large Peacock Fans Folder from "The Marriot Collection".  Glue the embossed paper to your tag base and trim around the edges and punch the hole.
  2. Gently ink the surface of the embossed tag - this will really bring out the embossing - also ink the edges. I've used Distress Ink in Vintage Photo
  3. If you wish, add some more detail with a mask and 3D paint - I've used the Mini Leaf Frame 6x6 template from The Crafter's Workshop with Art Anthology Velvet Dimensional Paint in Basil
  4. Cut three small frames using the Couture Creations Elegant Square die from "The Van Roe Collection". Layer the three frames using 3D foam adhesive. The layered frames become the centerpiece of the tag. I added flowers, fussy cut butterflies and a large square brad inside and around the frame as embellishments.
  5. Now for your chipboard elements - mist two of the Imaginarium Designs Art Deco Embellishments - I've used Art Anthology Colorations Spray in Mocha. Paint the Imaginarium Designs Word "grow"  (I've used the same paint as I used for the masking), then add Ranger Crackle Accents to the word. 
  6. Add the chipboard embellishments to the tag, layering the title on top of one of the Art Deco flourishes. I've also added a brad to the centre of each of the Art Deco Embellishments - they frame the brads perfectly!
  7. As a final step, if you want to - splatter your tag with a few drops of the same mist you used on your chipboards. 
Here are some close-ups of the tag!


~~~~~~~~~~~~~~~
Be sure to stop by the other Imaginarium Designs DT Blogs today:  Evgenia Sokolinskaya and Romy Veul.
Also - pop over to Couture Creations Blog to see what
Sue Smyth  &  Amanda-Jayne Baldwin
have created.
Don't forget to share the love!
~~~~~~~~~~~~~~~
Imaginarium Designs Chipboard Used
Denise's Art Deco Embellishment 1 - Tiny
IDDD0010
 
 love, grow, hello
IDW0083

Couture Creations Products Used
Embossing Folder - The Marriot Collection
Large Peacock Fans
CO723668
 Die - The Van Roe Collection
Elegant Square
CO723724

Other Products Used
Patterned Paper - FabScraps  Fantasy Flight C65 005; Art Anthology Velvet Dimensional Paint - Basil; Art Anthology Colorations Spray - Mocha; Distress Ink - Vintage Photo; Ranger Crackle Accents; The Crafter's Workshop Balzer Designs 6 x 6 Template - Mini Leaf Frame;  Farmhouse Paper Company Norland Buttons, Brads & Metals; Prima Flowers - Time Traveler's Memories Collection; Burlap Ribbon. 

Sunday, January 5, 2014

Bittersweet 2013 ~ Scraps of Darkness & Imaginarium Designs

Today, I am sharing a personal layout based on the January Sketch at Once Upon a Sketch. The journalling theme at OUAS is "Lessons Learned" and I've chosen to add private journalling to the back of my layout about my personal journey in 2013. I've used the Bo Bunny Winter Woodland paper and stickers, as well as the Prima Flowers included in the Scraps of Darkness December 2013 "Winter Wonderland" Kit to create this layout! I chose a picture of some Bittersweet from my garden that was covered in ice and snow following  an ice storm we had just before Christmas. I decided to go with a monochromatic theme so that the only colour on the layout is the pop of orange of the bittersweet berries in the picture.
Here is a close-up of the layering/photo-cluster. I started off by doing some masking with a Crafter's Workshop mask and Light Molding paste. I cut squares/rectangles from the Journal sheet of the Bo Bunny paper and also added squares of burlap from my stash to the layering under the photo. I brushed the Prima flowers with white gesso to coordinate them with the chipboards.
I love how the Imaginarium Designs Chipboard Branches and Leaves with holes sort of looked like the Bittersweet brances - they were the perfect complement to the photo on this layout. I wanted to keep the branches fairly plain to go with the monochromatic colour scheme, so I simply dry-brushed the chipboards with gesso and then added some thick gesso to the top edges of the chipboards to look like snow.
Imaginarium Designs Chipboard Used
 Branch and Leaves with Holes
IDDN0013
Branch and Leaves with Holes Balanced
IDDN0014

Other Products Used
Scraps of Darkness - December 2013 Winter Wonderland Kit - Patterened Paper - Bo Bunny "Woodland Winter" collection - Journal and Cardstock Stickers; Prima Flowers - La Tela.
Personal Stash - Cardboard, The Crafter's Workshop 6 x 6 Mask - Mini Cell Theory; Golden Light Molding Paste; Burlap,;Claudine Hellmuth Studio Gesso; White Floral Wire.
~~~~~~~~~~~~~~~
Don't forget that Imaginarium Designs is looking for new Designers - check out the DESIGN TEAM CALL for more information.

That's it for me today! I hope you liked my simple, monochromatic layout! Don't forget to leave a comment on my post on the Imaginarium Designs blog for a chance to win some Imaginarium Designs Chipboard Products!