Showing posts with label Tim Holtz. Show all posts

Saturday, January 20, 2018

Vintage French Tags ~ Creative Embellishments

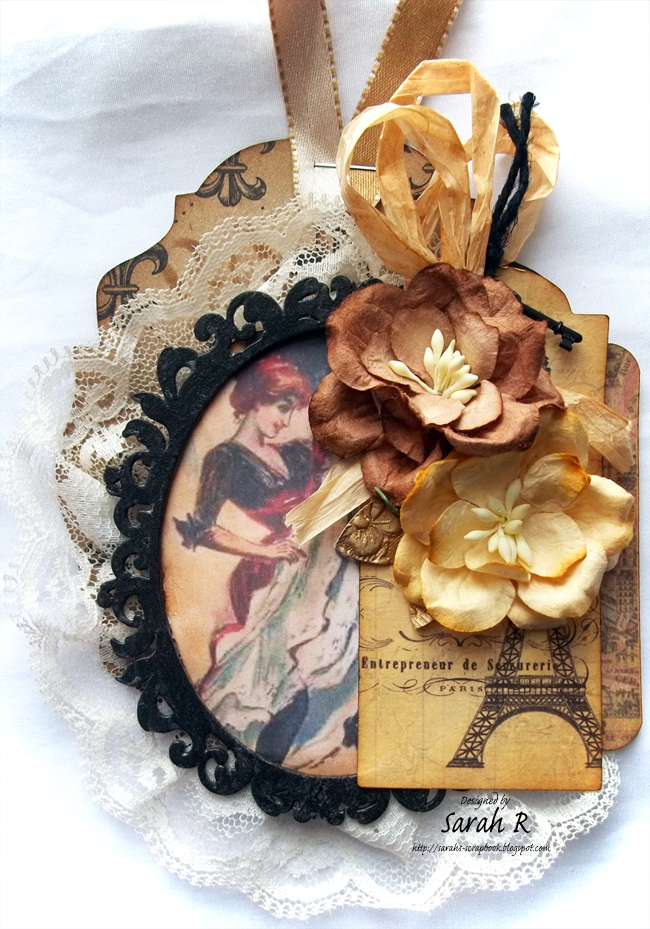
Hi There! Today I'm sharing a pair of Vintage French Tags created using two of the small Fancy Oval Frames from Creative Embellishments and papers/embellishments from Canvas Corp Brands. All the papers are inked with Distress Ink in Vintage Photo.
I used the Tim Holtz Baroque Die to cut the base of the tags from a sheet of Canvas Corp Black and Kraft Fleur de Lis paper.   I printed the vintage Cancan dancer images and used the Creative Embellishments Frames on them. I painted the frames with Black Acrylic Paint and added a very fine crackle texture on them. I used a 7 Gypsies Junque Pack to create the paper layers and small tags. I added some 7 Gypsies Rub-ons and Miniature Keys to embellish the tags, as well as some paper flowers from Wild Orchid Crafts and some raffia, lace and twine from my stash. Finally, I punched some leaves from some scraps of Canvas Corp Embossed Burnished Floral paper that I had left in my stash and added them to the flowers. Here is a close-up of each tag:


Tuesday, November 14, 2017

Vintage Hollywood Baroque Mini Album - with Video Flip-Through

Hi There Crafty Friends! I have a new mini-album to share with you today! I created this album using Tim Holtz's Baroque Movers and Shapers Die and Graphic 45's Vintage Hollywood collection. There are lots of photos below but check out the video on my YouTube Channel for all the details!


Wednesday, October 25, 2017

Not all those who wander are lost - Junk Journal ~ Canvas Corp Brands October Challenge

Hi there Crafty Friends! Today, I'm sharing a handmade Junk Journal with you! I made this journal for the Canvas Corp Brands October Challenge - "Books Worth Reading" (#ccbchallenge). I have always loved The Lord of the Rings, by J.R.R. Tolkein, so I chose to feature a quote from the introductory poem to the series on my journal cover:
"Not all those who wander are lost." 
I used a 7 Gypsies Book Cover and created a 1.5 in. spine for it and used some gorgeous Canvas Corp Embossed Burnished Floral paper on the spine.  I decorated the cover with papers and canvas from a 7 Gypsies Gypsy Pack and a Book Plate from my stash and created a ribbon closure using some gold crinkle ribbon. I painted the black Book Plate with Tattered Angels Glimmer Glam in Golden Goddess to give it a more vintage look. I added a piece of corrugated paper on the back cover as a mat for a Tattered Angels "Field Notes" card (also painted with the Golden Goddess paint).


I lined the inside covers with Tattered Angels Mixed Media Origins Melody paper - it is so beautiful and just waiting for colour to be added! I made three signatures for the journal using several sheets of 7 Gypsies paper, Canvas Corp Corrugated Paper, Mixed Media Paper, Drawing Paper, as well as a couple of sheets of paper by Tim Holtz. I also tucked in a few tags from the Gypsy Pack using some fancy paper clips from my stash.


I used some masks and added some Tattered Angels Glimmer Mists (in Sweet Clover, Suede and Denim Blue) to the Mixed Media pages.


With five folded pages in each signature, there is lots of room in the journal to get creative add more 'junque' to the pages! Thanks for stopping by my blog today! Happy Crafting!

Sunday, October 15, 2017

Halloween in Wonderland Configuration Book ~ Creative Embellishments

Hi there crafty friend! Today I'm sharing a super fun new project with you! This is my Halloween in Wonderland Configuration Book - combining two of my absolute favourite things - Halloween and Alice in Wonderland!

I started out with a Tim Holtz Configuration Book, which I covered with the blue-toned papers from the G45 collection. Then, I started layering elements from the papers, along with some awesome Creative Embellishments chipboard pieces, to create my cover design. I used my Silhouette Cameo to cut a keyhole shape from the black & white check paper and layered that over main image from the collection's signature page. Next, I cut the characters from a second sheet of the signature page so I could pop them up to create a 3D effect. I added the CE "We're All Mad Here" title and the Mad Hatter Top Hat (from the We're All Mad... chipboard set), which I painted with Prima Sparks acrylic paints. I also added in some CE Pumpkins and Pumpkin Vine Flourishes - painted with Prima Sparks and Prima Metallique Acrylic Paints. Finally, I finished off the cover with a Graphic 45 Shabby Chic Door Plate and Knob and a Graphic 45 Shabby Chic Key.

For the inside of the Configuration Book, I tried to include images of all the main characters from the Wonderland Books. On the left side, I I had to include the Mad Tea Party image, layered on some of the checked paper - I added some stickers from the collection to three of the corners, and one of the cups from the CE Tea Cup Set, which I painted with Prima Sparks and Prima Metallique Acrylic Paints.

For the right side, I used the following CE chipboard elements:
  • Mini Web - painted white and then coated with Frosted Lace Stickles
  • Simple Key Hole Plate - painted with Prima Metallique Acrylic Paints, with Prima Brads and a peek-a-boo image of Alice from the G45 papers
  • One of the open Books, painted with Prima Metallique Acrylic Paints and stamped using the CE Distressed Text Stamp
  • An Arched Window (with the Arch cut off) - painted with Prima Metallique Acrylic Paint
  • A few Potion Bottles, painted with Prima Sparks Acrylic Paints and decorated with some circle images punched from the G45 papers
  • Another Pumpkin (same as on the cover)
  • One of the Mini Mushrooms, painted with Prima Metallique Acrylic Paint
  • Creepy Gates - painted with Prima Metallique Acrylic Paint - and hinged so the gates open to show the little scene in behind

Here are some close-ups so you can see all the details:


Tuesday, August 15, 2017

Earthy ATCs ~ Creative Embellishments

Today I'm sharing a set of four "Earthy" ATCs created for the Creative Embellishments Design Team. I love making ATCs to try out new products/techniques and use up bits and pieces from my stash. I started out with some heavy black cardstock and used mod podge to cover it with scrunched up Tim Holtz Melange Tissue Wrap. Once that had dried, I used four colours of Distress Oxide Inks in Earth-tones to colour the ATC backgrounds (i.e. Walnut Stain, Vintage Photo, Iced Spruce and Peeled Paint). Next I added some Tim Holtz Remnant Rubs to each of the ATCs and then wrapped them with black thread attached with tiny staples. Next - time for the CE chipboard/wood veneer elements!
On the first ATC, "FOUND", I used a Nautical Compass Chipboard piece that I trimmed the right side off of - don't be afraid to cut up your chipboard pieces! I embossed the compass with Ranger Black Embossing Powder and then rubbed some of the Iced Spruce Distress Oxide into the star section of the compass.
On the second ATC, "FRAGILE", I used one of the wood veneer Hearts - I actually used the reverse side of the broken/band-aid heart and embossed it with Distress Embossing Powder in Tattered Rose. I inked the edges of the two heart pieces with the Vintage Photo Distress Oxide Ink.
On the third ATC, "discover", I used one of the chipboard Globes, which I trimmed the left side off of and then embossed it with Distress Embossing Powder in Old Paper and then rubbed the continents of the globe with the Peeled Paint Distress Oxide Ink.
On the fourth ATC, "be still", I had used a rub-on of a bird and wanted a bird-cage over it - but I didn't have any in my stash! So I used one of the chipboard Open Arched Windows and added a piece leftover from the Moroccan Lattice Panel to the back of it - you can layer your chipboard elements and remnants to create new designs! Next, I embossed the 'bird-cage' with Stampendous Shabby White Embossing Enamel and rubbed sections of it with the Walnut Stain Distress Oxide Ink.
I finished off the ATCs by adding some Prima/Finnabair Art Ingredients, including Frosted Mica Flakes, Granite Mica Flakes and Sterling Glass Glitter.

Thanks for stopping by my blog today - I hope you enjoyed seeing my ATCs!

Friday, March 31, 2017

Crazy Shaker Cards ~ Creative Embellishments

Today, I'm sharing some fun shaker cards with you! I've used Tim Holtz Crazy Dogs and Crazy Cats stamps (coloured with Copic Markers) along with Graphic 45 papers to create these cards. For the shaker part, I've used sequins and some Creative Embellishments Wood Veneers- which I left plain because I LOVE how the natural wood and laser engraving looks!
For the Crazy Dog Shaker Card, I used papers from Graphic 45's Good Ol' Sport collection and inked all the papers with Distress Ink in Vintage Photo. I used the Dog Gone Cute Wood Veneers in the shaker on this card. I also used two pieces from these Wood Veneers to embellish the front of the cards. I coloured the Ball using a Red Copic Marker and I added some patterned paper to the Dog Tag, outlined the tag with a Black Copic Marker and then inked it with Distress Ink in Vintage Photo. I thought this masculine card would be perfect for Father's Day!

For the Crazy Cat Shaker Card, I used papers from Graphic 45's Once Upon a Springtime collection and inked all the papers with Distress Ink in Antique Linen. I used the Purrfect Pieces Wood Veneers in the Shaker on this card. I thought this would be a fun card for Easter - featuring a confused Kitty who thinks he's a rabbit!
Thanks so much for popping by my blog today! Have Crazy Fun Crafting!

Sunday, January 1, 2017

Grungy, Mixed Media Tags ~ Creative Embellishments January Challenge

Happy New Year! What?! How did that happen? As it is the first of the month, a new challenge is up on the Creative Embellishments blog! Here is this the January 2017 challenge's inspiration picture - and the twist for this month's challenge is to use numbers on your project!
For this month's challenge, I've created a pair of Grungy, Mixed Media Tags - with Inspirational Quotes for the New Year!
I started off with two #8 Size Kraft Tags. For this challenge's twist to use numbers - I've embossed the tags using (1) a December Calendar Embossing Folder (by Tim Holtz/Sizzix) and (2) a Number Collage Embossing Folder (by Cuttlebug). I painted the embossed tags with Prima Art Basics Heavy Black Gesso and then added colour to the background using Inka Gold Metallic Rubs in Cobalt Blue, Emerald Green, Steel Blue, and Champagne. Finally, I used the Creative Embellishments Distressed Text Stamp along with some Brilliance Moonlight White Ink to do some random stamping on the background of the base tag.

I used a Tim Holtz/Sizzix Die to cut the smaller tags from some Core'dinations Graphic 45 Timeless collection paper - I lightly sanded the smaller tags to reveal the embossed design and inked them with Distress Ink in Black Soot and rubbed some of the Champagne Inka Gold Rub on them.  To play up the numbers element even more - the small tags are embellished with Tim Holtz Reinforcers in calendar and number collage patterns! The quotes are cut from the Graphic 45 Kraft Reflections collection paper - the two quotes are also inked with Distress Ink in Black Soot and rubbed with Inka Gold Metallic Rub in Champagne.

I save all my 'remnants' of chipboard from my projects - so for this challenge, I've used bits and pieces of chipboard leftover from previous projects! I used part of a Mini Brick Panel, part of a Large Clock Face, and a couple of Gears and a Clock Hand. All the chipboard pieces were altered using Finnabair's Rust Paste collection by Prima, along with a splatter of Lindy's Stamp Gang Time Travel Teal Starburst mist, a splattering of watered-down white gesso and some of the Champagne Inka Gold Rub.

I added a Prima Finnabair Metal Brad to the hole of the first tag and a Tim Holtz Hitch Fastener to the hole of the second tag. I also added a couple of metal embellishments from my stash that I stained with the Lindy's Stamp Gang Time Travel Teal mist.

Once the tags were completely assembled, I splattered everything with the Lindy's Stamp Gang Time Travel Teal mist and with some watered-down Liquitex Ink in Carbon Black. Here are some close-ups!


I hope these tags have inspired you to play along with this month's Creative Embellishments Challenge!

Challenge Rules:
  • Create a NEW project (i.e., layout, mini album, tag, card, canvas, etc…) as of Jan 1st 2017.
    • Please no back linking (meaning projects from previous months that may fit the challenge requirements). Please link only NEW projects.
  • Combining the CE Challenge with other challenges is permitted.
  • Please add your entry to the InLinkz box on the Challenge Post on the Creative Embellishments Blog to be eligible for the prize. You have until the last day of each month 11:55 pm eastern time to enter.
  • It is required that you mention in your blog post that you are playing along at Creative Embellishments together with a link back to our blog. Please make sure to reference our challenge. 
  • We would love to see you USE AT LEAST 1 OF CE products on your projects but it isn’t required to play along; however, everyone who does use CE product will get and extra chance at winning.
  • WINNERS will have 2 weeks to claim their prize. The winner will be announced on the CE blog post the day after the challenge ends.
Thanks so much for stopping by my blog! 
Happy New Year!