Showing posts with label Handmade Flowers. Show all posts

Tuesday, July 2, 2013

A Mixed Media Canvas, a Tutorial and a Card ~~~Imaginarium Designs~~~

Today, I'm sharing two projects I created for Imaginarium Designs in June - a mixed-media mini-canvas and a card.
~~~~~~~~~~~~
Amelia
First up is a mixed-media mini-canvas that I created for a dear friend who just had a gorgeous baby girl! It also happens to be the first canvas I've ever done and I am pretty happy with how it turned out! I used the Bo Bunny Little Miss collection for the background paper and to make all the paper flowers on the canvas. First, I mod-podged the base paper to the canvas and then sanded the edges to soften them. I then did some masking with light molding paste in the corners. I sponged on some watered-down gesso with a sea sponge. over the entire surface of the canvas and then used watercolours around the edges and on the masked areas to tie in with the colours of the papers. I fussy cut the photo (stolen from my friend's Facebook page!) and put it on a cheesecloth 'blanket' resting on top of the sweet baby's name.  The paper flowers were created with a combination of Spellbinders Shapeabilities Bitty Blossoms and Bo Bunny Little Miss Petals. In addition to the chipboard, some Bo Bunny trinkets and buttons were added to embellish the canvas.
For the chipboards on this canvas, I used a watercolour method that I am calling "marbled watercolouring" and I've put together a little photo-tutorial for you on how I accomplished the treatment on the letters.
Here are a few more close-ups of the chipboard pieces on the canvas!


Imaginarium Designs Chipboard Used
Capital Letters - IDAUC0001

Jessica Flourish - IDFL0014

Other Materials Used: Patterned Paper - Bo Bunny "Little Miss" Collection - Little Miss, Little Miss Alice, Little Miss Jamayka; Bo Bunny Little Miss Cardstock Stickers; Bo Bunny Little Miss Petals; Bo Bunny Little Miss Buttons; Bo Bunny Vicky B. Trinket; The Crafter's Workshop 6x6 Template - Mini Chicken Wire Reversed; Golden Light Molding Paste; Mod Podge (Matte); Claudine Hellmuth Studio Gesso; Artist's Loft Watercolour Pan Paints; Ranger Inkssentials Glossy Accents; Spellbinders Shapeabilities - Bitty Blossoms; Darice Glass Pearls;  Cheesecloth; Aleene's Tacky Glue; 3D Foam Adhesive; Glue Dots.
~~~~~~~~~~~~
New Baby Card
For my second project, I made a card for my friend to go along with the mini-canvas (above). Now, I am usually not a card maker. . . as in I never, ever make them - but she is a very special friend and I wanted to create something special for her, so here it is! I used Bo Bunny's Little Miss collection again and added in some Bo Bunny doilies. The flowers are a combination of Recollections mulberry paper flowers and some other flowers from my stash. The brads, sticker frame and flower petals (lower right corner) are also from Bo Bunny's Little Miss collection.
I used the ID "New Baby" sentiment and treated it with a mixture of two colours of Tim Holtz Distress Embossing Powder (Tattered Rose and Worn Lipstick). 
I also used the ID Mini-Birdcage and treated it with Tim Holtz Distress Embossing Powder in Vintage Photo.
 

Imaginarium Designs Chipboard Used
New Baby - IDW0016

Bird Cage - Small - IDT0019

Other Materials Used: Patterned Paper - Bo Bunny "Little Miss" Collection - Cut-Outs, Little Miss Alice; Bo Bunny Little Miss Brads; Bo Bunny Little Miss Cardstock Stickers; Bo Bunny Doilies - Medium and Small; Recollections Mulberry Paper Flowers; Bazzill Basics Cardstock - Pearl White; Tim Holtz Distress Embossing Ink; Tim Holtz Distess Embossing Powders - Tattered Rose, Worn Lipstick, Vintage Photo; Aleene's Tacky Glue; 3D Foam Adhesive; Glue Dots.
~~~~~~~~~~~~
That is it for me today - I hope you enjoyed my projects and tutorial. 

Monday, June 10, 2013

Tattered Wild Sunset Rose Tutorial

Today, I am sharing how I created the flowers used on my "Grandpa's Girls" layout, created with the ScrapThat! June Kit - "From Sunrise to Sunset". I've decided to call these flowers Tattered Wild Sunset Roses since I used the Tim Holtz Tattered Floral die and the flower colours remind me of a sunset!

1. Materials Required:
     -Coffee Filters
     -Tim Holtz Tattered Florals Die
     -Die Cutting machine (I used a Cuttlebug)
     -Mists in your choice of colours
     -Jewels/Brads for centre of flowers (I used the Versailles Flats included in the June Kit EAO)
     -White Craft Glue or Glue Dots
2. Cut the coffee filters with the Tattered Florals Die and your Die cutter.
3. You'll need a lot of flowers to do all the layering - I cut a total of seven coffee filters to yield 28 flowers.
4. Spread out the Die Cut Flowers and mist them with your choice of colours - I've used Tattered Angels Glimmer Mists in Lemon Zest, Butternut Squash, Oriental Poppy, and Candy Apple Red, as well as Smooch Spritz in River Mossy and Black Velvet.
5. Let the flowers dry completely. You should have a good assortment of flowers in a variety of variegated colours.
6. Choose the flowers you want to layer for your flower - use a variety of colours - for the larger flowers on my layout, I've used 2 large, 2 medium, 1 small and 1 extra-small flower, plus the centre jewel.
7. Layer your flowers, offsetting the petals of each successive layers - I used Glue Dots (Craft) to adhere the layers together, but you can use white craft glue as well.
8. A close-up of all the assembled flowers on the layout - the 28 die cut flowers let me create 3 large and 2 small flowers.
That's it - these aren't hard to make and really make a huge impact on a layout. Here they are on the completed layout! I finished off the flower cluster with some leaves cut from the brown ribbon in the June Kit and some raffia-wrapped floral wire from my stash.
I hope you'll give these flowers (or a variation of them) a try - be sure to leave me a comment and link if you do so I can see your creations!

Monday, June 3, 2013

Grandpa's Girls - Details and Closeups (ScrapThat! June Kit)

Today, I'm sharing the details and close-ups of the first of three projects created with the ScrapThat June Kit  "From Sunrise to Sunset". This layout is based on the ScrapThat! June sketch and features an old photo of me and my sister with our Grandpa (I think the picture was probably taken in the summer of 1977). How cute were my sister and I as little girls!?
I started off the base page (Sunrise Sunset Del Sol) by using the Prima Donna Downey Poppies and Peonies stencil with some Modeling Paste. I then misted the page with four colours of Tattered Angels Glimmer Mist (Lemon Zest, Butternut Squash, Oriental Poppy, Candy Apple Red) that coordinated with the colours of the base page so that the stenciled flowers would take on a similar colour as the base page. Here are a couple of close-ups of the stenciling/misting.
For the torn layers of this page, I used the X-Radient, Celcius and White Hot papers. I am loving torn paper lately and have been using it quite often on my layouts - it is a nice alternative to regular edge distressing. For the borders along the bottom of the picture I tore a strip of paper for the top layer, fussy-cut the scalloped 'lace' from the White Hot paper and punched the bottom border with a Martha Stewart edge punch. I used the Sunrise Sunset Alphabet Letters (Main Kit) for the title and distressed the edges of the letters a bit with my craft knife. Here is a close-up of the layering.
I handmade the flowers on this layout using my Tim Holtz Tattered Florals Die, coffee filters, mists and the Dress-it Up Flats included in the Embellishment add-on (you also see three of the Flat jewels along the right side of the layering). I'm going to have a full-tutorial on these flowers later in the month! I finished off the flower cluster with some leaves cut from the brown ribbon included in the Main Kit and some twisted pieces of raffia-wrapped floral wire (from my stash).
That's it for today. Come back tomorrow for the details of my second layout with this gorgeous kit!


Friday, May 31, 2013

ScrapThat! June Kit Reveal and Blog Hop!

Welcome to the ScrapThat!
 June Kit Reveal and Blog Hop!! 
~~~~~~~~~~~~~~~
First, I want to announce that this will be my final month designing for the ScrapThat! kit club. 
I have thoroughly enjoyed every minute of my time with the ScrapThat! Design Team and would like to thank Kaitlyn for the wonderful experience designing for ScrapThat! In addition, I want to thank the rest of the Design Team for being so supportive and such a truly wonderful group of ladies to work with! I wish all of you the best and will surely see you  around the scrappy blogs and websites!
Now....onto the June kit reveal!
~~~~~~~~~~~~~~~
We are so happy to see June after the long winter and excited to show you our creations with our beautiful Prima Collection !
Our Blog Hop features fabulous hop sites including our Design Team blogs. 
We have been scrapping away and are so excited to show you our creations! 

If you came here from:
you are on the right track!

If not, go back and start here: Scrap That!   
Then follow the rest of the order:
ScrapThat!
 

We are so happy to welcome the amazing 
Zoe Nemburt
as our June Guest Designer!!!
 
Hey, my name is Zoe Nemburt, and I am absolutely thrilled to be asked to design as a guest for ScrapThat! this month. I started scrapbooking in 2009 and seriously never looked back. I felt I had finally found my crafty passion!! Super Excited to be here for the month of June with the ScrapThat! team and I really hope to inspire you to create something fabulous.

Be sure to stop by Zoe's blog, Designs by Zoe, to be inspired by her gorgeous work! 

Now, without further ado....  

Introducing our June Kit,
 "From Sunrise to Sunset"

Featuring the designs of the fabulous Anna Dabrowska (a.k.a. Finnabair) we present a  collection of rich colors and designs that run from brights to neutrals. Whatever your scrapping style is, you will love this kit that is just chock-full of Prima goodies! Take a look:

Main Kit


Paper Add-On

Flower Add-On

 Embellishment Add-On


More details on this collection can be found here:
ScrapThat! Store 

We are currently accepting new

Kit Club Members.
For more information,
complete the form on the link below:
New Subscriber  

Look at the beautiful sketch Amarilys has created for June: 


See details about the challenge here: Sketch Challenges

We have something new for June!
In addition to Amy's sketch challenge,
 other members of the DT will also be hosting challenges!
  • Tracey G.'s challenge: "Scrap out of your comfort zone"
  • Laura's Challenge: "Using a long title"
  • Sandi's Challenge: "Color Challenge"
  • Tracey S.'s Challenge: "Use a stencil"
Check them out here. 

Everyone is welcome to participate.
Entries for all challenges are due by Wednesday, June 26.
 All winners of our challenges, including Layout of the Week, are eligible to receive 10% off any 2012 Kits ~ including Add-ons!
~~~~~~~~~~~~~~~
Here are my creations with the gorgeous ScrapThat! "From Sunrise to Sunset" June Kit!
Grandpa's Girls
(Based on the ScrapThat! June Sketch - MK, EAO)


Dreamer
(Based on the Prima May BAP - MK, FAO)

Sunrise Sunset Tags
(MK, EAO, FAO)
~~~~~~~~~~~~~~~
The June Blog Hop Prize is our "Life's Muse" Main Kit featuring Webster's Pages Everyday Poetry Collection (Webster's Poetry)

To qualify for this month's FABULOUS Prize, you must complete the following:
  • Visit each blog listed on the hop to see what each designer has created using this month's kit and sketch (comments are very much appreciated).
  • Each designer's blog hop post will feature a word or two that will make up a secret sentence, collect these words along the way.
  • You must become a FOLLOWER of each blog along the way and LIKE us on our Facebook Page!
  • Subscribe to Kelly's YouTube Channel at http://www.youtube.com/user/kellycreates
  • Post the ScrapThat! Blinkie on your blog.
  • For your last stop on our Blog Hop return here to the ScrapThat! Chat Blog. Leave a comment letting us know you have completed the hop.(Please do NOT include the secret sentence in your comments.)
  • Email the secret sentence to Tracey Sabella: tracey@scrapthat.ca
The Blog Hop ends Sunday, June 2 at Midnight EST.
The prize MUST be claimed within 3 days of the forum announcement which will also be made on the ScrapThat! Blog.
~ If left unclaimed a NEW winner will be chosen ~
**Winner will pay actual shipping costs for sending the kit from Canada.**
Shipping costs will be invoiced via PayPal unless you are a kit member,
 then your prize will be shipped with your monthly kit.
Prizes won during the month will be mailed out the first week of the following month.
Due to Customs clearance, International mailings sometimes take 30-75 days to receive.

My secret word is:
into

Next hop over to

For your final stop, return to the ScrapThat! Blog 
to let us know you have completed the hop.
Remember ~ only send the secret sentence to tracey@scrapthat.ca
Happy Hopping!

Wednesday, May 22, 2013

Quick and Easy Fussy-Cut Doily Rolled Rose Tutorial

Hi there! Just thought I would share a quick and easy flower tutorial with you today!

Materials Required:
Patterned Paper with doily print (can use any paper with larger circle pattern)
Fussy-cutting scissors (not pictured)
Scallop scissors
White craft glue
Pearl beads
1. Fussy-Cut Doilies from Patterned Paper.
2. Using scallop scissors, cut doily shapes into a spiral.
4. Starting at the outside edge, roll the spiral in on itself - you can use a paper piercer/paintbrush/quilling tool for this, but I just used my fingers. The tighter you roll, the smaller your rose.
5. Glue the rolled rose to the centre of the doily. 
6. Glue a pearl bead inside the centre of the rose.
That's it - a really simple rolled rose using the doily patterned paper included in the ScrapThat! May Anniversary Kit! Here is the layout I used these roses on!
Thanks for stopping by my blog today - hope you'll give these flowers a try!

Friday, May 10, 2013

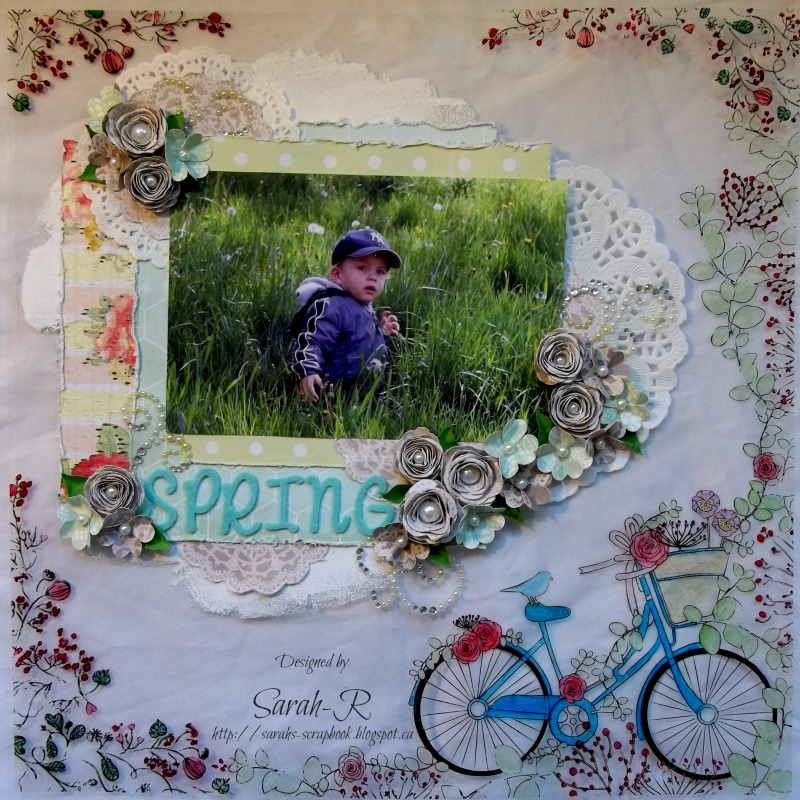
Spring - Details and Close-ups ~ ScrapThat! May Kit ~

Today, I'm sharing the details and close-ups of one of the layouts I created with the gorgeous ScrapThat! Spring into May Anniversary Kit. Today's layout is simply called "Spring" and features a picture of my son from last Spring (since this year, it seems, Spring decided to take its sweet time getting here and I couldn't get a decent Spring picture to use). I loved the KaiserCraft transparency included in this kit and used it as the base page for this layout. I coloured the transparency with Copic Markers - so cool how this turned out. Pictures of the layout are taken on a white background but it looks so much cooler in real life!
Here is a close-up of the coloured bicycle on the transparency. The Copic Markers worked really well to colour it - though you do see a few 'colouring lines'.
For the photo/layering area, I started out with a rough coat of gesso and then layered three different patterened papers, some fussy-cut doilies and two round doilies. I used the Alphas included in the Main Kit for the title. All the flowers on this layout are handmade and the Prima bling elements were also included in the Main Kit!
Here are some close-ups of the handmade flowers - I'll be posting a tutorial for the fussy-cut doily rolled roses later in the month!
Thanks so much for stopping by my blog! Happy Scrapping!

Friday, April 26, 2013

ScrapThat! May Anniversary Kit Reveal and Blog Hop!

Welcome to the ScrapThat! 
May Anniversary Kit Reveal and Blog Hop!! 

May is our three year anniversary and we want to 
thank all our subscribers and members for sharing their pages and creations with us!!
We are so excited to share the details about our newest kit
 featuring the amazingly gorgeous Prima Divine !!

If you came here from 
Tracey Gregory
you are on the right track!

Should you lose your way, here is the Blog Hop order:

We are so thrilled to welcome the talented Scrappy Superstar ~
Gabrielle Pollacco
as our May Guest Designer!!!


My name is Gabrielle Pollacco, I'm a mom of 2 sweet girls, happily married to my husband Steve and we have one big fluffy Labradoodle named Zoe, that sometimes makes her way into our family photos!   I've had the privilege of being a Guest Designer for ScrapThat! in the past year and was delighted to come back to scrap with this year's Anniversary kit! 

We are also so happy to announce our latest addition
 to the Design team as our Video Educator,
Kelly Klapstein !
Some of you may know me online as "Kelly Creates." I am a Canadian scrapbooker living in Edmonton, Alberta. I'm excited about sharing my designs and techniques with you through my video tutorials!"

You can subscribe to my YouTube Channel at www.youtube.com/user/kellycreates

Now, without further ado,
 introducing our fabulous May Anniversary Kit,
 "Spring into May"

And what a spring it is! We wanted a very special anniversary kit and this kit is packed with so many fresh and lovely goodies featuring Prima's Divine Collection. There are fabulous textures and soft bling to bring out your creativity!
Take a look:

Main Kit


Embellishment Add-On

Flower Add-On


Paper Add-On


More details on this collection can be seen here: ScrapThat! Store 

We are currently accepting new
Kit Club Members.
For more information,
complete the form on the link below:
New Subscriber 

Look at the beautiful sketch Amarilys has created for May:

See details about the challenge here: Sketch Challenges
Be sure to also check out the details of our monthly DT challenge
 hosted in May by Sarah here: DT Challenge
We have a Round Robin Challenge to celebrate National Scrapbooking Day this month as well hosted by Tracey G. It looks like it will be a blast!

Everyone is welcome to participate.
All entries for both challenges are due by Wednesday, May 29.
 All winners of our challenges, including Layout of the Week, are eligible to receive 10% off any 2012 Kits ~ including Add-ons!

Our Blog Hop features fabulous hop sites including our Design Team blogs. 
We have been scrapping away and are so excited to show you our  creations! 
~~~~~~~~~~~~~~~
Here are my creations with this month's gorgeous kit! 
Egg Hunt
Based on the ScrapThat! May Sketch - Main Kit, EAO, FAO

c.1979
Based on the Prima BAP for April - Main Kit, FAO

Spring
Main Kit Only

Be sure to check my blog later in the month for details and close-ups of all these projects!
~~~~~~~~~~~~~~~
The May Blog Hop Prize is our 2012 Main Kit,Prima's Nature Garden


To qualify for this month's FABULOUS Prize, 
you must complete the following:

* Visit each blog listed on the hop to see what each designer has created using this month's kit and sketch (comments are very much appreciated).

* Each designer's blog hop post will feature a word to make up a secret sentence,
collect these words along the way.

* You must become a FOLLOWER of each blog along the way 
and LIKE us on our Facebook Page!

* Post the ScrapThat! Blinkie on your blog.

* For your last stop on our Blog Hop return here to the ScrapThat! Chat Blog.
Leave a comment letting us know you have
completed the hop.
(Please do NOT include the secret sentence in your comments.)
*Email the secret sentence to Tracey Sabella:tracey@scrapthat.ca

The Blog Hop ends Sunday, April 28 at Midnight EST.


The prize MUST be claimed within 3 days of the forum announcement which will also be made on the ScrapThat! Blog.
~ If left unclaimed a NEW winner will be chosen ~
**Winner will pay actual shipping costs for sending the kit from Canada.**
Shipping costs will be invoiced via PayPal unless you are a kit member,
 then your prize will be shipped with your monthly kit.
Prizes won during the month will be mailed out the first week of the following month.
Due to Customs clearance, International mailings sometimes take 30-75 days to receive.

My secret word is:
Gerard

Next hop over to
Tracey Sabella

For your final stop, return to the ScrapThat! Blog 
to let us know you have completed the hop.
Remember ~ only send the secret sentence to tracey@scrapthat.ca
Happy Hopping!