Showing posts with label Christmas. Show all posts

Wednesday, November 21, 2018

Shabby Chic Christmas Altered File Folders ~ Creative Embellishments

Hi there Crafty Friends! Today I'm sharing a Shabby Chic Christmas project with you - using gorgeous chipboard elements from Creative Embellishments! Like all of you, I'm sure, I've started getting ready for Christmas - and decided to create these Altered File Folders as packaging for Christmas Gifts! I coffee-dyed a standard letter-size file folder and then cut it in half - sewing the sides of each half closed to create a pocket. I layered vintage music paper, vintage dictionary paper, some coffee-dyed paper doily, and some pages from Charles Dickens' A Christmas Carol on the folders and then added some vintage pink velvet ribbon and some vintage pink & white floral lace. I printed the angel images (a free printable I found on Pinterest), distressed them with Vintage Photo Distress Ink and stitched them to some coffee-dyed paper and white cheesecloth. I added three buttons, stitched with silver thread, to each printed image. I added a CE chipboard Pine Tree to each folder - I embossed the trees with Stampendous Embossing Powder in Winter Wonderland. I also added a CE chipboard Bow to each folder - I embossed the Bows with Distress Embossing Powder in Worn Lipstick, but didn't like the colour tone on this project, so I painted over it with some Prima Art Alchemy Metallique Paint in Vintage Rose and added some highlights with Smooch Pearl Accents. Finally, I embossed words from the CE Chipboard Christmas Sentiments with Martha Stewart Embossing Powder in Sterling - I used silver to pick up on the silver flecks on the trees and the silver thread in the buttons.


I've left the back of the folders fairly plain (for now!) - simply adding a small collage of vintage music paper, book page and lace at the top and randomly stamping the folders with my favourite CE Stamp - Distressed Script.

Tuesday, December 19, 2017

Creative Embellishments House Vignette with Graphic 45's A Christmas Carol Collection ~ and a Video Tutorial for Assembling the House Vignette!

Hi There Crafty Friends! I hope you're enjoying a fantastic holiday season. Today, I have a fun project created with the new Creative Embellishments House Vignette - https://creativeembellishments.com/house-vinguette to share with you. I've used the Vignette along with Graphic 45's A Christmas Carol collection to create this little Christmas House scene.


Other CE Products Used:
Outside:
Inside:
For the full details about how I altered the chipboard pieces, as well as a tutorial on how to assemble the CE House Vignette, you can pop over to my YouTube Channel!
Assembling the House:
You will need eleven 1 in. wide hinges – scored at ½ an inch and cut as follows:
  • 2 Sides – 5 ¾ in. 
  • 1 Bottom – 5 3/8 in. 
  • 2 Bottom Corners – 1 ¼ in. 
  • 2 Roof Sides - 4 in. 
  • 1 Roof Bottom – 5 3/8 in. 
  • 2 Roof Bottom Corners – 1 ¼ in. 
  • 1 Roof Peak – 1 ¼ in.
Thanks so much for stopping by my blog today! Happy Holidays!

Saturday, December 9, 2017

Believe - Baby's 1st Year December Layout ~ Creative Embellishments

Hi there Crafty Friends! Today I'm sharing another layout in my Baby's First Year series - created for the Creative Embellishments Design Team! Once again, I've used a combination of several Graphic 45 paper collections (A Place in Time, Children's Hour, Place in Time, and St. Nicholas) to create this layout - keeping with the theme I'm using throughout the 12 months of the album!
I've used the CE Chipboard Holly and Berry Flourishes and the Believe title from the Inspire Word Set on this layout. I painted the chipboard elements with Prima Art Extravagance Metallique Acrylic Paints and inked them with some Vintage Photo Distress Ink. I added Crackle Accents to the Holly Branches and Glossy Accents to the Holly Berries. Here is a close-up and a couple of different angles so you can see all the details and layers.


Tuesday, November 21, 2017

Junk Journal Style December Daily ~ with Video Flip Through

Hi there Crafty Friends! Today, I have a new journal to show you - a  Junk Journal Style December Daily. I made this journal using the Creative Embellishments Personal Journal Cover and Maja Design It's Christmas Time papers. The Maja Designs November Mood Board was the perfect inspiration to get some holiday crafting done!
I have a few pictures of the journal below, but to see all the details make sure you check out the Video Flip Through on my YouTube Channel!


Monday, December 19, 2016

Christmas 'Pinspiration' - Melted Snowman Ornaments ~ Creative Embellishments

I love Pinterest! It is such a great source of inspiration for crafty ideas - so I have to credit this project as a Christmas 'Pinspiration'! I've used the new Creative Embellishments Snowman Parts to create these Melted Snowman Ornaments.
If you have kids - you'll know that Disney's Frozen is still hugely popular - and my son loves Olaf, so I made him these ornaments with Olaf's quote "Some people are worth melting for..." I used inexpensive clear plastic Christmas balls and added some Ornament Flakes (from Michael's) and the Creative Embellishments Snowman Parts inside. I painted the Snowman Parts with Acrylic Paints - and made sure to paint both sides so that when you shake the ornament, the colour is visible on both sides. I added 'icicles' around the top of the Christmas Balls using a DecoArt Glistening Snow Writer (LOVE this product). Then I decorated the top of the ornament with some floral elements and twine and created a burlap banner to mat and hang the quote from the top. My son loves these - and because they are plastic, he can shake them around to find all the hidden Snowman Parts in the 'melted snow' inside! Here are some close-ups!


Thanks so much for stopping by my blog today! Happy Holidays!

Wednesday, November 16, 2016

St. Nicholas Christmas Ornaments ~ Creative Embellishments

Today, I'm sharing a set of Christmas Ornaments I made using the Creative Embellishments chipboard Stars Frame, along with Graphic 45's St. Nicholas collection. I trimmed the two smaller stars off the largest Star Frame and then embossed the three frames with Stampendous Embossing powder in Detail Gold. I used some of the 6x6 St. Nicholas papers on the back of the chipboard stars to create the base for the ornaments - the patterned side faces the back so that the back of the ornaments are pretty to look at too. I used lots of fussy-cuts from the 8x8 St. Nicholas Papers and pieces from the St. Nicholas Banners sheet to decorate the Star ornaments and then finished the embellishing with some Creative Embellishments Wood Veneer Holly Leaves and some ribbon. I painted the Holly Leaves with metallic paints and then added some Christmas Red Stickles to the holly berries for a dash of glitter.
Here are some close-ups of each of the ornaments. 

Thanks for stopping by my blog today! Happy Crafting!

Wednesday, January 13, 2016

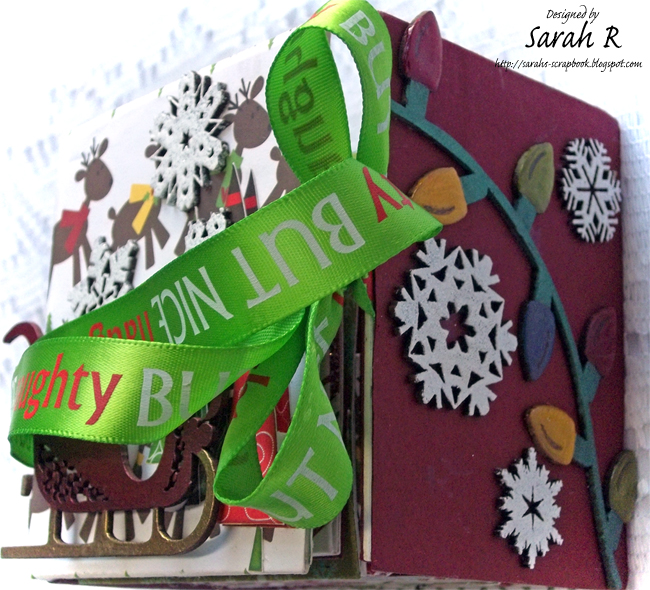
An "Elf-Sized" Mini Album for Creative Embellishments

Hi Crafty Friends!  Today I'm sharing a fun little project with you! I've created an "elf-sized" mini album - the album pages are only 3 in. x 3 in.! I made this album for my son for his Elf on the Shelf pictures from this past December. The Elf on the Shelf is such a fun thing for small children and keeps the "magic" of Christmas alive for the whole month, so there are twenty-four pocket pages in the album to hold a picture for each day from Dec. 1 - Dec. 24. A tiny album like this is also a great way to use up your stash of leftover Christmas papers!
I created a four-sided cover for the album and have decorated three of the four sides with Creative Embellishments chipboard elements. For the outer spine of the album, I've used The Elf on the Shelf title chipboard, which I embossed with Antique Gold embossing powder. I stacked the title so that it was triangular from top to bottom, to reflect the shape of a Christmas tree. I added some sequins as Christmas balls and a CE Chipboard Snowflake (embossed with Winter Wonderland embossing powder) as the 'star' of the tree.
I created a mini-scene on the front cover by fussy cutting some paper trees twice and layering them and added some CE Chipboard Snowflakes and the Santa Flourish Sleigh. I embossed the runners and the railing of the sleigh with Antique Gold embossing powder and painted the sleigh using Silks Acrylic Glaze in Carmen.
On the folding spine, I've used some more Chipboard Snowflakes and a section of the Christmas Light Strand 4 chipboard. I painted the Christmas Lights with Silks Acrylic Glazes and then added Glossy Accents to the bulbs to give them a nice, dimensional shine.
Finally, for the pages inside the album, I have used lots of Chipboard Snowflakes on the pockets to decorate the pages. I also used a tiny chipboard button (painted with Silks Acrylic Glaze and then treated with Glossy Accents) on the inside of the spine to hold the tassels and ornaments I used to add a little more interest to the spine.
Now I just have to add the photos and journalling and my son's Elf on the Shelf Album will be complete!

I hope you enjoyed my fun little Elf album! Happy Crafting!

Tuesday, December 22, 2015

Vintage Santa ATCs

I created this set of ATCs for the November/December ATC exchange at Scraps of Darkness/Scraps of Elegance! I found out today that my exchange partner, Jenny, got them - so now I can share some photos/details about them!

My craft room is currently dis-assembled for redecorating, so I had to use some papers that I had handy - so I used the American Crafts Jack Frost 6x6 papers and some Vintage Santa images from Meg's Garden for the ATCs. I went with a wintery theme and stenciled on some Liquitex Opaque Flakes texture paste and poured Finnabair glitter over the wet paste for some extra shimmer. I made a wreath with some berry vine from my stash and punched out greenery from three different shades of green paper. I added some flowers from Wild Orchid Crafts and some winter berries from my stash and then finished the ATCs off with the 'snow' made from heavy gesso sprinkled with glitter. Here is a photo of the set and some close-ups of each ATC.


I really hope Jenny liked her ATC set! Happy Christmas!

Saturday, December 12, 2015

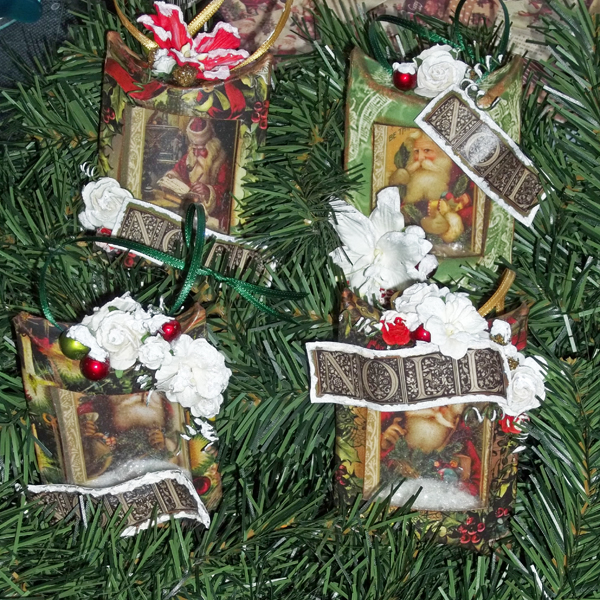
Victorian Pillow Box Shaker Ornaments and a Tutorial ~ for Meg's Garden!

Hi Crafty friends! Sarah here to share a set of four Pillow Box Shaker Ornaments I created using the absolutely divine Meg's Garden Vintage Christmas Papercrafter Pack! I've put together a video slideshow tutorial showing how to create one of these easy but beautiful ornaments - I hope you'll give it a try.

Here are a couple of photos from different angles of the set of ornaments - aren't the papers just gorgeous?! And I love those vintage Santa images. I embellished with some flowers and winter berries from my stash and added some heavy gesso and fairy dust as 'snow' to the embellishments and "Noel" cut-out!


And here is the full step-by-step slideshow tutorial!

Video Slideshow Tutorial


Thanks for stopping by my blog today! Happy Crafting!

Meg's Garden Products Used:
Vintage Christmas Papercrafter Pack

Tuesday, October 20, 2015

A Victorian Christmas Advent Calendar and High Tea at Younique - Nov. 8 and Nov. 15!

Please join me for the first class I'll be teaching at Younique Country Retreat Scrapbooking. This is a class you do not want to miss. You will create a beautiful Advent calendar using Prima's Victorian Christmas papers and flowers and a House of Drawers from KaiserCraft. This will be a keepsake that will be passed down from generation to generation.

This class will be offered at both the Guelph (November 8) and Mount Forest (November 15) locations. The Class fee of $90 includes all materials, instructions and, of course, what's a Victorian project without a High Tea in the afternoon! Register through the Younique Online Store or call (519) 836-0045.


I hope you'll join us at Younique for a fun afternoon of crafting!

Sunday, January 4, 2015

Holiday Magic is Found at Home

I took a little break from scrapping for the last month or so but I'm back with a new layout created to play along with a couple of challenges! I had lots of fun playing with different media on this one - definitely a good start to the New Year to get my mojo back!  I scrapped a sweet picture of my son wearing a Santa hat that I took this past December ...he's such a cutie! I definitely prefer to stay "home for the holidays" - so the title of the layout is Holiday Magic is Found at Home.


The Scraps of Darkness/Scraps of Elegance January 2015 Inspiration Board provided the inspiration for this layout - the gorgeous colours in the Aurora Borealis and the snowy branches were perfect inspiration to create a frosty layout.
I've used 7 Dots Studio "Cold Country" papers for this layout (actually from a past SOD Kit -Nov. 2013) and a holiday theme to play along with the December challenge at the 7 Dots Studio blog.
I've used a variety of Lindy's Stamp Gang Starbursts on the background and flowers -- together with some glamour dust added to the molding paste in masked areas and sprinkled on the gesso-painted cardboard, this layout has a lot of sparkle. I wish the photos showed the sparkle better!

That's my first layout of the New Year! I'll be back later this week with some exciting news to share - until then, Happy New Year and all the best to you in 2015!
Materials Used: Patterned Paper - 7 Dots Studio "Cold Country" - Forgotten and Lonely Evenings; Lindy's Stamp Gang Starburst Mists - Afternoon Delight Denim; Wild Honeysuckle Coral; Tea Pot Purple; Time Travel Teal; Golden Light Molding Paste; DecoArt Glamour Dust; The Crafter's Workshop 12x12 Template Half Tone Borders; Cosmo Cricket Tiny Text; Farmhouse Paper Company Metal Key; Prima Marketing Inc. Flowers and Bling; Corrugated Cardboard; Acrylic Gesso; Aleene's Tacky Glue.

Sunday, December 8, 2013

A Nutcracker Sweet Christmas ~ Imaginarium Designs

Today, I am sharing two Christmas projects with you - both using Imaginarium Designs Chipboard with Graphic 45's Nutcracker Sweet collection.
~~~~~~~~~~~~~~~
Nutcracker Sweet Bell Jar
First up is a Bell Jar I put together using the Imaginarium Designs Bill Board Train as the base. I knew as soon as I saw this 3D Train that I wanted to use it with the Graphic 45 Nutcracker Sweet collection and create a Nutcracker Christmas scene!
I mod-podged some of the the Nutcracker Sweet paper to the vertical portion of the Bill Board Train piece and did lots of fussy-cutting for the characters/embellishing.
 For the Train Side, I've included images of the Grandfather Clock, the Mouse King and the Nutcracker and added a "Happy Christmas" Title Chipboard.
I painted the train with acrylic paints and then dry-brushed gold paint over the entire thing; for the smoke, I used a Snow Marker that creates a puffy snow effect when heated with a heat gun. I painted the train track with black acrylic paint and then heat embossed it with holographic embossing powder. For the title, I painted it gold and then heat-embossed it with gold embossing powder. In the background, behind the train and the Mouse King, you can see one of the small Imaginarium Designs Chipboard presents.
 For the other side of the 3D piece, I again mod podged the paper to the vertical piece and fussy cut the title and an image of Clara from the Graphic 45 papers. I added a large bottle-brush Christmas Tree to this side as well.
I painted the Imaginarium Designs presents with acrylic paint and then used Sparkle Mod-Podge over that to give the pretty sparkly finish. You can also see the base of the Billboard Train, painted with gold acrylic paint and a better view of some of the train track in this photo.
~~~~~~~~~~~~~~~
Nutcracker Sweet ATC/Ornament
My second project today is an Artist Trading Card, which can also be used as a Christmas Tree Ornament.
Once again, lots of fussy cutting of the Graphic 45 Nutcracker Sweet papers. I also did some masking with a Crafter's Workshop 6 x 6 template and some Sparkle Texture Effect mixed with Heavy Gel Medium to create a "snow" effect.
I used the Imaginarium Designs Music Symbols with Holly on the ATC - I heat embossed them with Gold Embossing Powder and then used Stickles in Christmas Red and Holly to add the Holly details.
~~~~~~~~~~~~~~~
Imaginarium Designs Chipboard Used
4 Presents on Board - IDT0008

Bill Board Train - IDAA0006


Happy Christmas - IDP0073 

Music Symbols with Holly - IDFL0006

Other Materials Used:
Patterned Paper - Graphic 45 Nutcracker Sweet collection; Acrylic Paint; Mod Podge - Matte and Sparkle; Distress Embossing Ink; Ranger Embossing Powder - Holographic; Stampendous Embossing Powder - Detail Gold; Ranger Stickles - Christmas Red and Holly; Martha Stewart Sparkle Texture Effect; Heavy Gel Medium; The Crafter's Workshop 6 x 6 Halftone Circles Template; Marvy Uchida Snow Marker; Recollections Holiday Ribbon; Sparkle Resin Heart; Mini Bells; Aleene's Tacky Glue; 3D Foam Adhesive; Beacon 3-in-1 Glue.

~~~~~~~~~~~~~~~
That's it for me today - I hope you enjoyed my Christmas projects and I would like to wish everyone a wonderful holiday season! Don't forget to leave a comment on my blog post on the Imaginarium Designs Blog for a chance to win some amazing Imaginarium Designs Chipboard!