Showing posts with label Art Anthology. Show all posts

Tuesday, July 29, 2014

Day 3 of the Couture Creations & Imaginarium Designs Blog Hop

#couturecreationsaus   #imaginariumdesigns

Welcome to Day 3 of the

Couture Creations & Imaginarium Designs Blog Hop!  


We’re so excited to team up with Couture Creations sharing inspiring projects created with both our products with you this week. What could be more perfect than Embossing Folders and Dies and Imaginarium Designs gorgeous Chipboard designs.

Each day this week we will feature our Design Team projects and over on the 
Couture Creations Blog they will also feature their Design Team projects all created using Couture Creations and Imaginarium Designs products. So loads of inspiring projects for you to help get your creative juices flowing.
We will link to the tutorials on each Design Team members blogs,
please show all our designers some love and leave a comment on their blog.
We’ll be giving away Two $100 prize packages filled with Couture Creations & Imaginarium Designs goodness at the end of the week, so be sure to play along and check back on both Imaginarium Designs and Couture Creations blogs Monday 4th August 2014 to see if you’re the lucky winner!
Here are the different ways you can play along with us –
Like Couture Creations on Facebook.
Like Imaginarium Designs on Facebook.
Follow both the Imaginarium Designs and  Couture Creations Blogs. 
Share today's Imaginarium Designs blog post on your Facebook wall and tell them you did on our 
Facebook page.
 
 Leave a comment on today's blog post on the Imaginarium Designs blog post and on their Facebook page.
 Follow Couture Creations on Pinterest.
Follow Couture Creations on Instagram.
Hop over to the Couture Creations Blog and see what their Design Team has created using their Chipboard and Couture Creations products! 

They also have a  giveaway, so what are you waiting for – hop over!  

Oh, and don't forget to follow our Design Team Blogs!
~~~~~~~~~~~~~~~
Here is my project for the Blog Hop! 
I was inspired by the organic feel of the pattern in the Couture Creations embossing folder to create an "earthy" mixed media tag! This tag was so fun and easy to create with the Imaginarium Designs Chipboards and Couture Creations Die and Embossing Folder - here is a quick step by step:
  1. Emboss a piece of paper slightly larger than your tag base with the Couture Creations Embossing Folder - I have used the Large Peacock Fans Folder from "The Marriot Collection".  Glue the embossed paper to your tag base and trim around the edges and punch the hole.
  2. Gently ink the surface of the embossed tag - this will really bring out the embossing - also ink the edges. I've used Distress Ink in Vintage Photo
  3. If you wish, add some more detail with a mask and 3D paint - I've used the Mini Leaf Frame 6x6 template from The Crafter's Workshop with Art Anthology Velvet Dimensional Paint in Basil
  4. Cut three small frames using the Couture Creations Elegant Square die from "The Van Roe Collection". Layer the three frames using 3D foam adhesive. The layered frames become the centerpiece of the tag. I added flowers, fussy cut butterflies and a large square brad inside and around the frame as embellishments.
  5. Now for your chipboard elements - mist two of the Imaginarium Designs Art Deco Embellishments - I've used Art Anthology Colorations Spray in Mocha. Paint the Imaginarium Designs Word "grow"  (I've used the same paint as I used for the masking), then add Ranger Crackle Accents to the word. 
  6. Add the chipboard embellishments to the tag, layering the title on top of one of the Art Deco flourishes. I've also added a brad to the centre of each of the Art Deco Embellishments - they frame the brads perfectly!
  7. As a final step, if you want to - splatter your tag with a few drops of the same mist you used on your chipboards. 
Here are some close-ups of the tag!


~~~~~~~~~~~~~~~
Be sure to stop by the other Imaginarium Designs DT Blogs today:  Evgenia Sokolinskaya and Romy Veul.
Also - pop over to Couture Creations Blog to see what
Sue Smyth  &  Amanda-Jayne Baldwin
have created.
Don't forget to share the love!
~~~~~~~~~~~~~~~
Imaginarium Designs Chipboard Used
Denise's Art Deco Embellishment 1 - Tiny
IDDD0010
 
 love, grow, hello
IDW0083

Couture Creations Products Used
Embossing Folder - The Marriot Collection
Large Peacock Fans
CO723668
 Die - The Van Roe Collection
Elegant Square
CO723724

Other Products Used
Patterned Paper - FabScraps  Fantasy Flight C65 005; Art Anthology Velvet Dimensional Paint - Basil; Art Anthology Colorations Spray - Mocha; Distress Ink - Vintage Photo; Ranger Crackle Accents; The Crafter's Workshop Balzer Designs 6 x 6 Template - Mini Leaf Frame;  Farmhouse Paper Company Norland Buttons, Brads & Metals; Prima Flowers - Time Traveler's Memories Collection; Burlap Ribbon. 

Sunday, July 20, 2014

Vintage Steampunk Dress - Mixed Media Canvas ~ Scraps of Darkness

I have a mixed media canvas to share with you today that I had so much fun making with papers, embellishments and media from the June Perfectly Stunning Kit from Scraps of Darkness. One of my favourite 'paper artists' is Gabrielle Pollacco - and my canvas was inspired by this tutorial on her youtube channel. So, here is my 'darker' interpretation of her tutorial - a Vintage Steampunk Dress Mixed Media Canvas.
I started off by adding some bits of drywall tape to the canvas and then priming it with the Art Anthology Gesso included in the Creativity Add-on. Then I misted the canvas with three Lindy's Stamp Gang Mists (from my stash) - Midnight Rendezvous Raven and Cocoa Bean Copper Starbursts and Steel Shimmer Glitz Spritz. I added torn bits of the "Chrononaut" paper from the Bo Bunny Somewhere in Time collection which I distressed and inked with Distress Ink in Vintage Photo. I added the torn papers to the canvas with matte Mod Podge - I love how they look like old leather! I then did some masking with a mask from my stash and a mix of two of the Art Anthology paints from the Colour Add-on - the Stone Effects Dimensional Medium in Sandstone mixed with the Velvet Dimensional Paint in Kona. Here are some different angles of the full canvas.


Now we come to the dress! I fussy-cut the corset from the "Elegance" Bo Bunny paper and inked it with the Vintage Photo Distress Ink.  I added some dimension to the bodice by flipping it over and rubbing 'appropriate' areas with a ball tool. I created the skirt using a section of a sewing pattern and some black lace from a previous SOD Kit (Oct. '13) and splattered it with the black and copper mists. I added the chain from the Creativity Add-on to the watch fob from the Embellishment Add-on and used it as a belt for the dress. To embellish the canvas, I added the small black wings (Embellishment Add-on) and Prima flowers (Main Kit & Flower Add-on). The letters for the title (inked with distress ink and painted with black/copper mist mixture) are from my stash and the bling is from a previous SOD Kit. I also added in parts of a Dusty Attic Chickenwire panel that are embossed with Distress Embossing Powder in Black Soot. Here are some close-ups of the dress and embellishments on the canvas.


I hope you liked my Vintage Steampunk Dress Mixed Media Canvas - I had such a blast creating it! I definitely want to create more canvases like this!

Thanks for stopping by my blog today! Happy Scrapping!

Sunday, July 6, 2014

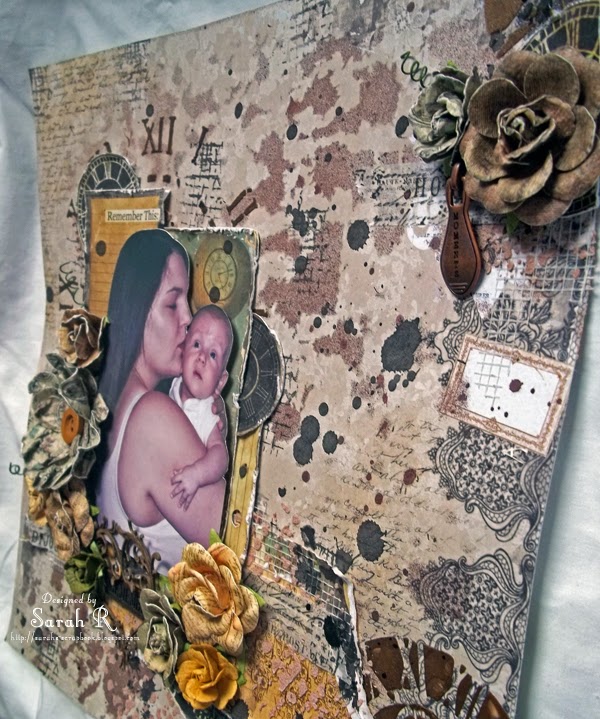
Remember ~ Scraps of Darkness

This is my first layout with the gorgeous Scraps of Darkness Perfectly Stunning Kit for June 2014. This will also be my last kit designing for Scraps of Darkness - I have had an amazing year with SOD and can't say enough about how wonderful Melinda (the owner) and the SOD/SOE Design Teams are - they have made my DT experience truly fantastic!

Now, to share my first layout - based on Suepup's Sketch for the June Kit. Here is my layout, using the kit's fantastic Marion Smith Designs Nirvana papers, Prima flowers and embellishments (Main Kit, Flower Add-on and stash) and the Art Anthology media included in the Colour Add-on.
And here is the June Sketch:
Rather than using paper for the large circle element in the background, I started out by masking a large clock face using a The Crafter's Workshop 12 x 12 Time Travel  template with the Art Anthology Velvet Dimensional Paint in Kona. I used the Tim Holtz Clockwork layering stencil (previous SOD kit) with the same paint on the right side of the layout. Once that had dried, I used the Prima Stain 12 x 12 Mask and misted the background page with the Art Anthology Mocha Colorations Spray. Then I started layering my torn and distressed papers along the bottom, adding in some drywall tape and pieces of Tim Holtz Tissue Tape (Sketchbook pack). Once that was in done, I did some more masking in a few places using The Crafter's Workshop 12 x 12 Well Rounded template with the Art Anthology Stone Effects Dimensional Medium  in Sandstone and then some stamping with black ink and a mesh stamp. The last bit of layering was the distressed matting for the photo and the fussy-cut clocks. As a final touch I did some splattering using Liquitex Ink in Carbon Black. To complete the layout, I added the photo, the Prima Flowers and Embellishments and included a chipboard heart from my stash that I painted with the Kona paint. Here are some close-ups!


Thank you so much for stopping by my blog today - I appreciate your visits and comments so much.

Happy Scrapping!

Thursday, May 22, 2014

With Love ~ Scraps of Darkness

I have another project created with the Scraps of Darkness April His & Hers Kit to show you today. After creating some Gothic ATCs and a couple of boyish layouts with this kit, I decided to change things up and create a romantic layout featuring a honeymoon photo of my husband and me.
I did some masking in the background with two The Crafter's Workshop Masks - one with Art Anthology Dimensional Paint in Truffle Velvet and the other with light molding paste then spritzed with Lindy's Stamp Gang Starburst Mist in Steampunk Sepia - I let some of the Steampunk Sepia  mist drip down the page as well. I used lots of distressed layers of the Prima Stationer's Desk collection papers and the Prima chalkboard paintables. I used a black and white photo to coordinate with the black elements in the layering - and scraped the edges of the photo with my distressing tool and then painted them with Lindy's Stamp Gang Flat Fabio in Sandra Dee Sepia - I also splattered the layout with the Sandra Dee Sepia. The paper clips, gorgeous lace, ribbon and flowers from the kit - and the incredibly cool metal flower flourish - made embellishing this layout so fun! The title is a Stationer's Desk tag from the Embellishment Add-On - though I replaced the more rustic twine from the tag with the burgundy crinkle ribbon from the Main Kit. Here are some close-ups!

Thanks for visiting my blog today! Happy Scrapping!

Saturday, May 17, 2014

Snapshots ~ Scraps of Darkness and Imaginarium Designs

This layout was created with the Prima Stationer's Desk collection included in the Scraps of Darkness April His & Hers Kit, along with some Prima flowers and metal embellishments from previous kits and some Art Anthology dimensional paint from my stash. The fun photos of my son are from May the Fourth - hence the Star Wars shirt in the photos. . . May the Fourth be with you.....
I based this layout on the April SOD Sketch - I've used the masked rulers instead of paper strips. Once the gold masked areas dried, I rubbed them with Inka Gold in Hematite to get the silvery-gold combination. I stapled some of the ruler ribbon from the Main Kit to the layering and added in some Prima flowers a Prima clock (cut in half) from previous kits. I really wanted a lot of metallic elements in this layout! Before adding the photos, I splattered the layout with Gold Izink and Liquitex Acrylic Ink in Black Marble.
I used one of the Imaginarium Designs Snapshots Frames, which I painted with Art Anthology Gold Sorbet dimensional gel paint. This is the same paint I used for the ruler masking on the layout - I just love the metallic glittery finish. I added in one of the Tim Holtz clips from the Creativity Add-on to one of the pictures as another metallic element. Here are some close-ups!


Imaginarium Designs Chipboard Used
Family Snap Shots in Frame Square Corners
IDW0054

Other Products Used
Scraps of Darkness April 2014 "His and Hers" Kit:  Patterned Paper - Prima Stationer's Desk collection; Ruler ribbon, Tim Holtz Hinge Clip. Stash: Art Anthology Dimensional Gel Paint - Gold Sorbet; Tim Holtz Layering Stencil - Measured;  Prima Mechanicals Clock Face; Izink Pigment - Gold; Liquitex Acrylic Ink - Carbon Black; Inka Gold Metallic Rub - Hematite; Thread; Aleene's Tacky Glue; 3D Foam Adhesive
~~~~~~~~~~~~~~~
Thanks so much for stopping by my blog today. Don't forget to leave a comment on my post on the Imaginarium Designs Blog for a chance to win some Imaginarium Designs chipboard!

Sunday, April 13, 2014

Alice Art Journal Page - "Who are you?" ~ Scraps of Darkness

Today, I'm sharing an art journal page created in my new Art Journal that came in the Scraps of Darkness March "Radioactive" Kit - Creativity Add-On. I'm planning to do a series of "Alice" Art Journal pages - so I decided to kick it off with this one, entitled "Who are you?". If you are familiar with the Alice in Wonderland, you'll recognize this as a quote from the book - by the caterpillar to Alice.
I started with a sheet of watercolor paper cut to 5 x 7.5 in. to fit inside the Art Journal. I fussy cut the strips out of the Studio Calico Lemon Lush Analytics paper from the kit and randomly layered the strips on the base page. Then i added a light coat of heavy gesso using a credit card. Next, I added the fussy-cut Alice in Wonderland image using heavy gel medium (this works great as a glue/sealer). I used the Balzer Bits mask  by The Crafter's Workshop that came in the Creativity Add-on with some Art Anthology Velvet Dimensional paint in Limeaid. Once the paint had dried I used some Inka Gold in Cobalt Blue to highlight the stenciled area and randomly rubbed some around the edges of the page as well. I used the white foam letters from the kit and coloured them with Inka Gold in Haematite. Finally, I used the small feather stamps from the Creativity Add-On with some Lindy's Stamp Ganag Embossing Powder in Midnight Sapphire. I had so much fun experimenting and playing with the different art mediums creating this page! Here are some close-ups!


Thanks so much for visiting my blog today!