Showing posts with label Lindy's Stamp Gang. Show all posts

Wednesday, November 1, 2017

"Autumnus" Altered Mask ~ Creative Embellishments November Challenge

Happy November Crafty Friends! As always, the first of the month brings a new challenge over on the Creative Embellishments Blog. This month's inspiration picture is just gorgeous and the twist for this challenge is to use a flourish on your project!
Autumnus is the Roman goddess of Autumn/the harvest - and the inspiration image made me think of a nature goddess, so I was inspired to create this "Autumnus" Altered Mask.
I had a second-hand mask in my stash waiting to be altered - so I started off by painting it with black gesso and then started adding CE chipboard pieces, including Autumn LeavesBranch and Leaves, and Flourish 26 (for this month's twist to use a flourish). Once I was happy with the chipboard arrangement, I painted everything with black gesso and then dry brushed on some white gesso to help bring out the details. I misted the mask with two colours of Lindy's Stamp Gang Starburst Mists (Opal Sea Oats and Ponderosa Pines Olive) and then used Prima Metallique Acrylic Paints in Autumn colours to bring out the details of the chipboard pieces. When I was done adding colour, I added some Prima Metal Flowers, and a metal butterfly and pearls from mys stash and then added some Prima Art Ingredients Glass Glitter in Gold Rush and Mica Flakes in Gold Leaf. I finished off the altered mask by adding some moss green trim I had in my stash around the outside edge of the mask.

I hope you like my interpretation of this month's challenge - I can't wait to see what you create! Remember to follow the Rules for the Challenge so that you're eligible to win!

Challenge Rules:
  • Create a NEW project (i.e., layout, mini album, tag, card, canvas, etc…) as of November 1st 2017.
    • Please no back linking (meaning projects from previous months that may fit the challenge requirements). Please link only NEW projects.
  • Combining the CE Challenge with other challenges is permitted.
  • Please add your entry to the InLinkz box on the Challenge Post on the Creative Embellishments Blog to be eligible for the prize. You have until the last day of each month 11:55 pm eastern time to enter.
  • It is required that you mention in your blog post that you are playing along at Creative Embellishments together with a link back to our blog. Please make sure to reference our challenge. 
  • We would love to see you USE AT LEAST 1 OF CE products on your projects but it isn’t required to play along; however, everyone who does use CE product will get and extra chance at winning.
  • WINNERS will have 2 weeks to claim their prize. The winner will be announced on the CE blog post the day after the challenge ends.
Thanks so much for stopping by my blog! 

Friday, September 1, 2017

Six Impossible Things - Alice in Wonderland Art Journal Page ~ Creative Embellishments September Challenge

Happy September! It's my favourite time of year - the weather is crisp and cooling off and the kids are going back to school - a time full of possibilities! It's also time for a new challenge at Creative Embellishments! All the numbers on the inspiration photo were the perfect inspiration for this Six Impossible Things page for my Alice in Wonderland Art Journal. The quote reads:
Alice laughed. “There’s no use trying,” she said: “one can’t believe impossible things.”
“I daresay you haven’t had much practice,” said the Queen. . . “Why, sometimes I’ve believed as many as six impossible things before breakfast.”

I started the background by using the CE Distressed Checkers Stencil - I used a sponge and some Black Archival Ink and randomly added stencilling across the page. I also used the Black Archival Ink with one of the CE Halftone Circle Stamps to do some background stamping (for this challenge's twist). I added some stencilled clocks using a Prima 12x12 stencil and Prima Art Extravagance Copper Crackle Paste. I cut the image of Alice and the White Queen from an Alice in Wonderland Puzzle Book I found and then used Lindy's Stamp Gang Mists (Rusty Lantern Lime, Edelweiss Moss Green, Ponderosa Pines Olive, Caribbean Blue, and Breakfast Club Blue) and charcoal pencil to blend the scene from the image into the page. I painted the I-VI (for the 6 Impossible Things) of the Grunge Roman Numerals chipboard using Prima Art Alchemy Metallique in Acrylic Paint in Brass Hardware. Finally, I inked the edges of the pages using Prima Art Alchemy Metallique Wax in Aged Brass. Here are a few more photos!


I hope you like my interpretation of this month's challenge - I can't wait to see what you create! Remember to follow the Rules for the Challenge so that you're eligible to win!

Challenge Rules:
  • Create a NEW project (i.e., layout, mini album, tag, card, canvas, etc…) as of September 1st 2017.
    • Please no back linking (meaning projects from previous months that may fit the challenge requirements). Please link only NEW projects.
  • Combining the CE Challenge with other challenges is permitted.
  • Please add your entry to the InLinkz box on the Challenge Post on the Creative Embellishments Blog to be eligible for the prize. You have until the last day of each month 11:55 pm eastern time to enter.
  • It is required that you mention in your blog post that you are playing along at Creative Embellishments together with a link back to our blog. Please make sure to reference our challenge. 
  • We would love to see you USE AT LEAST 1 OF CE products on your projects but it isn’t required to play along; however, everyone who does use CE product will get and extra chance at winning.
  • WINNERS will have 2 weeks to claim their prize. The winner will be announced on the CE blog post the day after the challenge ends.
Thanks so much for stopping by my blog! 

Monday, July 31, 2017

"Adorable" - Large Mixed Media Photo Tag ~ Creative Embellishments

Today I'm sharing another project made with one of the fantastic Creative Embellishments Large Tags! I have created this "Adorable" Mixed Media Photo Tag featuring a picture of our new kitten, Anna!
I layered lace on the Large Tag an then some CE chipboard elements including: a piece from the Door Knockers, the Flourish Circle Frame, and one of the pieces from the Filigree Corner Set 1. I painted the entire piece with Prima Art Basics Heavy Black Gesso and Heavy White Gesso and then misted it with Lindy's Stamp Gang Starbursts in Opal Sea Oats and Red Hot Poker Orange and Lindy's Stamp Gang Flat Fabio in Tears on My Pillow Tangerine. I used Prima Art Alchemy Metallique Waxes in Rich Copper and White Gold to highlight the textures. I used the "Adorable" title from the Boy Word Set, which I inked with Ranger Jet Black Archival Ink and then rubbed with the Metallique Waxes. Finally, I added some cheesecloth as a 'bed' for the fussy-cut kitten picture and some white flowers that I highlighted with some of the Metallique Waxes. Here are some angles and a close-up so you can see all the details!


Tuesday, March 21, 2017

Rusty Patina Altered Denim Journal Cover ~ Creative Embellishments

Hi there! Today I'm sharing a fun Altered Denim Journal Cover with you - created using lots of amazing Creative Embellishments chipboard!
I started off altering the Prima/Finnabair Denim journal by using a Prima Stencil along with some Prima Art Basics Heavy Body Gel mixed with Prima Art Ingredients Mica Powder in Rust. Once the stenciled areas had dried, I added some bits of lace and trim and then started adding my Creative Embellishments Chipboard pieces, as well as some metal embellishments by Prima and trinkets from my stash. I've used the following CE chipboard pieces:
Once I was happy with the placement of all the chipboard pieces and embellishments, I covered everything with a coat of Prima Art Basics Clear Gesso. Then, I sprayed the cover with Lindy's Stamp Gang Starburst Mist in Cocoa Bean Copper. I used Prima Art Extravagance Rust Effects Paste to add the rust-look to the chipboard and then used some Prima Art Alchemy Metallique Acrylic Paint in Light Patina mixed with Prima Art Ingredients Texture Powder to add the green-tinted patina effect. I then dry brushed with Prima Art Alchemy Metallique Acrylic Paints in Light Patina and Ancient Coin in places to enhance some embellishments. Finally, I finished off the cover using some Prima Art Ingredients Copper Glass Glitter applied with Prima Art Basics Soft Matte Gel. Here are some close-ups so you can see all the details.


Thanks for stopping by my blog today! Happy Crafting!

Saturday, February 25, 2017

"Scorched Heart" Mixed Media 6x6 Canvas ~ Creative Embellishments

Today I'm sharing a mixed media canvas created for the Creative Embellishments Design Team! I'm calling this piece Scorched Heart.
I started out with a 6x6 canvas and used a Prima stencil and some Prima Art Extravagance White Crackle Texture Paste. Once the texture paste had dried, I added the a small tart tin that I had primed with Prima Art Basics Heavy White Gesso. Next, I started playing with colours to create the background - I've used Lindy's Stamp Gang February Colour Challenge Palette for this Canvas.
I used LSG Mists in Queen of Hearts Red, Pretty in Pink Pink and Dark Chocolate Truffle. I also used Prima Metallique Art Alchemy Gold Rush Acrylic Paint to add the gold-tone to the background and then inked the edges of the canvas with Distress Ink in Ground Espresso

Once I was happy with the back ground I added the altered Relics & Artifacts Flaming Heart on top of the Tart Tin. To alter the Relics and Artifacts Flaming Heart, I started by removing the jewelry rings from the two pieces and gluing them together. I painted the flames using Prima Metallique Art Alchemy Paints in Gold Rush, Fresh Orange and Rusty Red. I primed the heart with Prima Art Basics Heavy Black Gesso and then added a coat of Prima Art Extravagance Gold Crackle Texture Paste. Once the texture paste had dried, I sanded the heart to level out any bumpy areas and to add some extra distressing. Next, I painted the heart with a coat of Tim Holtz Distress Crackle Paint in Clear Rock Candy. Finally, when the clear crackle layer was dry, I misted the heart with the Queen of Hearts Red mist, allowing it to seep into the cracks and then wiped it off the surface. 
I used the smallest set of wings from the Fairy Wing Set 3 to add wings to the heart feature. I started off by embossing the wings with Lindy's Stamp Gang Embossing Powder in Golden Angel Wings and then adding some Vintage Gold Embossing Powder to the Wing Tips. The wings ended up being too light to suit the canvas, so I misted them with the Queen of Hearts Red mist and then added some Prima Metallique Art Alchemy Rusty Red Acrylic Paint to the Wings. I painted the wing tips with the Gold Rush paint and also lightly dry-brushed the gold over the red part of the wings.
To finish off the canvas, I added pieces cut from the Mini Quatrefoil 6x6 Panel. I inked the panel pieces with the Ground Espresso Distress Ink and then glued them to the frame. Wherever the panel pieces overlapped with the gold-tone in the background, I added some Prima Art Extravagance Gold Glitter using Ranger Crackle Accents. The glitter ended up being too . . . glittery. . . for the canvas so once it had dried, I painted over the glitter sections with the Gold Rush Paint to tone it down. I ended up loving the texture this gave to the gold sections of the panel!Thanks so much for visiting my blog today! Happy Crafting!


Wednesday, February 1, 2017

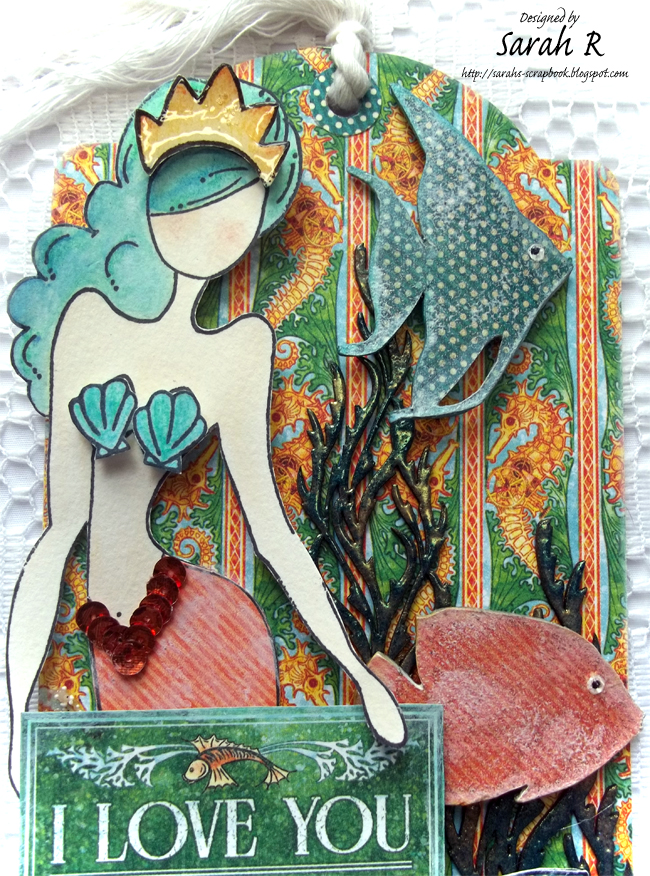
Voyage Beneath the Sea Mermaid Valentine Tag ~ Creative Embellishments February Challenge

I was inspired by this month's Creative Embellishments challenge photo to create a colourful Voyage Beneath the Sea Mermaid Valentine Tag. The twist on this month's challenge was to use paint - so I had some fun with Watercolours!

I stamped the mermaid and painted her with Watercolours and added some Graphic 45 Voyage Beneath the Sea paper to her tail. I created the scene using some Prima White Sand Texture Medium, Bronze Glitter and Prima Art Stones (regular and mini). I used Creative Embellishments Seashells and Seaweed 2, which I embossed with Lindy's Stamp Gang Embossing Powders. Then I lightly dry-brushed the seashells with white gesso to give them a weathered/under-the-sea look. I added two Creative Embellishments Tropical Fish to the scene as well. I covered the fish with paper from the Graphic 45 6x6 paper pad. Inked/Distressed them with Distress Ink and white gesso and then painted on the eyes. I painted them with some Prima 3D Gloss Gel Medium for some shine and added a dot of Glossy Accents for the fish eyes! 

Here are some different angles/close-ups so you can see all the details and dimension!


Hope you like my interpretation of this month's challenge - I can't wait to see what you create! Remember to follow the Rules for the Challenge so that you're eligible to win!

Challenge Rules:
  • Create a NEW project (i.e., layout, mini album, tag, card, canvas, etc…) as of February 1st 2017.
    • Please no back linking (meaning projects from previous months that may fit the challenge requirements). Please link only NEW projects.
  • Combining the CE Challenge with other challenges is permitted.
  • Please add your entry to the InLinkz box on the Challenge Post on the Creative Embellishments Blog to be eligible for the prize. You have until the last day of each month 11:55 pm eastern time to enter.
  • It is required that you mention in your blog post that you are playing along at Creative Embellishments together with a link back to our blog. Please make sure to reference our challenge. 
  • We would love to see you USE AT LEAST 1 OF CE products on your projects but it isn’t required to play along; however, everyone who does use CE product will get and extra chance at winning.
  • WINNERS will have 2 weeks to claim their prize. The winner will be announced on the CE blog post the day after the challenge ends.
Thanks so much for stopping by my blog! 

Friday, August 26, 2016

Mechanical Heart ~ Mixed Media Canvas for Creative Embellishments

Hi Crafty Friends! Today, I'm sharing a small mixed media canvas using lots of amazing Creative Embellishments products! I'm calling this my "Mechanical Heart".
I started out with a 5-in. embroidery hoop with a piece of canvas stretched inside it. Then I used the Creative Embellishments Crackled Brick Stencil with some Prima Art Extravagance Texture Paste in White Crackle. Once the texture paste had dried, I coated the canvas with clear gesso. I used white gesso on all the chipboard pieces prior to starting to layer them on the canvas. I've used the following Creative Embellishments chipboard elements to create the canvas:
I layered several pieces of the pipe works within the centre of the piece to create depth and create a level surface to attach the steampunk heart. Once all the chipboard elements were glued in place (and the glue had dried) I started misting/splattering the canvas with Lindy's Stamp Gang Starburst Mists in: Cocoa Bean Copper, Rusty Lantern Lime, and Ponderosa Pine Olive - I wanted the entire piece to have an "aged copper patina" look. Once I was happy with the mists/splatters, I painted the embroidery frame and dry brushed areas of the canvas with Prima Art Alchemy Metallique paints in Steampunk Copper and Green Olive. I used Prima Art Basics Soft Matte Gel to add Microbeads (in Antique Copper and Peridot) and Prima Art Ingredients Glass Glitter in Copper to the project. Finally, I finished the piece by adding a Prima Junkyard Findings Switch - which I also dry brushed with the Metallique paints. Here are some more angles and close-ups so you can see all the details!


Thanks for stopping by my blog today! Happy Crafting!

Friday, June 10, 2016

Mixed Media Altered Paint Brush ~ Creative Embellishments

Hi Crafty Friends! Today I'm sharing an altered paintbrush I made using lots of different Creative Embellishments Chipboard. I've used the following chipboard pieces on this project:
I started off by gluing all the chipboard pieces onto the paintbrush, also adding a few metal embellishments and a resin piece I had in my stash. I painted everything with two coats of white gesso to get a unified base to add the colour. I started off by spraying the piece with Lindy's Stamp Gang Midnight Rendezvous Raven Starburst. I really just wanted the black to settle into the recesses of the piece, so I gently wiped the top with a baby wipe to remove some colour. Next, I alternated misting the piece with Lindy's Stamp Gang Flat Fabios in Caribbean Blue and Summer Lovin' Sun. Once I was happy with the teal/blue and yellow blends, I wanted to add some pink too - so I mixed some Lindy's Stamp Gang Magicals in Pretty in Pink Pink with water and misted a few areas of the piece. I love how the different colours of mists blend to get hints of green or purple on the piece. I highlighted the word "Art" with Inca Gold Rub in Magenta and then highlighted raised areas of the entire piece with Inka Gold Rub in Champagne. Finally, to add a more distressed look, I scraped away some of the coloured areas to reveal some of the gold metal of the paintbrush. Here are a few more angles and close-ups!

The colours I used for this altered paintbrush were inspired by the yellow, pink and teal of the Lindy's Stamp Gang June 2016 Color Challenge.
This was such a fun project to make! I hope you enjoyed seeing it!

Friday, May 27, 2016

It's Always Tea Time! ~ Alice in Wonderland Inspired Art Journal Page for Creative Embellishments

Today, I have an Art Journal Page inspired by Alice in Wonderland to share with you - created for the Creative Embellishments Design Team! If you follow my blog at all, you'll know that I have a whole series of 'Alice' Art Journal Pages! I created the background using a stencil and Lindy's Stamp Gang Cheshire Cat Cherry Starburst, added the Tim Holtz Tissue Tape and then splattered the page with Curiouser Chartreuse Flat Fabio. Then, I used strongly brewed tea and added splashes, splatters and tea rings to the page. I used Creative Embellishments Clock Hands and Mini Pocket Watches embossed with Ranger Fine Black Embossing Powder to embellish the page and then added pieces of the Creative Embellishments Tea Set to the page. I wanted the Tea Set to look like old china, so I painted it with White Gesso and used the Lindy's Stamp Gang Mists to stain the designs on the chipbooard; finally, I used UTEE to give the Tea Set a nice glossy finish. The clock hands point to the tea cups because - "It's Always Tea Time!"
  Here are some close-ups and different angles of the page!


Thanks for stopping by my blog today. I hope you enjoyed another little trip to Wonderland!