Hi There Crafty Friends! Today, I'm sharing a new Creative EmbellishmentsHouse Vignette with you! I love the CE House Vignette SO much - it is such fun to create with - and this time I have used Graphic 45's Master Detective collection to create A Murder at 221B Baker St.
(Note: If you're going to be creating your own CE House Vignette,
I have a video tutorial on my YouTube Channel showing how I put it together.)
For the exterior of the House Vignette, I first covered the house with the Graphic 45 papers. Then, I added two Greek Gable End Ornaments as planters on either side of the house. I painted the ornaments with Prima Art Alchemy Metallique Paint in Steampunk Copper and then rubbed them with Art Alchemy Antique Brilliance Waxes in Lucky Emerald and Fire Ruby. I used the Arched Doors Set 2, one of the Windows Set of 4, and one of the Arrow Banners and embossed them with Stampendous Aged Black Embossing Enamel. I added some spiderweb paper behind the window and some Tim Holtz Vellum on the back of the doors. I hinged the doors and added Tim Holtz Mini Fasteners as knobs. The hinged doors open to reveal a fussy-cut of Sherlock Holmes (and Friends) in the doorway. Finally, I fussy cut "221B Baker St." from the Graphic 45 papers and added it to the Arrow Banner.
I used the Title Page of the 8x8 Master Detective collection to cover the interior of the House Vignette and then fussy cut elements from a second Title Page to create the 3D vignette inside the house. I added some spiderwebs and spiders, as well as some moss to the top of the house. I added moss along the floor of the house, along with skulls, a poison bottle, an evidence scroll, and a pumpkin. Here's a close-up of all the little decorative bits!
Hi There Crafty Friends! If you follow my blog, you'll know that I am a huge admirer of Graphic 45 - and it is time for their 2018 Brand Ambassador Auditions! I am throwing my hat in the ring this year and am showcasing two of my favourite G45 projects below!
Project #1: Voyage Beneath the Sea Mini Album with Video Flip Through and Step-by-Step Page Construction Tutorial
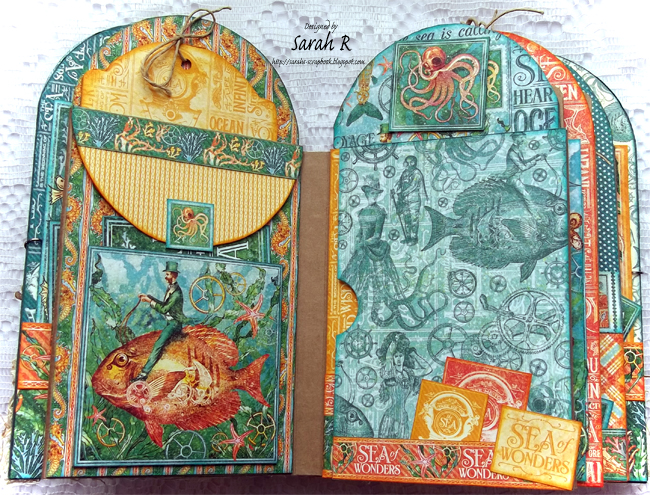
I created this mini-album using Graphic 45's gorgeous Voyage Beneath the Sea collection. I have a video walk through of the album so you can see all the pockets, tags and embellishments. I've also provided a tutorial in the video on how to create the page bases for the album. You can find the original blog post for this project (with all the measurements) here.
I embellished the cover of the album withchipboard elements by Creative Embellishments and added in some decorative grass and real sea shells. The closure for the album is a Tim Holtz Swivel Clasp and two seashell eyelets I had in my stash. All the Graphic 45 papers in the album are edged with Distress Ink - either Peacock Feathers, Wild Honey or Spiced Marmalade, depending on the colour of the patterned paper.
Mini Album Walk Through and Tutorial
Album Photos
Front Cover
Album Spine
Back Cover
Full Cover
Front Inside Cover & Page 1
Page 1 & Page 2
Page 2 & Page 3
Page 3 & Page 4
Page 4 & Back Inside Cover
Project # 2: Master Detective Clue Game
Oh No! Sherlock Holmes has been murdered and it can only have been by one of those closest to him! You are now a Master Detective and must discover which one of Holmes' companions has committed the crime!
We LOVE playing games in our family and Clue (by Hasbro) is one of our favourites! As soon as I saw the Master Detective Collection by Graphic 45, I knew I had to create my own version of Clue using the papers!
I created the folding gameboard and covered the back of the board with papers from the Master Detective 12 x 12 Patterns and Solids. All the papers for the game are inked with Distress Ink in Ground Espresso. I outlined the front panel of the gameboard with some Tim Holtz Halloween-themed Design Tape that perfectly complements these papers! I used the Signature Page from the 8x8 Paper Pad to decorate the front of the board.
I made a large envelope for the back of the 8x8 page and attached it with velcro dots - this way it can be used as storage for all of the game cards! I made a second smaller envelope (tucked into the pocket on the front) that can be used during the game to hold the suspect, weapon and location cards for the mystery.
I created the Weapon and Location cards by printing on some of the papers from the 12 x 12 Patterns and Solids - I sized these cards to fit on the 12 x 12 Master Detective Card cut-outs - so all of the cards, including the Character Cards, have the "Master Detective" Design on the back. I also created the game score cards using paper and colours that coordinate with the Master Detective Collection. I laminated all the cards so they could be played with and not get damaged; I also laminated the score cards so that they can be used with dry-erase marker! The game tokens are some small skulls I cut off of a Halloween costume necklace!
For the Game Board itself, I used different papers for each room (and a journalling card for one of the rooms) and then outlined each room with some Tim Holtz Design Tape so that the room boundaries were defined. The game spaces were made using alternating colours of the Houndstooth patterned paper from the 12 x 12 Patterns and Solids. All the room labels, as well as the weapons and "Clue" title are Custom Cut Creative Embellishments Chipboard!
Here's a closer look at all the cards, weapons and game tokens!
Well, that's it! My audition post is complete! Wish me luck!
Hi there! I'm back with a new instalment in my "Baby's First Year" series of layouts. I've used a combination of several Graphic 45 paper collections (A Place in Time, Children's Hour, and Time to Flourish) to create this layout, along with a Creative EmbellishmentsSweetheart chipboard title from the Valentine's Hashtags and a wood veneer heart from the Lover's Hearts Set 2.
I layered my papers and cut-out elements from the papers (all inked with Distress Ink in Vintage Photo), added the sweet photo of my son and then added the title and wood veneer heart to finish off the layout. The title was a bit too long, so I ended up cutting the hashtag off of it. I painted the sweetheart title and the heart with Prima Art Extravagance Metallique Paint in Royal Red and then inked them with Distress Ink in Vintage Photo. Here are some close-ups/different angles so you can see all the layers and details!
Hi there! Today I'm back with a new installment in my "Baby's First Year" series of layouts. I've used a combination of several Graphic 45 paper collections (A Place in Time, Children's Hour, Mother Goose, and Time to Flourish) to create this layout, along with two Spoons from the Creative EmbellishmentsSmall Cutlery set.
I painted the spoons with Prima Art Extravagance Metallique Paint in Silver Spoon and then dry-brushed two tones of Metallique blue paint (Midnight Sky and Rich Turquoise) on the handles. Once the paint was dry, I added some Vintage Photo Distress Ink to the spoons to make them look slightly tarnished. Here are some close-ups and different angles so you can see all the layers and details!
Happy New Year! Today, I'm sharing a little project to help keep me organized this year - a Passport-size Planner/Journal using the amazing Creative Embellishments Passport Journal Cover. I used the Graphic 45 Master Detective collection to decorate the journal cover - all the papers are inked with Distress Ink in Vintage Photo. I've made this little journal in a Traveler's Notebook style so that I can update/replace the calendar/notebook as needed!
I'm calling this Notebook "It's Elementary" as I love everything 'Sherlock Holmes' related - and it is elementary that I NEED something like this little planner to keep my organized throughout the year. I covered the notebook with papers from the 12x12 Patterns & Solids and used cut-outs and a border from the 8x8 Patterned Paper to decorate the cover and I added a Graphic 45 chipboard element to the closure elastic.
I added a pocket from the Graphic 45 Tags & Pockets to the inside of the front cover and left it open behind so that there are actually two little tuck spots inside the front cover. I made a little cover for the planner from some of the Patterns & Solids paper and reinforced the spine with some Tim Holtz Decor Tape - this will help the cover stand up to being pulled in and out of the elastic binding. I decorated the front of the planner section with a tag from the tags and pockets. I found a free printable Passport-size 2018 calendar at Lady Falcon Travelers - and it is the PERFECT size for this journal.
The Passport Journal Cover is also the perfect size to hold a mini composition book. (I found them at Walmart in packs of 3 for less than $2!) I covered the front of the composition book with paper from the Patterns & Solids and covered the back with plain black cardstock. I'm going to use the notebook to jot down project ideas so I never forget one of my 3 a.m. moments of inspiration!
I added a side tuck spot to the back cover and made a coordinating pen holder using a small black bulldog clip and some green elastic.
Thanks so much for stopping by my blog today - I hope 2018 is off to a fantastic start for you!
Hi There Crafty Friends! I hope you're enjoying a fantastic holiday season. Today, I have a fun project created with the new Creative Embellishments House Vignette - https://creativeembellishments.com/house-vinguette to share with you. I've used the Vignette along with Graphic 45's A Christmas Carol collection to create this little Christmas House scene.
For the full details about how I altered the chipboard pieces, as well as a tutorial on how to assemble the CE House Vignette, you can pop over to my YouTube Channel!
Assembling the House:
You will need eleven 1 in. wide hinges – scored at ½ an inch and cut as follows:
2 Sides – 5 ¾ in.
1 Bottom – 5 3/8 in.
2 Bottom Corners – 1 ¼ in.
2 Roof Sides - 4 in.
1 Roof Bottom – 5 3/8 in.
2 Roof Bottom Corners – 1 ¼ in.
1 Roof Peak – 1 ¼ in.
Thanks so much for stopping by my blog today! Happy Holidays!
Hi there Crafty Friends! Today I'm sharing another layout in my Baby's First Year series - created for the Creative Embellishments Design Team! Once again, I've used a combination of several Graphic 45 paper collections (A Place in Time, Children's Hour, Place in Time, and St. Nicholas) to create this layout - keeping with the theme I'm using throughout the 12 months of the album!
I've used the CE Chipboard Holly and Berry Flourishes and the Believe title from the Inspire Word Set on this layout. I painted the chipboard elements with Prima Art Extravagance Metallique Acrylic Paints and inked them with some Vintage Photo Distress Ink. I added Crackle Accents to the Holly Branches and Glossy Accents to the Holly Berries. Here is a close-up and a couple of different angles so you can see all the details and layers.
Hi there! Today I'm sharing a new Mini-Album with you. I've created this Joie de Vivre album using Graphic 45's French Country Deluxe Collector's Edition papers and embellished the cover with Creative Embellishments Sunflower Corner Set.
I painted the Sunflower corner with Acrylic Paints and Inked the Edges with Distress Ink in Ground Espresso. I used Glossy Accents to add some Bronze Micro-Beads to the Centre of the Sunflowers - I wanted them to look like Sunflower Seeds! Once the beads had set - I added a coat of Crackle Accents to the Flowers. Here's another angle of the cover:
There are lots of photos of the inside of the album below - but be sure to check out the full Video Flip Through on my YouTube channel!