Showing posts with label Home Decor. Show all posts

Saturday, July 15, 2017

Portrait of a Lady Victorian Fan ~ Creative Embellishments

Hi There! I have a new altered project to share today! I have used one of the gorgeous new Creative Embellishments Chipboard Victorian Fans, along with Graphic 45's Portrait of a Lady collection to create this elegant Portrait of a Lady Victorian Fan!
I started by joining the fan pieces together using cream coloured ribbon. Then I covered both sides of each fan piece with papers from the Portrait of a Lady collection (12x12 Patterned Paper and 12x12 Patterns and Solids). I inked the edges of all the paper with Distress Ink in Old Paper. I fussy cut portraits and flowers from the 12x12 and 8x8 patterned papers to decorate the front of the fan and used three Mini Frames and two Door Knockers to mount the fussy-cut portraits on each of the fan pieces. I embossed the frames and door knockers with Stampendous Aged Ivory Embossing Enamel. I also added a string of half pearls around the mini frames on two of the portraits. I finished off the Fan with a Tasseled Wrist Strap, a floral charm, a mirrored charm and a Graphic 45 Chipboard Element from the collection. Here are some more photos and close-ups!


Saturday, April 15, 2017

Vintage Hollywood Hat Boxes ~ Creative Embellishments

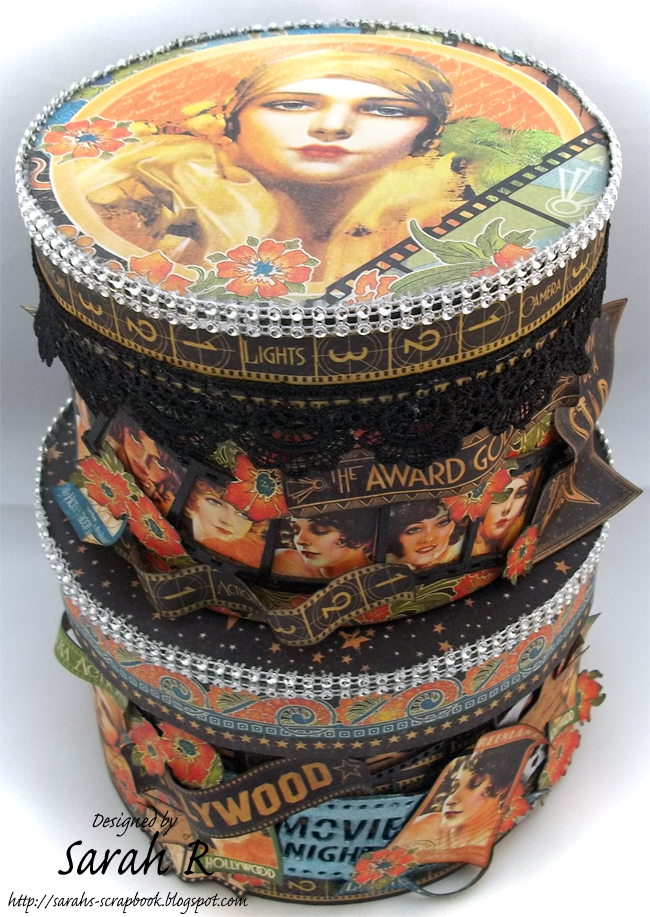
Hi there! Today I'm sharing a pair of Vintage Hollywood Hat Boxes with you! As soon as I saw these small hat boxes in a local second-hand shop, I knew I wanted to alter them. The Vintage Hollywood collection by Graphic 45, paired with some amazing Creative Embellishments chipboard, make these an amazing display item and storage space for my room! I've used papers from both the 12 x 12 and 8x8 patterned paper pads - and did lots of fussy cutting to embellish the boxes - all the paper's edges are inked with Distress Ink in Black Soot. And what is a Vintage Hollywood themed piece without some bling? So I added some rhinestone trim to both box lids as well as some black lace to the smaller box lid.


On the larger box (below), I've used one of the Movie Night tickets and the Movie Reel from the Creative Embellishments chipboard Movie Night Six Piece Set. I painted the ticket using Prima Art Alchemy Sparks paint in Magical Pond. I heat embossed the movie reel with black and silver embossing powders. I also added a strip of the numbered 'film' paper behind the film section of the movie reel.


For the smaller hat box (below), I used one of the Creative Embellishments Chipboard Wavy Film Strips. I heat embossed the film strip with black embossing powder and then fussy-cut the starlet images from the 12x12 border strip page so that the film strip sections would frame the faces.


Thanks so much for visiting my blog today! Happy Crafting!
Sarah

Thursday, May 12, 2016

Clockwork Angel Altered Dress Form ~ Creative Embellishments

Hi Crafty Friends! Today, I have a project created for the Creative Embellishments Design Team to show you -  a dress form I altered using a whole lot of Creative Embellishments Chipboard pieces! I am calling this piece my Clockwork Angel! It was SO fun to make!

FRONT
I started off altering the dress form by gluing on the lace and all the chipboard items. I have used a variety of different sized of CE Gears around the entire dress form. I have also used the Bicycle Chain Borders, a Door Knocker, Clock Hands, and Keys. The winged CE Chipboard is the gorgeous Steampunk Heart with Wings - I added the top of one of the chipboard keys to this to make it look like you could turn the gears in the heart. Once all the chipboard pieces were in place, I added a few Prima metal embellishments and some half pearls and then started painting the dress form with both black and white gesso. I focused the black gesso on the bottom of the dress form and the white gesso on the top, blending them in the middle. Once the gesso dried, I sprayed the entire dress form with Lindy's Stamp Gang Starburst Mist in Steampunk Sepia. Once it was dry again, I started playing with colour using the new Finnabair Art Extravagance Metallique Paints by Prima. And I just KEPT playing with different colours until I was happy with the results. Finally, I added some Finnabair Art Extravagance Antique Silver Crackle Texture Paste in places and finished off the dress form with some Hematite glass beads. Lots more pictures below to show you all the details!

BACK

RIGHT SIDE

LEFT SIDE

CLOSE-UPS


I hope you enjoyed seeing my Clockwork Angel Altered Dress Form - it is on display in my craft room now and I just love it! Happy Crafting!

Wednesday, April 6, 2016

Altered Initial using Graphic 45's Good Ol' Sport Collection

Hi There Crafty Friends! I have a quick share today - an altered initial I made for my son using Graphic 45's Good Ol' Sport collection.
I started off by covering the W with the "Teamwork Paper" - I inked the edges with Distress Ink in Faded Jeans and covered it with a coat of matte Mod Podge. Next, I fussy-cut images from the papers and used pieces from the borders and cut-aparts to decorate the initial. All the decorative pieces are edged with Distress Ink in Black Soot and I've layered them and curved them to give lots of dimension to the project. Here are a few angles and close-ups.


My son just loves this and it is already hanging in his room!
Thanks for popping by my blog today! Happy Crafting!


Saturday, April 2, 2016

Graphic 45 'Home Sweet Home' Expanding Recipe Folder - Video Tutorial

I have a brand new off-the-page project to share with you today - AND my very first video tutorial! I have made an expanding recipe folder using Graphic 45's Home Sweet Home collection and I filmed the process from start to finish so that you can follow along and create one too! Here are a few pictures of the finished Recipe Folder. Scroll down for all the paper/chipboard measurements and a link to the YouTube video!


Measurements:

  • Sides
    • 2 pcs Kraft Cardstock - 4 1/4 in. x 10 in.
    • 2 pcs cut from a Tyvek envelope - 4 1/4 in. x 10 in.
  • Divider Tabs
    • 9 pcs Kraft Cardstock - 4 5/8 in. x 6 1/4 in.
  • Cover
    • Front and Back
      • 2 pcs chipboard - 6 1/2 in. x 5 in.
        • Front Cover - 3 magnets - centre at 1 in., 1 3/4 in. and 2 1/2 in. from top
      • 2 pcs patterned paper - 8 1/2 in. x 7 in. (outside)
      • 2 pcs patterned paper - 6 1/4 in. x 4 3/4 in. (inside)
    • Bottom
      • 1 pc chipboard - 6 1/2 in. x 2 in.
      • 1 pc patterned paper - 7 1/2 in. x 2 1/2 in. (outside)
      • 1 pc patterned paper - 6 1/4 in. x 2 in. (inside)
    • Hinges
      • 2 pcs Kraft Cardtock - 2 in. x 6 1/4 in. (reinforced with strong tape)
  • Top Flap
    • 2 pcs patterned paper - 6 1/2 in. x 6 1/2 in.
    • 1 pc cut from Tyvek envelope - 6 1/2 in. x 6 1/2 in.
    • 1 magnet - centre at 1 in. up from bottom
Now that you have all the material measurements, you can follow along with the construction of the folder!
Thanks for stopping by my blog today! I hope you liked the expanding recipe folder and find the tutorial helpful!

Wednesday, February 24, 2016

World's Fair Inspirational Shadowbox ~ Creative Embellishments

Today I'm sharing a shadowbox I created using Graphic 45's World's Fair collection together with some awesome Creative Embellishments Chipboard! I just love how the Wrought Iron Fence (Set 2) and the Lamp Post chipboards coordinate and help set the scene for the shadowbox.
I started out by painting the wooden shadowbox with black gesso. Then, I added a generous layer of Finnabair's White Crackle Texture Paste. Once it had dried, I used sandpaper to distress the box a bit and then inked it with Distress Ink in Black Soot to help the crackle show more. Finally, I gave the edges of the box a generous inking with the Distress Ink. All the papers and fussy-cuts are also inked with Black Soot Distress Ink. I used the World's Fair 6x6, 8x8 and 12x12 paper pads on this project, creating lots of dimension with different thicknesses of 3D foam adhesive and cardboard layers for extra dimension. 
To alter the chipboard pieces, I painted them with a coat of black gesso; then, I used Finnabair's Graphite Texture Paste to create a wrought iron look on the fence and lamp post. I painted the lamp lights with a few coats of acrylic paint that matches the papers and finished them off with a generous coat of Ranger Crackle Accents. I took lots of close-ups and angled photos of the shadowbox so you can see the gorgeous texture on the chipboard pieces and all the dimension.


Thanks so much for dropping by my blog today!

Saturday, January 16, 2016

'Couture' Make-up and Jewelry Tray

This week, I was playing with the Couture Collection by Graphic 45. A while ago, I made a necklace rack using this collection and I decided to make a coordinating Make-up/Jewelry tray to use on my dresser! I wanted someplace to put a few things I use frequently, like a lipstick, my glasses, hand cream and my favourite necklace (when I'm not wearing it) and this was my solution! I used an old photo frame I picked up at a second-hand store and painted/distressed the frame. I used the backing of the frame to build up the decor for my tray. Lots of fussy cutting/layering of images from these gorgeous papers and coordinating roses added to make it extra feminine (though I had to squish the flowers a bit to fit it under the glass)! Here are a couple of different angles of the tray and a close-up (there's a wee bit of glare from the glass top of the tray - its really hard to photograph glass)!


And here is the tray in use on my dresser! So perfect to hold everyday items!
I'm going to enter this in the Graphic 45 January Challenge -  #GetG45Organized! Wish me luck!