Showing posts with label Paper Mixing Bowl. Show all posts

Sunday, May 19, 2013

Precious Moments - The Final Challenge at The Paper Mixing Bowl

I'm sad to say that this May's challenge will be the final challenge at The Paper Mixing Bowl. We've been doing challenges for a little over a year now and I just haven't seen the participation increase to any extent. Due to other DT commitments (and my desire to have some sort of personal life beyond scrapping), I just cannot justify the time for something that isn't generating significant interest or participation.

I want to thank everyone who has played along with our challenges - I hope they have inspired you just a bit.

To my wonderful Design Team - as you already know, my decision to end The Paper Mixing Bowl was extremely difficult because you have all been so wonderful and inspiring. Please accept my sincere gratitude and appreciation for all you have done for the PMB!


In May, we celebrate Mother's Day - so this month's recipe challenge had a 'mother' theme. I chose to scrap a photo of myself with my son when he was just three-days old. I've used gorgeous Pion Designs papers for this layout. 
Here is the recipe card for the May challenge:
I found these colours hard to find in my stash - they aren't my usual colour palette at all - but I loved the soft tones of the Pion papers and was able to bring in some of each colour in the papers and flowers. I started out by splattering the base page with watered-down acrylic paint in Antique White - it worked as a tone-on-tone witht the paper, so doesn't show well in the photos but is visible in real life. I have trouble with 'hearts' - I don't love using them - so I altered the sketch and just did some layering of papers in place of the heart design. I machine-stitched each of the layered papers (with the exception of the tags). I used a light teal pearl flourish (ZVA creative) and pearl-centred flowers to bring in the pearl element of the recipe. 
The title is a chipboard title by Imaginarium Designs - I've used it plain on this layout as I thought the plain chipboard looked so lovely with the soft colours and brown tones in the papers.
 I fussy cut butterflies from the Pion papers and layered them to create the 3D butterflies. I added a large frayed bow to the large fussy-cut tag that I used as the mat for the picture. I love how the bow frames the top of picture and how the frayed edges tie in with the stitching.
 I also fussy cut some tags from the Pion papers, layered them and added some frayed cotton to the end to tie in with the stitching and the bow on the layout.
Thanks for stopping by my blog today. I hope you'll pop by The Paper Mixing Bowl blog to play along with our final challenge and say goodbye!

Friday, March 15, 2013

Beautiful Day - The Paper Mixing Bowl March 2013 Recipe Challenge

Hello Scrappy Friends! I'm back with a new layout for The Paper Mixing Bowl Challenge Blog! This month's recipe celebrates St. Patrick's Day - and has some fun design elements inspired by all things Irish. Here is my layout, entitled "Beautiful Day" (after the U2 song) and the March 2013 Recipe Card that inspired the layout (note: wherever you see bold italics in this post indicates an element from the recipe). The three small photos were actually taken last St. Patrick's Day (March 17), which was a beautiful early Spring day - all the snow had melted and my son was able to play in the yard in his Spring coat and rubber boots!
I had an older Basic Grey (BG) collection - "Origins" - that had the perfect colours for this recipe. I've used lots of distressed layers and hand-cut out the large shaped page from one of the BG papers. I added in a square doily as a lace layer as well and a die-cut that I cut using my Silhouette. I also double-punched a border using a Martha Stewart deep edge punch. I added a kiss of colour to the layout by lighting spritzing around the edge of the layout with Tattered Angels Glimmer Mist in Sweet Clover. Here is a close-up of all the layering.
I used some miscellaneous flowers from my stash (mostly leftovers from old kits or RAKs) as well as a green  feather pick from the dollar store to create the flower cluster. I also added a gold lace bow to the cluster to bring in another recipe element.
I hope you'll stop by and play along with the March Recipe Challenge at The Paper Mixing Bowl.

Thanks so much for stopping by my blog today!

Friday, February 1, 2013

Through the Looking Glass - Scrap for Help and The Paper Mixing Bowl

Today is my first reveal as part of the Scrap for Help Design Team! This month, the recycled element to be used in the Scrap for Help Challenge was plastic. I combined my Scrap for Help layout with the January recipe at The Paper Mixing Bowl (since I didn't have a layout for our January 15th reveal). Here is my layout, entitled Through the Looking Glass, using the gorgeous "Wonderland" collection by 7 Dots Studio. I'm also going to enter this layout in the "Cold Colours" challenge on the 7 Dots Studio blog.
I wanted to do something really different for this layout, so I decided to do an "artsy" layout. Like so many people, I struggle with my weight and often feel badly about my appearance - so this layout is about trying to overcome these feelings. The photos of my eyes are offset to represent the dysmorphia with which I often see myself. 

I machine-stitched around the edge of the top layer of the layout - first using a straight stitch and then a zig-zag. For my plastic element for the Scrap for Help Challenge, I used some plastic packaging that I melted with my heat embossing tool and layered underneath the corrugated cardboard on the layout. I coated the cardboard with gesso and added microbeads in silver and ebony - then I sprayed it with a light coat of acrylic sealer to help keep the beads on. I smashed a mirror from an old compact and used the pieces to surround the photos in my layering. (It isn't bad luck if you break a mirror on purpose, right?)
The journalling in the rolled paper in the top right corner says, "You are so much more than what you see in the mirror."  You can more clearly see the microbeads in this close-up.
I had some fun with Photoshop creating the pics for this. I had my husband take a picture of me and then I cropped it so that I could focus on the eyes. I converted the picture to black & white, but then re-revealed the eye colour - my eyes are very light blue, so the effect is very subtle. Here is a close-up of the photos so you can more clearly see the effect. I sanded the edges of the photos to get that awesome distressed look!
Here is the January recipe card from The Paper Mixing Bowl that I used for this layout.
Thanks so much for stopping by my blog today. I appreciate your visits and sweet comments so much!
Materials Used:
Patterned Papers - 7 Dots Studio - Wonderland Collection - Mushroom & Smoke, Alice, and White Rabbit Alpha Stickers; Plastic Packaging; Corrugated Cardboard; Claudine Hellmuth Studio Gesso (White); Recollections Microbeads - Silver and Ebony; American Crafts Thickers - Poolside Vinyl Letter Stickers (Black); Queen & Co. Bakers Twine; Aleene's Tacky Glue; 3D Foam Adhesive; Krylon Satin Finish Sealer.


Thursday, November 1, 2012

Pumpkin Patch - The Paper Mixing Bowl November 2012 Recipe Challenge

Where did October go?!?! I can't believe another month is over already! And a new month means a new challenge at The Paper Mixing Bowl. This month's recipe is Thanksgiving Leftovers (. . . already had my share of these after Canadian Thanksgiving in October). For my layout, I have scrapped some photos of my son from our trip to the Pumpkin Patch in October to pick out our Hallowe'en pumpkins! Here is my layout:
And here is the November 2012 Recipe Challenge that inspired it:
I had a lot of fun with this layout - using lots of different "recycled" items. I stuck with a neutral palette and started off by creating my own background using a 12x12 piece of cardboard that I cut out of a box from one of my scrapbooking kits. I peeled off the top layer of the cardboard to reveal the corrugated paper underneath and then brushed some gesso across the corrugated cardboard; finally, I distressed and inked the edges of the cardboard background with Distress Ink in Walnut Stain. I recycled a piece of Prima packaging (lightly coated with gesso, distressed and inked), a tag (distressed and inked) and a page out of a dictionary (if you look closely, you'll see its the page with "pumpkin" on it) to use in my layering. I've also used some plain black cardstock and some elements from Tim Holtz's Kraft Resist papers (Kraft Resist and Kraft Resist - Halloween Haunts). Lots of distressing and inking on all the papers for this layout.  Here are a couple of close-ups of the layering.

I used a Crafter's Workshop template (Harlequin) with some Distress Embossing Ink and Distress Embossing Powder in Vintage Photo to create the diamond Harlequin pattern on the black cardstock paper. For the banner, I added some small Halloween postcards from the Kraft Resist Halloween Haunts paper, and strung the banner using some metallic eyelets and twine (i.e. fibre).
For my embellishments, I've used a small wooden picket fence (Michael's Bargain Bin) and a Chipboard door - both of which were embossed with Distress Embossing Powder in Vintage Photo and inked with Distress Ink in Walnut Stain. I used some Prima flowers, which I slightly altered by inking them so that the coordinated better with the layout. I also used a Prima vine - I thought this was appropriate for a Pumpkin Patch layout (i.e. pumpkin vines....) and love how it looks on the layout. The title letters are cut from the Kraft Resist - Halloween Haunts papers, distressed and inked with Distress Ink in Walnut Stain.
Thanks so much for stopping by my blog today. I hope you'll check out the November Challenge at The Paper Mixing Bowl too!

Monday, October 1, 2012

Boo - The Paper Mixing Bowl October 2012 Recipe Challenge

Well, I'm a little late posting this - but here is my layout for this month's challenge at The Paper Mixing Bowl. This month's recipe is "Pumpkin Pie" with some fun, Halloween-inspired design elements! For my layout, I have scrapped a picture I captured of my son on his first Halloween. Note: I did not scare him to get him to make the expression on his face - it was just a lucky picture of a funny face! Anyhow, here is my layout and the Recipe Card for this month's challenge.
I used a combination of Echo Park "Chillingsworth Manor" and My Mind's Eye "The Spider's Web" papers for the layout. For the "utensils" (i.e. design elements), I fussy-cut the pumpkins from a sheet of the MME paper, used some spider's web and plastic spider Halloween decorations and cut/distressed some cat scratches into the layout. Here is a close-up of the photo/embellishment cluster from the top left of the layout.
For my journalling, I (obviously) used Halloween as the inspiration and simply wrote on a ticket cut from one of the "Chillingsworth Manor" papers. 
That's it for tonight's post - I hope you'll pop over to The Paper Mixing Bowl Blog and play along with this month's challenge!

Saturday, September 1, 2012

Play. Always. - The Paper Mixing Bowl September 2012 Recipe Challenge

I can't believe it is September already! The summer really flew by this year...I am NOT ready for it to be Autumn yet! *sigh* Oh well, a new month means a new challenge over at The Paper Mixing Bowl - and this month the theme was fun and games - with a Recipe Challenge of "Buttery Popcorn". Here is my layout and this month's recipe card!
The layout features my gorgeous little boy (of course) and I have used My Mind's Eye "Follow Your Heart - Be Amazing" papers. The main ingredient for the recipe was yellow - not my favourite colour, but I am happy with how it works on this layout. I used the yellow hexagon patterned paper as the photo mat and fussy cut the hexagons from one sheet of the MME paper as my repetitive shapes element. For my journalling, I simply used a 3D MME sticker and journalled about my son's favourite game - soccer. He loves it so much, he even wants to play it in the rain (as in these photos).

I also used some gesso and molding paste on this layout - I love the look of these but haven't experimented too much with them yet. For this layout, I simply swiped some gesso on the base page and then used a Chicken Wire mask and some light molding paste. Once the molding paste had dried, I brushed it with some Perfect Pearls in Blue Patina to make it stand out. I love how the masking turned out - and that it plays along with the recipe and is part of my repetitive shapes for this layout!
For my title, I played off the scrabble letter that was already on the MME paper and printed some digi scrabble letters from fuzzimo.com. The title also accounts for the game pieces element of the recipe. I chose the title "Play. Always" because my son loves to play - and I hope he always remembers to play and have fun - it is all too often that we forget that! I printed the scrabble letters on white cardstock, cut them out and adhered them to some chipboard using Mod Podge. I then trimmed them down and inked the edges with Distress Ink in Vintage Photo.
That's it for now! I hope you'll play along with the September 2012 Recipe Challenge at The Paper Mixing Bowl!

Thanks so much for visiting my blog today. 
Materials Used:
Patterened Paper: My Mind's Eye - Follow Your Heart - Be Amazing - Kraft Unique, Be the Best, and Honey Blue; My Mind's Eye Follow Your Heart - Layered Stickers; Claudine Hellmuth Studio Gesso (white); Crafter's Workshop Temlate - Chicken Wire; Golden Light Molding Paste; Ranger Perfect Pearls - Blue Patina; Digi Scrabble Letters - fuzzimo.com; Mod Podge (matte); Distress Ink -  Vintage Photo; 3D Foam Adhesive; Memory Tape Runner XL

Wednesday, August 1, 2012

Tropical Travelogue - The Paper Mixing Bowl August 2012 Challenge

It is time, once again, for a new challenge reveal at The Paper Mixing Bowl! This month the Recipe Challenge is "Margaritas" (mmm....tasty) - and the Main Ingredient is lime-green! I chose pictures from my honeymoon in Punta Cana for this layout - and did some photoshop doctoring to get the polaroid effect and sepia tone. Here is my layout and this month's recipe card!
Graphic 45's "Tropical Travelogue" collection was perfect for this layout - so much so that I used it as the title for the layout too! The base page of my layout is Core'dinations Kraft Core paper, which I sanded around the edge - I love how the sanded kraft-core looks like "sand" for my beachy, tropical layout! I used a torn piece of the Rainforest paper to anchor the central elements of the layout. I then layered some cheesecloth on top of that and then used a passport page that I cut from the Exotic Destination paper to mat the photos. The other paper embellishments (postage stamps, journalling spot, title, beach sign) are cut from the Exotic Destination and Paradise Postage papers from the G45 collection.
My non-paper embellishments include some seashells picked up in the Michael's bargain bin, some heavy twine and a couple of mini-clothespins - which I love! I took a couple of "dimensional" photos of this layout so you can get the full effect of all the 3D embellishments - the flat photos really don't do this layout justice!

That's it for today! I hope you'll pop over to The Paper Mixing Bowl blog and play along with this month's recipe challenge.

Thanks so much for visiting my blog today! Don't forget to enter your name for a chance to win some Scrappy Goodies in celebration of my birthday (link in the right sidebar)! 

Materials Used:
TBA

Sunday, July 1, 2012

I AM Canadian - The Paper Mixing Bowl July 2012 Challenge

Well, it has been a month since my last post. I was hoping to get a lot more scrapping done - but I recently got a new job and have been so busy with it that it was hard to find time to scrap! But it is time for a new challenge at The Paper Mixing Bowl - so I had to find some time to get my DT Layout done - and I am so happy with this one! Here is the recipe card from The Paper Mixing Bowl for the July 2012 Recipe Challenge:
Since July 1st is Canada Day - I scrapped some photos of my son from last July 1st, which was his very first Canada Day! I've called the layout "I AM Canadian" - and for my fellow Canadians out there, you'll recognize the title as the slogan/logo from a Molson Canadian beer campaign from several years ago! Beer and Canada Day - wow, am I living up to a stereotype or what?
For this layout, I used papers from Fabscraps' gorgeous Classic and Shabby Chic collections for my layering, as well as as a woodgrain page by My Mind's Eye as the base page and photo mat. I followed the sketch fairly closely, but did lots of distressing of all the papers and added some extra embellishments. I also changed the journalling placement - and tucked a die-cut circular journalling card behind the photo mat - which simply states " William's first Canada Day - July 1, 2011".

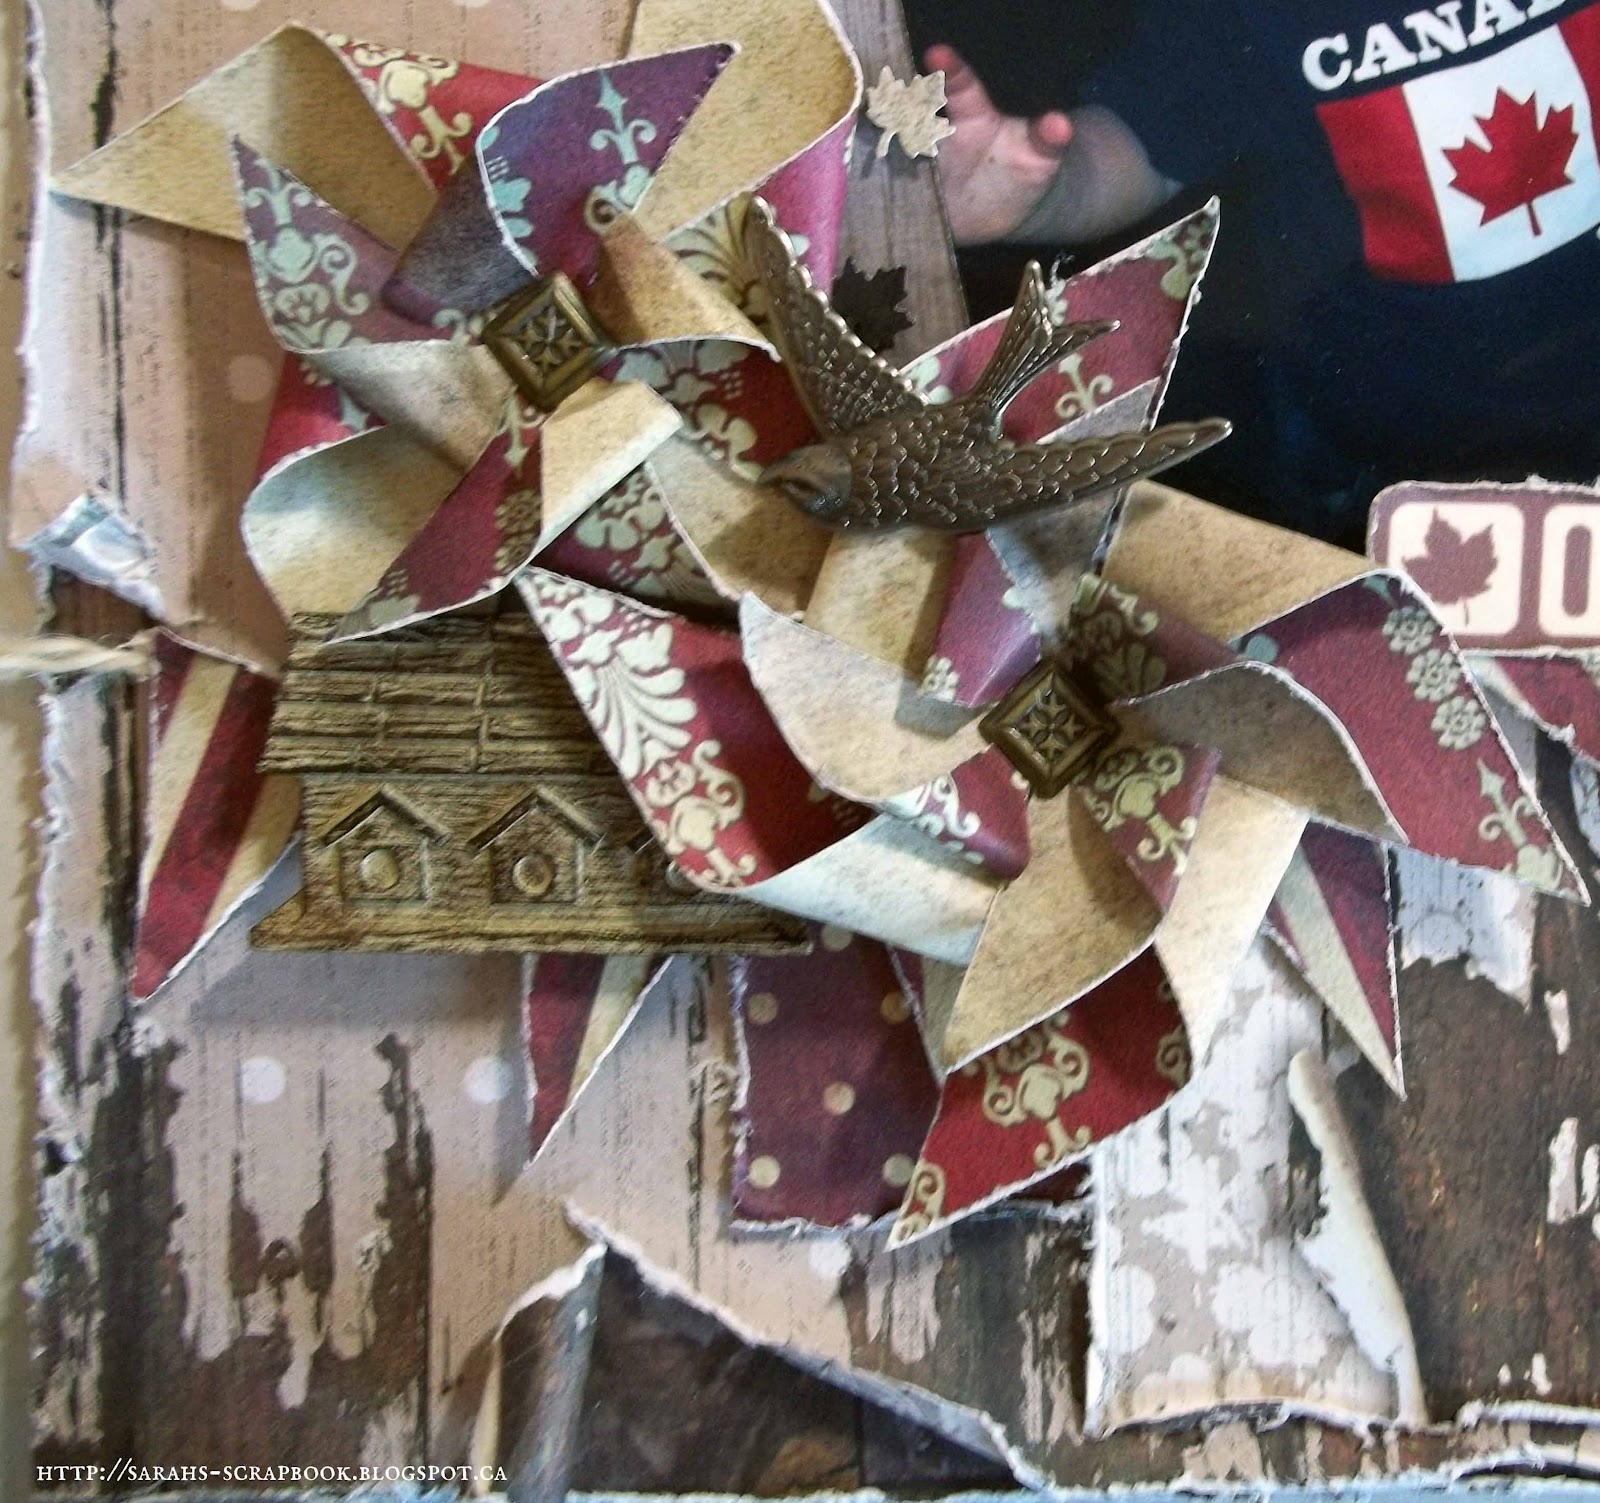
I used polka-dot, stripe and floral patterned paper in my layering to fulfill the recipe requirement of contrasting paper patterns. I also used some of the polka-dot and stripe papers to create banners in the top-right and bottom-left corners of the layout, respectively. In honour of summer and to create a star shape element, I used another patterned paper from Fabscraps Classic collection to create pinwheels for the layout. I added tiny pinwheels to the polka-dot banner and created large, double-layered pinwheels for the embellishments in the lower-left corner. I also punched some maple leaves from the different sheets of paper to create the maple leaf confetti that I added around the photos.
I added a Tim Holtz Idea-ology Bird Adornment and a Recollections Birdhouse to the embellishment cluster to complete it.
I hope you'll pop over to The Paper Mixing Bowl Blog and check out the July 2012 Recipe Challenge!

Thanks so much for visiting my blog today!
Materials Used:
Patterned Paper: Fabscraps "Classic" Collection - Rhythm, Red Stripe, Black Bird; Fabscraps "Shabby Chic" Collection - Stone Flower, Fleur; My Mind's Eye "Miss Caroline" Dolled Up "Living" Everyday Paper; Recollections Cardstock (Cream); Recollections Resin Embellishments (Birdhouse); Tim Holtz Idea-ology Adornments (Bird); American Traditional Designs - Square Brads; Round Brads from Stash; White Twine from Stash; Memory Tape Runner XL; Glue Dots - Mini and Memory Book.


Friday, June 1, 2012

Daddy and Me - The Paper Mixing Bowl June 2012 Challenge

It is that time again - a new challenge is up for the month of June at The Paper Mixing Bowl. This month the Recipe is for Shish Kebab - with a main ingredient of Charcoal Briquettes. The journalling prompt was to "journal about a special man in your life" - so I used a picture of my DH and DS from last Father's Day! Here is this month's Recipe Card and my layout!
This layout actually came together really easily for me - and I am so happy with how it turned out. The base page (my charcoal element) is an embossed Core'dinations page that I lightly sanded so the clocks would stand out. I machine-stitched around the edge of the page, alternating a straight stitch and some zig-zag stitching.
I added some Bazzill Basics Antique Dictionary paper and I used Tim Holtz Kraft Resist paper (also with Dictionary Script) for the photo mat and tag. I attached the photo using coloured tape in charcoal. I distressed the edges of the papers and did lots of inking with Distress Ink in Vintage Photo. I added a twine tie, Tim Holtz Idea-ology reinforcer (not in close-up) and metal pin to the tag. The journalling on the tag (close-up coming) simply says "Playing with Daddy - Father's Day 2011". I used the Simple Stories Documented papers for the Bingo Card and Banner Elements on the page. I added eyelets to each of the banner flags and used  twine to string the banner. I added a Tim Holtz Idea-ology metal Clock Face and Game Spinner at the bottom corner of the photo and some Maya Road Wooden Calendar Numbers to the Banner; the numbers represent June 19, 2011 - i.e. Father's Day 2011.
For the title, I used Tim Holtz Idea-ology Tissue Tape in Symphony (the 'Dictionary' tape) and letter stickers from the Simple Stories Documented collection. I tried to get the last 'utensil' in by including brackets around the title element - but I didn't love how it looked - so I removed them!

I hope you'll pop over to The Paper Mixing Bowl Blog and check out the June 2012 Recipe Challenge. We also have a Design Team Call going on at The Paper Mixing Bowl - so check that out too!

Thanks so much for visiting my blog today!
Materials Used:
TBA