Saturday, April 22, 2017

Midnight Masquerade Large Mixed Media Tag ~ Creative Embellishments

Hi There! Today, I'm sharing a fun, extra large, Mixed Media Tag! I've used one of the new Creative Embellishments chipboard Large Tags as the base for this project; these tags are fantastic and perfect for Mixed Media - I love them!
I started the front of the tag by stencilling on a pattern in two corners using Prima Art Basics White Modeling Paste. Next, I glued on some CE chipboard pieces, including some Door Knockers, pieces from the Filigree Corner Set 2, and a Flourish 4. Once I had all the chipboard in place, I painted everything with Prima Art Basics Heavy Black Gesso and then rubbed it with three colours of Prima Art Alchemy Antique Brilliance Waxes - Amethyst Magic, Mystic Turquoise and Red Amber. Then, I used Prima Art Alchemy Metallique Wax in White Gold to bring out some of the texture from the stencilling and to highlight the chipboard pieces. Once I was happy with the background, I used fussy-cuts from Graphic 45's Midnight Masquerade collection to create the scene on the tag (all paper edges were inked with Distress Ink in Black Soot).
On the reverse side, I started by trimming a sheet of paper from the Midnight Masquerade 12x12 Patterns and Solids to cover the tag. I created another scene using fussy cuts from the Midnight Masquerade Patterned Papers. I added another chipboard piece from the Filigree Corner Set 2 (treated the same as the front side of the tag) and some of the CE Wood Veneer Stars, which I rubbed with the White Gold wax. Here are some close-ups of the two sides of the Large Tag.


Finally, to finish off the tag, I tied a collection of ribbons, lace and seam binding to the top and added the three masks from the CE chipboard Masquerade Masks as embellishments dangling from some of the ribbon. I treated one side of the masks the same as the front of the tag and glued/trimmed patterned paper to the other side of the masks and inked the edges with Distress Ink in Black Soot.
Thanks so much for visiting my blog today! Happy Crafting!
Sarah

Saturday, April 15, 2017

Vintage Hollywood Hat Boxes ~ Creative Embellishments

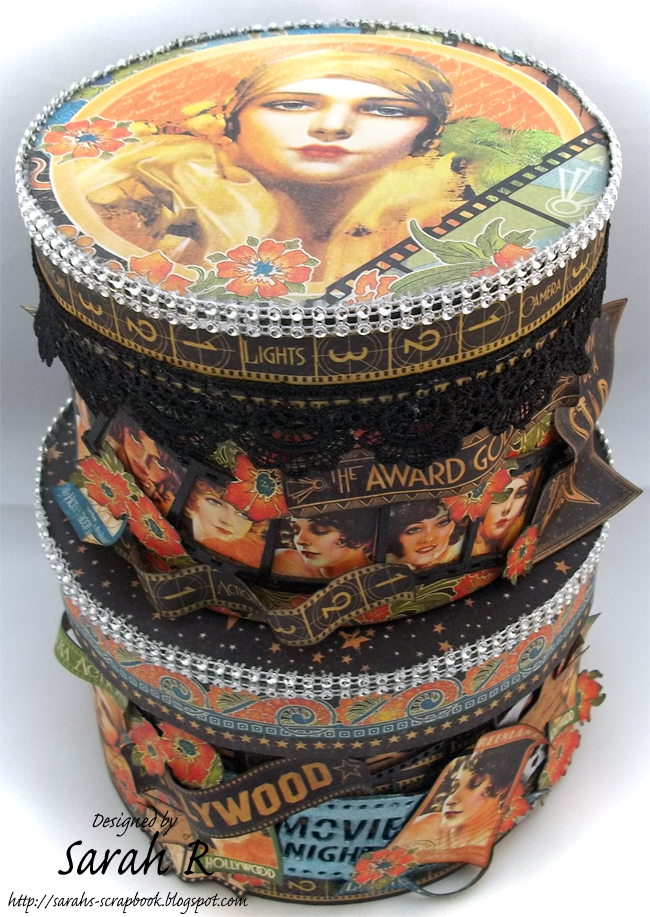
Hi there! Today I'm sharing a pair of Vintage Hollywood Hat Boxes with you! As soon as I saw these small hat boxes in a local second-hand shop, I knew I wanted to alter them. The Vintage Hollywood collection by Graphic 45, paired with some amazing Creative Embellishments chipboard, make these an amazing display item and storage space for my room! I've used papers from both the 12 x 12 and 8x8 patterned paper pads - and did lots of fussy cutting to embellish the boxes - all the paper's edges are inked with Distress Ink in Black Soot. And what is a Vintage Hollywood themed piece without some bling? So I added some rhinestone trim to both box lids as well as some black lace to the smaller box lid.


On the larger box (below), I've used one of the Movie Night tickets and the Movie Reel from the Creative Embellishments chipboard Movie Night Six Piece Set. I painted the ticket using Prima Art Alchemy Sparks paint in Magical Pond. I heat embossed the movie reel with black and silver embossing powders. I also added a strip of the numbered 'film' paper behind the film section of the movie reel.


For the smaller hat box (below), I used one of the Creative Embellishments Chipboard Wavy Film Strips. I heat embossed the film strip with black embossing powder and then fussy-cut the starlet images from the 12x12 border strip page so that the film strip sections would frame the faces.


Thanks so much for visiting my blog today! Happy Crafting!
Sarah

Saturday, April 8, 2017

Floating Teacup Garden ~ Creative Embellishments and Petaloo Blog Hop Day 6

Welcome to Day 6 of the Creative Embellishments and Petaloo Blog Hop!
The theme for this hop was Mother's Day and when I think of Mother's Day - it makes me think of my Grandmother, who loves flowers and tea; so those memories were the inspiration for this floating teacup garden scene.
I started by constructing the floating teacup and used a Creative Embellishments (CE) Ornate Gate 2 at the back of the project as extra support under the teacup. I painted the gate and floating teacup with Heavy White Gesso before beginning to decorate the piece. I started by adding decorative grasses and the branches and vines. The branches on top of the teacup are from the CE Branches - I heat embossed these branches with Distress Embossing Powder in Walnut Stain an then added some greenery to the tips of the branches. The two vines at the base of the floating teacup are CE Flourish 15 and Flourish 28 - I heat embossed the two flourishes with Distress Embossing Powder in Old Paper and then lightly sponged some acrylic paint in Leaf Green onto the pieces.
I created the cascade of flowers using a variety of Petaloo flowers, including Darjeeling Garden Rosettes in Pink (1491-110), Darjeeling Dahlias in Teal (1467-106), Darjeeling Dahlias in Purple (1467-104), Darjeeling Petites in Pink (1465-110), and Darjeeling Petites in Purple (1465-104). Once I was happy with how the cascade of flowers looked, I added a resin birdbath embellishment and fussy cut pieces from Graphic 45's Children's Hour collection. I inked the edges of the fussy cuts with Distress Ink in Brushed Corduroy - I also inked the visible edges of the teacup and saucer with the Distress Ink. Finally, I finished off the piece by adding some Petaloo Butterflies - Darjeeling Mini Butterflies in Pink (1486-110) and Darjeeling Mini Butterflies in Purple (1486-104).

There are lots more pictures below so you can see all the details of this Floating Teacup Garden!


Thanks so much for stopping by my blog! I hope you're having fun hopping along with Creative Embellishments and Petaloo!
Sarah

Saturday, April 1, 2017

Bitten Bunnies ATCs ~ Creative Embellishments April Challenge

It's April! It's Spring (finally)! And a new month means a new challenge at Creative Embellishments! Here is this month's inspiration picture - and the challenge twist is to use flowers on your project!
I was inspired by the grass and bright colours of this month's challenge photo to create this fun series of Easter ATCs using the CE Bitten Bunnies.
I used the CE Fairy Dust 2 Stencil with some Prima Art Basics Modeling Paste to add some texture to the background of the ATCs. I created the colour gradient in the background using three colours of Distress Ink - Pine Needles, Bundled Sage, and Broken China and then I splattered the cards with water to dilute/remove some ink. I inked the edges of the ATCs with Distress Ink in Ground Espresso. I painted the Bitten Bunnies with Art Anthology Dimensional Paint in Chocolate Sorbet and used a dab of heavy white gesso for the eyes. I used SnowTex to create the puffy tail on the larger bunny. I also used the CE chipboard Grass Set, which I primed with white gesso and then misted with two colours of green mist; then I added glossy accents to the grass. Finally, I used two of the CE chipboard Flourish Eggs, which I painted with Prima Art Alchemy Metallique Acrylic Paints in Pink Blush and Rich Turquoise. I added some Stickles in Fruit Punch and Mermaid to the eggs to enhance the details.  Here are some close-ups of each card!


I hope you like my interpretation of this month's challenge - I can't wait to see what you create! Remember to follow the Rules for the Challenge so that you're eligible to win!

Challenge Rules:
  • Create a NEW project (i.e., layout, mini album, tag, card, canvas, etc…) as of April 1st 2017.
    • Please no back linking (meaning projects from previous months that may fit the challenge requirements). Please link only NEW projects.
  • Combining the CE Challenge with other challenges is permitted.
  • Please add your entry to the InLinkz box on the Challenge Post on the Creative Embellishments Blog to be eligible for the prize. You have until the last day of each month 11:55 pm eastern time to enter.
  • It is required that you mention in your blog post that you are playing along at Creative Embellishments together with a link back to our blog. Please make sure to reference our challenge. 
  • We would love to see you USE AT LEAST 1 OF CE products on your projects but it isn’t required to play along; however, everyone who does use CE product will get and extra chance at winning.
  • WINNERS will have 2 weeks to claim their prize. The winner will be announced on the CE blog post the day after the challenge ends.
Thanks so much for stopping by my blog! Happy Spring!