Saturday, October 31, 2015

An Eerie Tale Stacked Coffins and Mini Album - Part 1

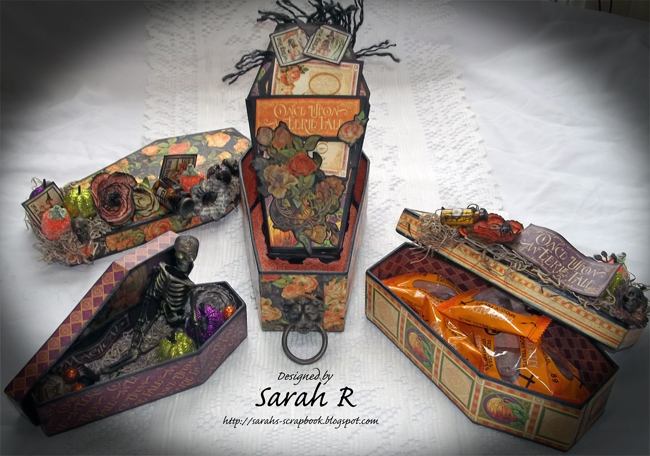
Hello Crafty Friends and Happy Halloween! Have I mentioned that I LOVE Halloween?!?! This year I've been working on a big project with the Graphic 45 An Eerie Tale collection. I used three coffin nesting boxes and stacked them to create this altered art piece. The boxes are magnetized so that they'll stay together when stacked. The top box is a decorative piece, the middle box can hold some Halloween Candy and the bottom box holds the An Eerie Tale mini-album, which I am going to use for Halloween pictures of my son. In this post I'm going to share some photos and details of the stacked coffins. I'll share the mini-album with you in my next post!
 I started off by painting the kraft-coloured coffins with black gesso. I cut papers to fit the insides and outsides of the boxes and used mod-podge (matte) to adhere all the papers. The magnets that hold the stacked boxes together were glued to the boxes before adding the paper so that they're hidden. I've inked all the papers and fussy cuts with Distress Ink in Black Soot and embellished the stacked coffins with some Spanish moss, painted plastic skeleton, mini-skulls and spiders; inked flowers; frosted/glitter pumpkins; Tim Holtz Apothecary Vials (with black wax sealing the corked lids); and fussy cuts from the An Eerie Tale papers (which I backed on black cardstock).

Here are some close-ups and different angles of the stacked coffins!


And a couple of shots of the un-Stacked Coffins!


Join me again tomorrow for Part 2 of this post in which I'll share a look inside the Coffin Mini Album!
Have a Spooky Halloween!

Friday, October 23, 2015

Upcycled Christmas to Spooky Halloween Village

I have a super fun project to share with you today! I bought a small ceramic Christmas Village for $6 at a local second-hand store and have upcycled it to a Spooky Halloween Village. I LOVE Halloween - its so fun and stress-free and this Halloween Village will be an awesome decoration for years to come! My son LOVES it SO much that when we saw another second-hand Christmas Village the other day, he asked me to get it to make more houses for the Halloween Village (I'm still working on these new pieces)! Here's a Before/After Shot of the Village pieces (sorry the before is a little blurry).
I used lots of Finnabair mediums on this, including Heavy Black Gesso, Heavy White Gesso, Soft Matte Gel Medium and Ebony Glitter. I've also used some acrylic paints in metallic purple and metallic green, as well as some orange sparkle paint. I finished off the houses with some "graveyard moss", foam pumpkins and some painted plastic spiders and mini-skulls. More details and close-ups below!
I started off by painting each of the pieces with a coat of black gesso. Once that had dried, I dry-brushed the pieces with white gesso. I highlighted details on each piece using orange, purple, green, white, and red acrylic paints and added ebony glitter to the roofs using Soft Matte Gel. The Soft Matte Gel was also the best way to apply the graveyard moss. Finally, I added the pumpkins, spiders and skulls using Beacon 3-in-1 glue. Here is a close-up of each piece!
Morgue  (Formerly a Firehouse!)

Haunted House

Deconsecrated Church

Fence and Body Snatchers

Bridge and Headless Horseman

Vampire Carriage
Spooky Halloween Village - with Lights
I hope you had fun seeing my Spooky Halloween Village - I can't wait to add more pieces to it!
Happy Halloween! 

Tuesday, October 20, 2015

A Victorian Christmas Advent Calendar and High Tea at Younique - Nov. 8 and Nov. 15!

Please join me for the first class I'll be teaching at Younique Country Retreat Scrapbooking. This is a class you do not want to miss. You will create a beautiful Advent calendar using Prima's Victorian Christmas papers and flowers and a House of Drawers from KaiserCraft. This will be a keepsake that will be passed down from generation to generation.

This class will be offered at both the Guelph (November 8) and Mount Forest (November 15) locations. The Class fee of $90 includes all materials, instructions and, of course, what's a Victorian project without a High Tea in the afternoon! Register through the Younique Online Store or call (519) 836-0045.


I hope you'll join us at Younique for a fun afternoon of crafting!

Wednesday, September 30, 2015

"Nana" - for Meg's Garden using the English Rose Garden Collection

Hi Scrappy friends! I have a new layout using the Gorgeous English Rose Garden collection. As soon as I saw these papers, I new I wanted to do a heritage layout using a photo of my grandmother with my sister and me and our children - three generations! I wanted the layout to look almost like a visit to Nana's house - with her favourite colour (green) as well as floral and lace accents.
I've embellished the layout with doilies and lots of flowers, lace and metal accents from Meg's Garden store as well as a few pieces from my stash.  I also added some extra sparkle to the layout using a stencil with white texture paste sprinkled with bronze glitter! Here are some close-ups and different angles of the layout!


Thanks for stopping by my blog today!
Happy Scrapping!

Meg's Garden Products Used:
Meg's Bundle of Goodies - Temptations in Cream, Camel, Copper and Brown
The English Rose Garden Collection - A Bouquet of Roses and Leaves & Foliage
Circle Lace Doilies (15 cm diameter) 

Thursday, September 10, 2015

Mixed Media Vintage/Grungy Cards for Meg's Garden

Hi Scrappy friends! Today, I'm sharing a set of three mixed media, vintage/grungy cards created using the gorgeous Meg's Garden English Rose Garden collection!  I just love the Cut & Create pages included in the Meg's Garden collections - they make it so easy to find a gorgeous image to act as the centerpiece for a card!
I created these cards using the 6x6 papers and bit and pieces of the 12x12 papers from the English Rose Garden Collecton. I also added in some pieces of doily, lace and flowers from the Meg's Garden Store. I used sparkling watercolours, black acrylic paint and white gesso from my stash to add the colour/splatters, as well as some flowers, sentiment tickets and microbeads as embellishments. Here are some close-ups!


Thanks for stopping by my blog today!
Happy Scrapping!

Meg's Garden Products Used:
Meg's Bundle of Goodies - Temptations in Cream, Camel, Copper and Brown
The English Rose Garden Collection - Mini PackA Bouquet of Roses, Roses &Lace and Paisley Roses
Circle Lace Doilies (15 cm diameter) 

Tuesday, September 1, 2015

Dans un jardin français ~ Pocket Letter (SOD/SOE Swap Aug. '15)

Hello Scrappy Friends! A quick share tonight of a pocket letter I made for a swap with Scraps of Darkness/Scraps of Elegance! I hope my swap partner, Cindy, likes this pocket letter I made for her! I've called this pocket letter Dans un jardin français (In a French Garden) because the paper I used has some beautiful french translations of Shakespeare Sonnets. I had lots of fun fussy cutting, making  pockets and little tag inserts and embellishing the front side of the pocket letter!
I decided to keep the back of the pocket letter flat since the front side was so dimensional (and I had to fit it in the pocket sleeves)! So I echoed the yellow, red, gold and sepia tones from the front and used my gelli plate and some mists to create a background for a stamped/mixed media pocket page featuring stamps by Finnabair. I added some gold glitter paint to the page to tie into the gold glitter on the front as well.
Here's a peek at the back of the tag inserts from the front page - I also used Finnabair stamps on these.
And, finally, some photos of the pocket letter in plastic page - I made a fun ribbon tassel to add to the edge of the page as a final embellishment!


Thanks for stopping by my blog today! Happy Scrapping!

Monday, August 10, 2015

Finnabair-Inspired Art Journal Cover

Hi Scrappy Friends! I've had a project sitting around completed for weeks and have just now found a chance to share it - isn't summer crazy busy?!?!?! I decided to start a new Art Journal for pages featuring some of my favourite literary quotes. But first - I needed to create the journal cover!!! I've used the Prima/Finnabair Vintage Vanity journal and a collection of Prima/Finnabair Vintage Trinkets as well as plenty of trinkets from my stash to embellish the cover! This was so much fun to create!
I started off   by removing the front and back covers from the journal and used a Finnabair doily stencil with white molding paste across the front and back covers. Next, I painted both covers with a coat of black gesso. Then I added all the embellishments (with the exception of the glass beads) using heavy gel medium. Once the gel medium dried, I painted everything with another coat of black gesso. I added colour using Viva Decor Inka Gold Rubs in Emerald Green, Cobalt Blue, Haematite, Steelblue and Silver. Finally, I added three different colours of glass beads using Soft Matte Gel. As a final step, I sealed everything with some Satin finishing spray. Here are some close-ups!

 And finally, a photo of  both the back and front cover!
I can't wait to start working INSIDE this journal!
Thanks for stopping by my blog today! Happy Scrapping!

Monday, July 6, 2015

Easter Treats ~ Meg's Garden DT

Hi Scrappy Friends! Today I'm sharing a layout with you that I made using the gorgeous Meg's Garden Forgotten Meadows collection! I just love the soft floral images on these papers and decided to make a layout that really played on a balance between a large floral image and my photo collage. Here is my son searching for his Easter Treats this year!
I used a Prima basket-weave stencil and white molding paste along the right side of the layout and chose two colours of Lindy's Stamp Ganag mists that  match the tones in the large floral image on the left side of the page. I used the mini-papers to create the layering under my photos and added a flower (tinted with the same pink mist) and some lace from the Meg's Garden store. Finally, I added a few resin pieces, title and bling from my stash to complete the layout. Here is a close-up and a couple of different angles of the layout so you can see the layering!


Thanks so much for stopping by my blog today! Happy Scrapping!

Meg's Garden Products Used:
Forgotten Meadows Paper Collection - Sunshine on Petals and Mini Papers Pack
Meg's Bundle of Goodies - Temptations in Cream and Sage

Saturday, July 4, 2015

Vintage Pocket Letter ~ Meg's Garden DT

Hello! Today I am sharing a new project for the Meg's Garden Design Team using a combination of the gorgeous Butterfly Garden and Forgotten Meadows collections, as well as some embellishments from the Meg's Garden Store and from my stash. Have you heard of pocket letters? I just recently learned about them and, since I love making Artist Trading Cards, I thought it would be fun to create a pocket letter page, which is (essentially) a collection of coordinated ATCs in a trading card page! The Meg's Garden Mini-Papers and Cut & Create Ephemera papers are absolutely perfect for creating pocket letters - you can also use bits and pieces leftover from your larger papers! I wanted this page to look as though it were a collection of vintage memorabilia from a trip to Paris, so I have distressed and added Vintage Photo distress ink to the edges of the papers.
 Here are some close-ups of each of the rows  (out of the plastic trading card page to avoid glare)!


I hope you like my pocket letter page - it was so fun to make! If you create one with Meg's Garden products, leave me a link in the comments below so I can pop by for a look!

Happy Scrapping!

Meg's Garden Products Used:
Forgotten Meadows Paper Collection - Cut & Create Ephemera and Mini Paper Pack
Butterfly Garden Paper Collection - Cut and Create Ephemera and 12 x 12 A Flower Garden for Butterflies
Meg's Bundle of Goodies - Temptations in Cream and Sage and Temptations in Blue